配置web.xml
<?xml version="1.0" encoding="UTF-8"?>
<web-app xmlns:xsi="http://www.w3.org/2001/XMLSchema-instance" xmlns="http://java.sun.com/xml/ns/javaee" xsi:schemaLocation="http://java.sun.com/xml/ns/javaee http://java.sun.com/xml/ns/javaee/web-app_2_5.xsd" version="2.5">
  <display-name>SpringMVC</display-name>
  <welcome-file-list>
    <welcome-file>index.html</welcome-file>
    <welcome-file>index.htm</welcome-file>
    <welcome-file>index.jsp</welcome-file>
    <welcome-file>default.html</welcome-file>
    <welcome-file>default.htm</welcome-file>
    <welcome-file>default.jsp</welcome-file>
  </welcome-file-list>
  <!-- 配置servlet -->
  <servlet-mapping>
  	<servlet-name>springmvc</servlet-name>
  	<!--拦截所有URL后缀为.do结尾的  -->
  	<url-pattern>*.do</url-pattern>
  </servlet-mapping>

  <servlet>
  	<servlet-name>springmvc</servlet-name>
  	<!-- 注册DispatcherServlet -->
  	<servlet-class>org.springframework.web.servlet.DispatcherServlet</servlet-class>
  	<init-param>
  		<param-name>contextConfigLocation</param-name>
  		<param-value>classpath:spring-mvc.xml</param-value>
  	</init-param>
  	<load-on-startup>1</load-on-startup>
  </servlet>
</web-app>
通过以上配置,所有从前端发送过来的请求,都将交给DispatherServlet处理。关于SpringMVC中一次完整的请求过程请看下边:
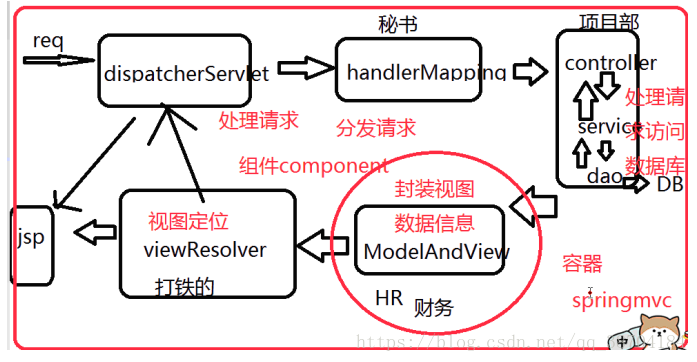
核心架构的具体流程步骤如下:
1、 首先用户发送请求——>DispatcherServlet,前端控制器收到请求后自己不进行处理,而是委托给其他的解析器进行处理,作为统一访问点,进行全局的流程控制;
2、 DispatcherServlet——>HandlerMapping, HandlerMapping将会把请求映射为HandlerExecutionChain对象(包含一个Handler处理器(页面控制器)对象、多个HandlerInterceptor拦截器)对象,通过这种策略模式,很容易添加新的映射策略;
3、 DispatcherServlet——>HandlerAdapter,HandlerAdapter将会把处理器包装为适配器,从而支持多种类型的处理器,即适配器设计模式的应用,从而很容易支持很多类型的处理器;
4、 HandlerAdapter——>处理器功能处理方法的调用,HandlerAdapter将会根据适配的结果调用真正的处理器的功能处理方法,完成功能处理;并返回一个ModelAndView对象(包含模型数据、逻辑视图名);
5、 ModelAndView的逻辑视图名——> ViewResolver, ViewResolver将把逻辑视图名解析为具体的View,通过这种策略模式,很容易更换其他视图技术;
6、 View——>渲染,View会根据传进来的Model模型数据进行渲染,此处的Model实际是一个Map数据结构,因此很容易支持其他视图技术;
7、返回控制权给DispatcherServlet,由DispatcherServlet返回响应给用户,到此一个流程结束。
现在对SpringMVC是不是有了一个大致的了解呢?
配置好了web.xml(整个web应用的配置文件)之后,接下来我们需要配置spring-mvc.xml(这是springmvc的配置文件,文件名默认为servletName-servlet.xml,这里我们的servlet名字是spring,当然你也可以自定义名字,然后再web.xml中指定,这在上面的配置中也有体现。)
下面是spring-mvc的具体配置:
<?xml version="1.0" encoding="UTF-8"?>
<beans xmlns="http://www.springframework.org/schema/beans"
	xmlns:xsi="http://www.w3.org/2001/XMLSchema-instance"
	xmlns:context="http://www.springframework.org/schema/context"
	xmlns:jdbc="http://www.springframework.org/schema/jdbc"
	xmlns:jee="http://www.springframework.org/schema/jee"
	xmlns:tx="http://www.springframework.org/schema/tx"
	xmlns:aop="http://www.springframework.org/schema/aop"
	xmlns:mvc="http://www.springframework.org/schema/mvc"
	xmlns:util="http://www.springframework.org/schema/util"
	xmlns:jpa="http://www.springframework.org/schema/data/jpa"
	xsi:schemaLocation="
		http://www.springframework.org/schema/beans http://www.springframework.org/schema/beans/spring-beans-3.2.xsd
		http://www.springframework.org/schema/context http://www.springframework.org/schema/context/spring-context-3.2.xsd
		http://www.springframework.org/schema/jdbc http://www.springframework.org/schema/jdbc/spring-jdbc-3.2.xsd
		http://www.springframework.org/schema/jee http://www.springframework.org/schema/jee/spring-jee-3.2.xsd
		http://www.springframework.org/schema/tx http://www.springframework.org/schema/tx/spring-tx-3.2.xsd
		http://www.springframework.org/schema/data/jpa http://www.springframework.org/schema/data/jpa/spring-jpa-1.3.xsd
		http://www.springframework.org/schema/aop http://www.springframework.org/schema/aop/spring-aop-3.2.xsd
		http://www.springframework.org/schema/mvc http://www.springframework.org/schema/mvc/spring-mvc-3.2.xsd
		http://www.springframework.org/schema/util http://www.springframework.org/schema/util/spring-util-3.2.xsd">

	<!-- 定义请求处理映射 HandlerMapping -->
		<bean id="handlerMapping"
		class="org.springframework.web.servlet.handler.SimpleUrlHandlerMapping">
		<!-- 指定请求和Controller对应关系 -->
		<property name="mappings">
			<props>
				<prop key="hello.do">helloController</prop>
			</props>
		</property>
		</bean>

		<!-- 声明Controller -->
		<bean id="helloController" class="com.zhiyou100.entity.HelloController"/>
		<!-- 定义视图解析器ViewResovler -->
		<bean id="viewResolver" class="org.springframework.web.servlet.view.InternalResourceViewResolver" >
		<property name="prefix" value="/WEB-INF/"/>
		<!-- jsp为后缀的内容  -->
		<property name="suffix" value=".jsp"/>

		</bean>
	</beans>
现在对web应用的配置,springmvc的配置已经完成了,万事俱备,只欠东风,我们具体的执行动作呢?
下面相当于项目部将接收到的任务分配给各个部门,部门完成后,组装再发送给项目部,然后项目部将组装好的东西发送给财务部,财务做一些报表等等,然后给打铁的,打铁的将定位下具体要给客户展示什么界面,操作好后,再将总体的发送给董事。董事和客户交谈,给客户最终的产品,用什么官方话讲啊,直接用大家都能看懂的大白话将,这样更容易上手,更容易理解。
package com.zhiyou100.entity;


import javax.servlet.http.HttpServletRequest;

import javax.servlet.http.HttpServletResponse;


import org.springframework.web.servlet.ModelAndView;

import org.springframework.web.servlet.mvc.Controller;


/**

* @author Administrator

*

*/

public class HelloController implements Controller{


public ModelAndView handleRequest(HttpServletRequest request, HttpServletResponse response) throws Exception {

// TODO Auto-generated method stub

return new ModelAndView("jsp/Hello");

}

}
下面是根据客户需求,最终给客户展示的效果图。到这里我们与客户的所有交涉已经结束了。
<%@ page language="java" contentType="text/html; charset=UTF-8"

pageEncoding="UTF-8"%>

<!DOCTYPE html PUBLIC "-//W3C//DTD HTML 4.01 Transitional//EN" "http://www.w3.org/TR/html4/loose.dtd">

<html>

<head>

<meta http-equiv="Content-Type" content="text/html; charset=UTF-8">

<title>Insert title here</title>

</head>

<body>

<h1>Hello,SpringMVC</h1>

</body>

</html>