一、HTTP客户端
1.1 万维网与HTTP
1.1.1 HTTP概述
超文本传输协议(HTTP,HyperText TransferProtocol)是互联网上应用最为广泛的一种网络协议
1.1.2 HTTP消息详解
1.http的请求部分
1.1 基本结构

- 请求行 GET /test/hello.html HTTP/1.1
- 请求头(并不是每一次请求都一样)
- 空行
- 请求数据(内容名字=内容体)
1.2 常用的GET请求头
1. Host:localhost:8080[浏览器要找的主机]
2. Accept:text/html,image/*(告诉服务器,浏览器可以接受文本,网页图片)
3. Accept-Charaset:ISO-8859-1 [接受字符编码:iso-8859-1]
4. User-Agent:Nozilla/4.0(Com...)[告诉服务器我的浏览器内核]
5. Connection:close/Keep-Alive [保持链接,发完数据后,我不关闭链接]
2.服务端响应信息
2.1 基本结构
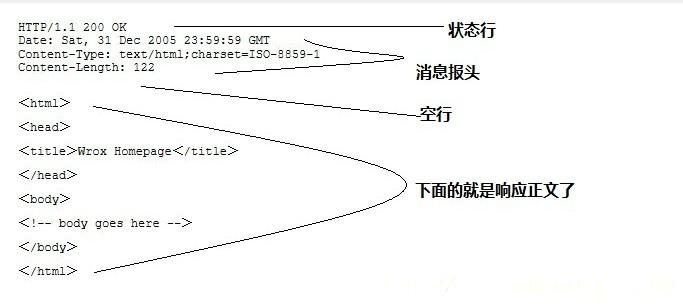
- 状态行 HTTP/1.1 200 OK
- 响应头
- 空行
- 响应数据
2. GET响应头信息
1.server:apache tomcat [告诉浏览器我是tomcat]
2.Content-Encoding:gzip[告诉浏览器我使用了gzip]
3.Content-Type:text/html;charset=gb2312[内容格式和编码]
4.Content-Lenght:80 [告诉浏览器回送的数据大小]
5.Last-Modified:Tue,11 Juj,2000 18 18:29:20[告诉浏览器该资源上次更新 时间是多少]
6.Date:Tue,11 Jul 2000 18:23:51 [返回数据给客户端的时间]
7.Connection:close/Keep-Alive [连接方式为长连接]
二、urllib模块
2.1 urllib基础
2.1.1 urllib简介
urllib中包括了四个模块
1. urllib.request可以用来发送request和获取request的结果
2. urllib.error包含了urllib.request产生的异常
3. urllib.parse用来解析和处理URL
4. urllib.robotparse用来解析页面的robots.txt文件
2.1.2 爬取网页
1. 先需要导入用到的模块:urllib.request
2. 在导入了模块之后,我们需要使用urllib.request.urlopen打开并爬取一个网页
3.读取内容常见的有3种方式:
– read()读取文件的全部内容,与readlines()不同的是,read()会把读取到的内容赋给一个字符串变量。
– readlines()读取文件的全部内容,readlines()会把读取到的内容赋值给一个列表变量。
– readline()读取文件的一行内容。
import	urllib.request
html = urllib.request.urlopen('hep://www.tedu.cn')
html.readline()
html.read(4096)
html.readlines()
2.1.3 爬取百度主页数据
1. 爬取的网页为http://www.baidu.com的数据
2. 保存的文件名为/tmp/baidu.html
from  urllib import request
html=request.urlopen('http://www.baidu.com/')
data=html.read()
print(type(data))
with open('/tmp/baidu.html','wb') as fobj:
    fobj.write(data)
2.1.4 下载网络资源
1. urllib不仅可以下载网页,其他网络资源均可下载
2.有些文件比较大,需要像读取文件一样,每次读取一部分数据
import urllib.request
html = urllib.request.urlopen('hep://172.40.50.116/python.pdf')
fobj = open('/tmp/python.pdf',    'ab')
while True:
      data=html.read(4096)
      if not data:
          break
      fobj.write(data)
fobj.close()
2.1.5 爬取图片
1. 将http://www.tedu.cn所有的图片下载到本地
2. 本地的目录为/tmp/images
3. 图片名与网站上图片名保持一致
from urllib import request
import os
import re

def get_webData(url,fname='web.html'):
    html=request.urlopen(url)
    with open(fname,'wb') as fobj:
        while True:
            data=html.read(4096)
            if not data:
                break
            fobj.write(data)

if __name__ == '__main__':
    if not os.path.exists('/tmp/163/'):
        os.mkdir('/tmp/163/')
    get_webData('http://www.163.com','/tmp/163/163.html')

    img_urllist=[]
    img_patt=r'(http|https)://[\w/\.-]+\.(jpg|jpeg|png)'
    with open('/tmp/163/163.html','rb') as fobj:
        for line in fobj:
            line=line.decode('GBK')
            m=re.search(img_patt,line)
            if m:       #匹配不到返回的是None
                img_urllist.append(m.group())

    for img_url in  img_urllist:
        fname=img_url.split('/')[-1]
        fname=os.path.join('/tmp/163',fname)
        try:
            get_webData(img_url,fname)
        except:
            pass

    print('下载完成!!!')
2.1.6 模拟客户端
1.有些网页为了防止别人恶意采集其信息所以进行了一些反爬虫的设置,而我们又想进行爬取
2.可以设置一些Headers信息(User-Agent),模拟成浏览器去访问这些网站
from urllib import request

header={'User-Agent':'Mozilla/5.0 (X11; Linux x86_64; rv:52.0) Gecko/20100101 Firefox/52.0'}
url='http://127.0.0.1/'
html=request.Request(url,headers=header)

print(request.urlopen(html).read())
2.2 urllib进阶
2.2.1 数据编码
1. 一般来说,URL标准中只会允许一部分ASCII字符,比如数字、字母、部分符号等
2. 而其他的一些字符,比如汉字等,>是不符合URL标准的。此时,我们需要编码。
3.如果要进行编码,可以使用urllib.request.quote()进行
from urllib import request
print(request.quote('李俊 你好'))

#%E6%9D%8E%E4%BF%8A%20%E4%BD%A0%E5%A5%BD
2.2.2 HTTP异常处理
1. 如果访问的页面不存在或拒绝访问,程序将抛出异常
2. 捕获异常需要导入urllib.error模块
>>> html = urllib.request.urlopen('http://172.40.50.116/a.html')
urllib.error.HTTPError: HTTP Error 404: Not Found
>>> html = urllib.request.urlopen('http://172.40.50.116/aaa')
urllib.error.HTTPError: HTTP Error 403: Forbidden
2.2.3 处理Web服务错误
1. 起动一个web服务
2. 在web服务器的文档目录下创建目录ban,权限设置为700
3. 编写python程序访问不存在的路径和ban目录,处理404和403错误
4. 404错误打印“无此页面”,403错误打印“无权访问”
from urllib import request,error

no_url='http://127.0.0.1/a.html'
ban_url='http://127.0.0.1/ban/'
try:
    html=request.urlopen(no_url)
except error.HTTPError as e:
    print(e)

try:
    html2=request.urlopen(ban_url)
except error.HTTPError as e:
    print(e)
三、paramiko模块
3.1 安装paramiko模块
3.1.1 本地安装
# yum install -y gcc gcc-c++ python-devel
# tar xzf paramiko-1.15.4.tar.gz
# python setup.py install
3.1.2 网络安装
# pip install paramiko
3.2 paramiko基本使用
1. SSHClient
– 创建用于连接ssh服务器的实例
>>> ssh = paramiko.SSHClient()
2. paramiko.AutoAddPolicy
– 设置自动添加主机密钥
3. ssh.connect
– 连接ssh服务器
4. ssh.exec_comand
– 在ssh服务器上执行指定命令
3.3 编写用于实现ssh访问的脚本
1. 编写用于实现ssh访问的脚本
– 创建SSHClient实例
– 设置添加主机密钥策略
– 连接ssh服务器
– 执行指定命令
import paramiko
ssh=paramiko.SSHClient()
ssh.set_missing_host_key_policy(paramiko.AutoAddPolicy)
ssh.connect('192.168.4.10',username='root',password='123456')
ssh.exec_command('useradd zhangsan')
a=ssh.exec_command('id zhangsan')
print(len(a))
print(a)
print(a[0])
print(a[2].read())

stdin,stdout,stderr=ssh.exec_command('id wangwu')
print(stderr.read())
3.4 利用多线程实现ssh并发访问
1. 在文件中取出所有远程主机IP地址
2. 在shell命令行中接受远程服务器IP地址文件、远程服务器密码以及在远程主机上执行的命令
3. 通过多线程实现在所有的远程服务器上并发执行命令
import paramiko
import os,sys
import getpass
from threading import Thread

def rcmd(host,passwd,command,user='root',port=22):
    host=host
    passwd=passwd
    command=command
    ssh = paramiko.SSHClient()
    ssh.set_missing_host_key_policy(paramiko.AutoAddPolicy)
    ssh.connect(host, username=user, password=passwd,port=port)
    stdin, stdout, stderr=ssh.exec_command(command)
    out=stdout.read()
    # print(out)
    err=stderr.read()
    # print(err)
    if out:
        print('%s [out]:\n%s' % (host,out.decode()))
    if err:
        print('%s [err]:\n%s' % (host,err.decode()))

if __name__ == '__main__':
    if len(sys.argv) != 3:
        print('Usage:%s ipFile "command"' % (sys.argv[0]))
        sys.exit(1)
    ipfile=sys.argv[1]
    password=getpass.getpass
    command=sys.argv[2]

    with open(ipfile) as fobj:
        for line in fobj:
            ip=line.strip()
            print(ip)
            t=Thread(target=rcmd,args=(ip,password,command))
            t.start()