一.组件的输入属性
1.输入属性的装饰器
@Input()
2.实例代码
-
生成子组件order
ng g component order -
在子组件中输入amount属性
//order.component.ts export class OrderComponent{ @Input() amount:string } //order.component.html <p>存在{{amount}}份股票</p> -
在父组件中定义属性值
//app.component.ts export class AppComponent{ stock=""; } //app.component.html <input type="text" placeholder="请输入股票的份数" [(ngModel)]="stock"/> <app-order [amount]="stock"></app-order> -
属性绑定是单项的,从父组件到子组件,子组件值的改变不会改变父组件的值
二.组件的输出属性
1.输出属性的装饰器
@Output()
2.实例代码
-
生成子组件quote
ng g component quote -
在子组件中定义PriceQuote,并设置利用被Output装饰器装饰的lastPrice定时向父类发射变换的对象
//price-quote.component.ts export class PriceQuoteComponent{ stockCode:string = "IBM"; price:number; @Output() lastPrice:EventEmitter<PriceQuote> = new EventEmitter(); constructor(){ setInterval(()=>{ let priceQuote:PriceQuote = new PriceQuote(this.stockCode, 100*Math.random()); this.price = priceQuote.lastPrice; this.lastPrice.emit(priceQuote); }, 1000); } } export class PriceQuote{ stockCode:string; price:number; constructor( public stockCode:string, public price:number ){} } -
父组件接受信息并显示出来
//app.component.ts export class AppComponent{ stock = ""; priceQuote:PriceQuote = new PriceQuote("",0); priceQuoteHandler(event: PriceQuote){ this.priceQuote = event; } } //app.component.html <app-price-quote (lastPrice)="priceQuoteHandler($event)"></app-price-quote> <div> 股票代码是:{{priceQuote.stockCode}} 股票价格是:{{priceQuote.price}} </div> -
默认组件的事件名就是Output修饰的变量名,如果想修改就在装饰器的参数中写对应内容。如:
@Output('priceChange'),捕获的事件名为priceChange
三.中间人模式
1.中间人模式
- 中间人模式的作用:从组件接受数据到将其传递给另一个组件
- 中间人模式的条件:发出信息的组件和接受信息的组件有共同的父组件,一个使用
@Input()一个使用@Output()
四.组件的生命周期
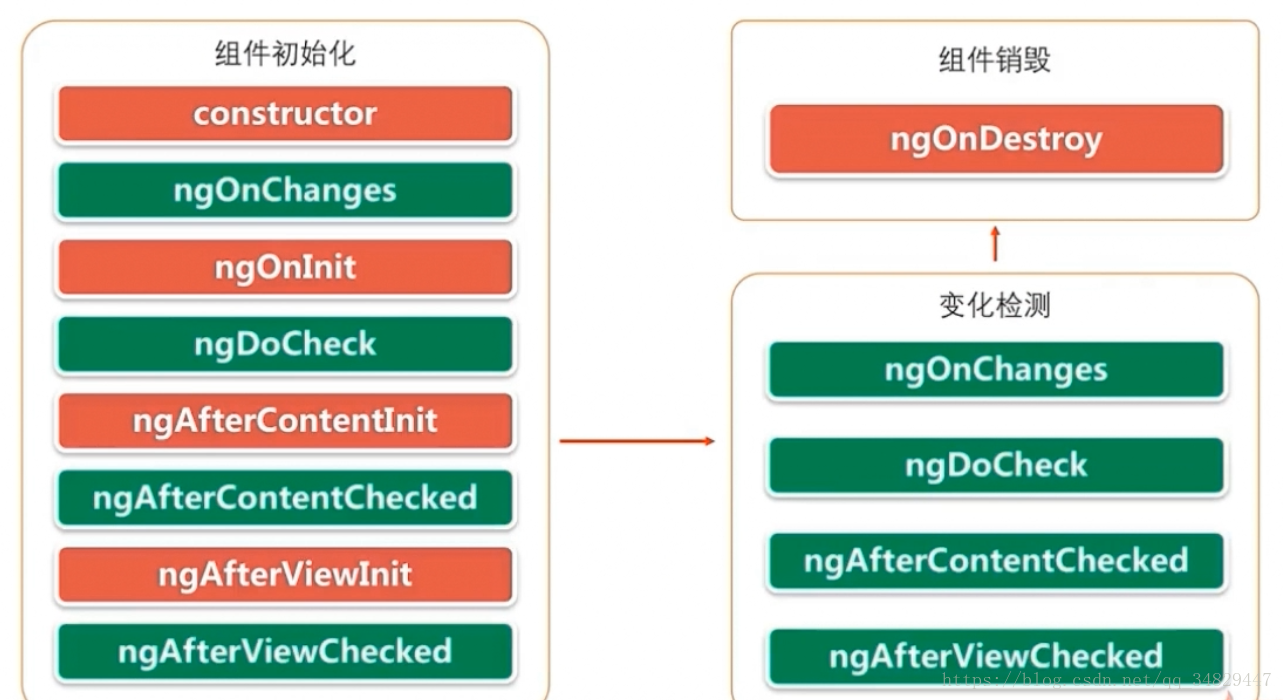
- 每一个钩子都是angular/core中定义的接口,实现对应接口即可重写对应的方法(注意:如果不实现接口,直接写方法名也可以,但为了让IDE支持等原因最好加上对应的接口)
- ngOnChanges的参数取得的是当前组件所有输入属性的值,使用
方法参数['输入属性']获得对应的输入属性的值。如果组件没有输入属性,则ngOnChanges方法永远不会被调用。 - 方法调用顺序如上图左侧所示
- 注意如果组件的初始化逻辑需要依赖输入属性的值,则需要把逻辑写到ngOnChanges方法中。因为在constructor方法执行时获取不到输入属性的值,只有执行到ngOnChanges方法时才会为输入属性赋值。
1.ngOnChanges钩子
- 每次输入属性的指向发生变化时,都会调用ngOnChanges方法
- 输入属性指向变化时ngOnChanges会被调用,如果传递的是对象中的值的指向则不会调用ngOnChanges方法(即值发生改变会反映到页面上,但不会调用ngOnChanges方法,此时是由于angular的变更检测机制)
2.变更检测机制及doCheck钩子
-
变更检测机制是通过zone.js来实现,主要保证组件属性的变换和模板变化同步,但变更检测机制不会改变组件属性的值
-
变更检测策略
- 图解
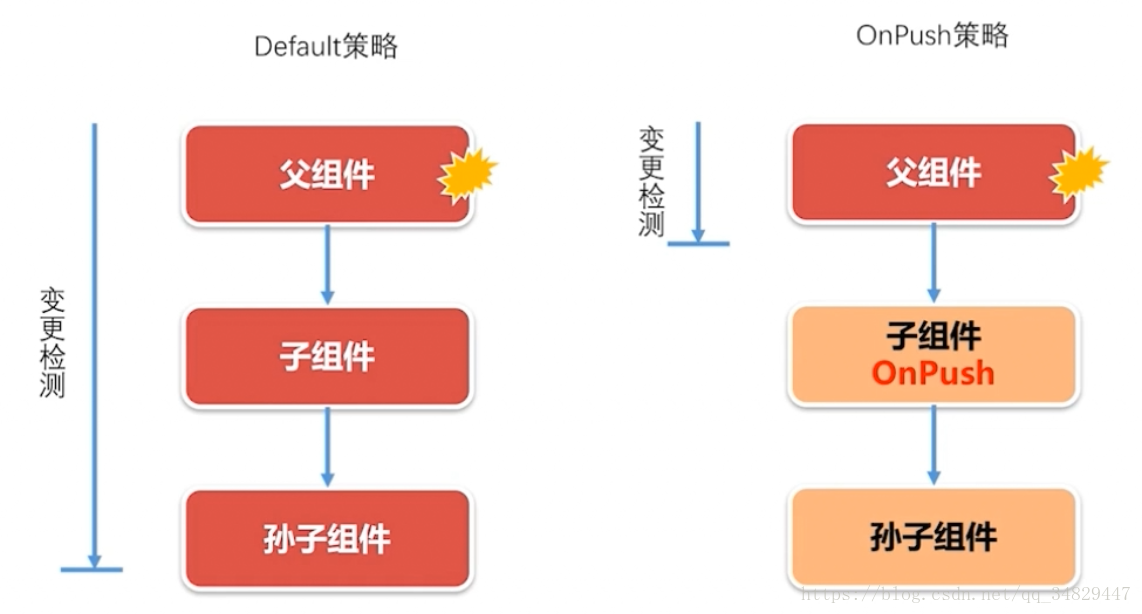
- Default策略:只要组件属性发生变化,整个组件树都会被检查
- onPush策略:只有在子组件的输入属性发生变化,整个组件树才会被检查
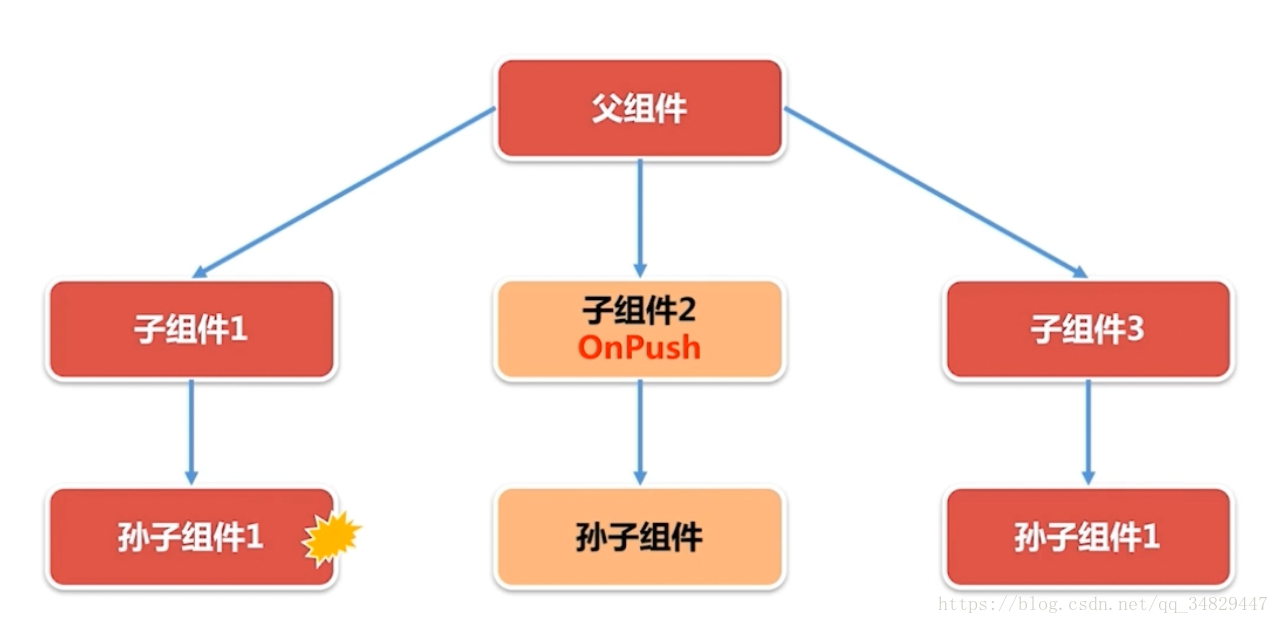
- 详细变更检测图解
-
doCheck钩子在触发变更策略的时候执行
- 注意:ngDoCheck会在每一次页面发生事件的时候被触发(点击输入框但不输入也会触发),故最好实现方法的时候进行一次值的判断再执行对应内容,从而更高效。
-
@ViewChild()装饰器用于在父组件中调用子组件的api,而不是传递数据-
在子组件child.component.ts中声明方法
greeting:void(name:string){ console.log("hello "+name); } -
在父组件app.component.html中定义模板本地变量
<app-child #child1></app-child> <app-child #child2></app-child> -
在父组件app.component.ts中利用
@ViewChild('child1')修饰模板中本地变量的名字export class AppComponent implements OnInit{ @ViewChild('child1')//利用ViewChild装饰器在父组件获得子组件的引用 child1:ChildComponent; constructor(){ } ngOnInit():void{ this.child1.greeting("Tom");//调用子组件的方法 } } -
在父组件的html中可以给button设置监听事件和引用模板变量的方式调用方法
<app-child #child1></app-child>
<app-child #child2></app-child>
<button (click)="child2.greeting('Jerry')">调用child2的greeting方法</button>
-
-
ngAfterViewInit和ngAfterViewChecked钩子
-
这两个钩子当组件的模板中所有内容组装完成后,模板已经呈献给用户看了之后被调用的。
-
实例
- 在子组件和父组件中都重写ngAfterViewInit方法和ngAfterViewChecked方法
- 开启项目时会发现会先执行所有子组件的方法后才会执行父组件的ngAfterViewInit方法和ngAfterViewChecked方法
- ngAfterViewInit方法只会被调用一次,ngAfterViewChecked方法在每一次变更时(所有重写了ngAfterViewChecked组件的方法)都会被调用
-
angular的变更检测机制要求不能在组件被组装好之后更新影响模板的属性,否则会抛出异常(即ngAfterViewInit和ngAfterViewChecked方法中不能修改模板显示的属性)【解决方案:将想修改的属性写到另一个js的运行周期中执行,如下代码演示】
message:string; //属性值(显示在页面)
//报错情况
ngAfterViewInit():void{
    console.log("父组件的视图初始化完毕");
    this.message = "Hello";
}
//矫正情况
ngAfterViewInit():void{
    console.log("父组件的视图初始化完毕");
    setTimeout(()=>{
        this.message = "Hello";//将修改属性的逻辑写到另一个运行周期中
    },0);
}
-
3.动态生成html——投影和innerHTML标签属性
-
使用
<ng-content></ng-content>指令在子组件中标记投影点<div> 子组件内容 <ng-content></ng-content> </div> -
在父组件中将要投影到子组件中的html片段写到子组件的html标签中
<div> 父组件内容 <app-child> <div> 这个div是父组件投影到子组件 </div> </app-child> </div> -
在运行时,就会将父组件的div投影到子组件的ng-content中
-
设置多个投影点从父组件投影到组件(使用select和class匹配)
<!-- 子组件html --> <div> 子组件内容 <ng-content select=".header"></ng-content> <div> 这个div定义在子组件中 </div> <ng-content select=".footer"></ng-content> </div> <!-- 父组件html --> <div> 父组件内容 <app-child> <div class="header"> 头部分内容,title是{{title}} </div><!--其中title为父组件的属性,仅用于显示投影到子组件的ng-content上--> <div class="footer"> 尾部分内容 </div> </app-child> </div> -
利用属性绑定,绑定html内容显示到模板
<div [innerHTML]="divContent"></div> //对应的ts文件 export class AppComponent{ divContent = "<div>show detail</div>" } -
注意:
<ng-content>是平台无关的且可以定义多个投影点,innerHTML只能在浏览器中使用且一个DOM中只能插一个。
4.ngAfterContentInit和ngAfterContentChecked
- ngAfterContentInit()在父组件投影内容初始化完毕时调用;ngAfterContentChecked()在父组件投影内容变更检测完毕时调用
- 执行顺序:先执行父组件投影内容初始化和变更检测的方法,再执行子组件投影内容初始化和变更检测的方法
- ngAfterContentInit中可以改变属性值,因为当执行ngAfterContentInit时整个视图还没有组装完毕,只是投影的内容被组装完毕了
- 注意:所有带有Checked名称的钩子,在页面发生变化时都会被调用,故所有带有Checked的钩子都要实现的很轻量级
5.ngOnDestory
- 每一次从一个路由到另一个路由的时候,前一个路由的组件就会回调ngOnDestory方法用于销毁相关资源