由于前天写的有点模糊,我决定推到重来,在做一个demo。
OK!,先空功能实现
一:流程图
gif演示:如下

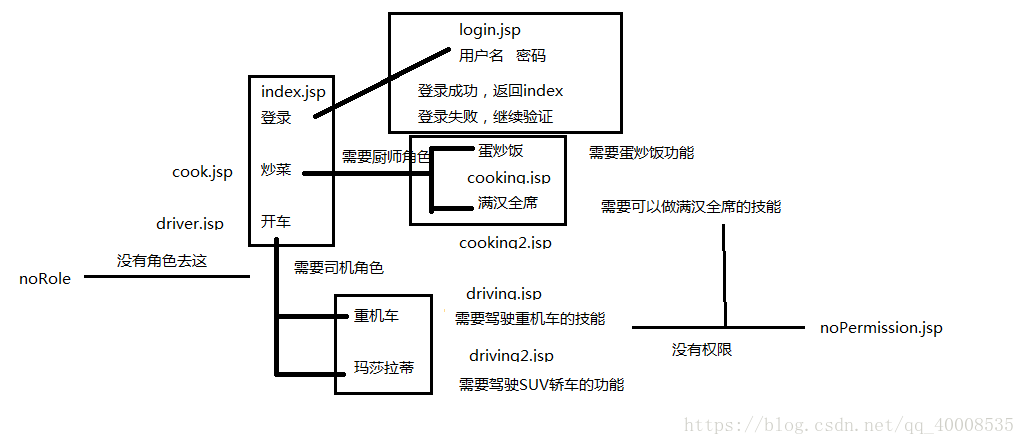
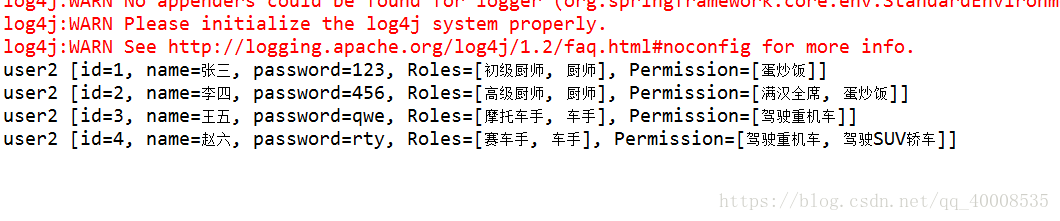
二:每个任务拥有的角色与权限
项目主要用ssm框架搭建,这我就只放置查询语句
<?xml version="1.0" encoding="UTF-8"?>
<!DOCTYPE mapper PUBLIC "-//mybatis.org/DTD Mapper 3.0" "http://mybatis.org/dtd/mybatis-3-mapper.dtd">
<mapper namespace="dao.userDao">
	<select id="getPassword" resultType="String">
		select password from user where name=#{name}
	</select>

	<select id="getRoles" resultType="String">
	select r.name from user u
		left join user_role ur on u.id = ur.uid
		left join Role r on r.id = ur.rid
		where u.name = #{name}
	</select>

	<select id="getPermission" resultType="String">
	select p.name from user u
		left join user_role ru on u.id = ru.uid
		left join role r on r.id = ru.rid
		left join role_permission rp on r.id = rp.rid
		left join permission p on p.id = rp.pid
		where u.name =#{name}
	</select>
//这里新定义了一个user2,用来查询全部信息
	<resultMap type="bean.user2" id="userMap">
		<id property="id" column="id"/>
		<result property="name" column="name"/>
		<result property="password" column="password"/>
		<collection property="Roles" column="name" select="getRoles"></collection>
		<collection property="Permission" column="name" select="getPermission"></collection>
	</resultMap>
	<select id="getAll" resultMap="userMap">
	select * from user where name=#{name}
	</select>

</mapper>
三:配置
OK!!!将ssm框架搭建好之后,就可以开始配置shiro
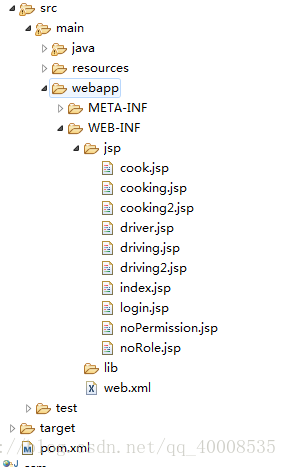
整体的项目架构如下:
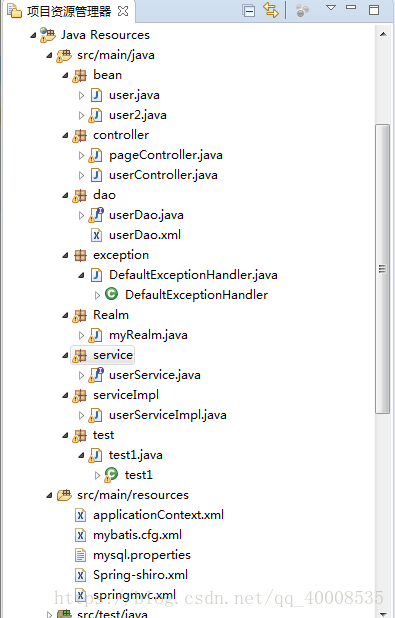
这里pageController的作用:由于jsp文件都放在WEB-INF文件的jsp文件里面
外界无法直接访问,So,需要定义映射去访问它们。pagerController就诞生了,只需要localhost:8080/项目名称/index就可以访问主页。
package controller;

import java.util.ArrayList;
import java.util.List;

import org.apache.shiro.SecurityUtils;
import org.apache.shiro.authz.annotation.RequiresPermissions;
import org.apache.shiro.subject.Subject;
import org.springframework.stereotype.Controller;
import org.springframework.web.bind.annotation.RequestMapping;
import org.springframework.web.bind.annotation.RequestMethod;

@Controller
public class pageController {
	@RequestMapping(value="index")
	public String index() {
		return "index";
	}
	@RequestMapping(value="login",method=RequestMethod.GET)
	public String login() {
		return "login";
	}
	@RequestMapping(value="cook")
	public String cook() {
		return "cook";
	}
	@RequestMapping(value="driver")
	public String driver() {
		return "driver";
	}

	@RequestMapping(value="noRole")
	public String noRole() {
		return "noRole";
	}

	@RequestMapping(value="noPermission")
	public String noPermission() {
		return "noPermission";
	}
	@RequestMapping(value="driving")
	public String driving() {
		return "driving";
	}

	@RequestMapping(value="driving2")
	public String driving2() {
		return "driving2";
	}

	@RequestMapping(value="cooking")
	public String cooking() {
		return "cooking";
	}

	@RequestMapping(value="cooking2")
	public String cooking2() {
		return "cooking2";
	}
}
到了这个时候,应该已经可以访问了,当时没有权限控制而已。
四:配置shiro
最简单的Shiro配置
web.xml 配置shiro过滤器
<!-- Shiro配置 -->
	<filter>
		<filter-name>shiroFilter</filter-name>
		<filter-class>org.springframework.web.filter.DelegatingFilterProxy</filter-class>
	</filter>
	<filter-mapping>
		<filter-name>shiroFilter</filter-name>
		<url-pattern>/*</url-pattern>
	</filter-mapping>
springmvc.xml 配置shiro注释
	<!--启用shiro注解-->
	<bean
		class="org.springframework.aop.framework.autoproxy.DefaultAdvisorAutoProxyCreator"
		depends-on="lifecycleBeanPostProcessor">
		<property name="proxyTargetClass" value="true" />
	</bean>
	<bean
		class="org.apache.shiro.spring.security.interceptor.AuthorizationAttributeSourceAdvisor">
		<property name="securityManager" ref="securityManager" />
	</bean>
spring-shiro.xml 配置过滤器,securityManager等东西
这个配置文件记得加载,在监听器中或者applicationContext.xml都可以
/login 这个指的是login请求 localhost:8080/项目名称/login
/login.jsp 这个访问时jsp页面, maven项目访问webapp下,web项目访问WEB-INF下
<?xml version="1.0" encoding="UTF-8"?>
<beans xmlns:xsi="http://www.w3.org/2001/XMLSchema-instance"
	xmlns="http://www.springframework.org/schema/beans" xmlns:util="http://www.springframework.org/schema/util"
	xmlns:context="http://www.springframework.org/schema/context" xmlns:p="http://www.springframework.org/schema/p"
	xmlns:tx="http://www.springframework.org/schema/tx" xmlns:mvc="http://www.springframework.org/schema/mvc"
	xmlns:aop="http://www.springframework.org/schema/aop"
	xsi:schemaLocation="http://www.springframework.org/schema/beans
	http://www.springframework.org/schema/beans/spring-beans-4.0.xsd http://www.springframework.org/schema/tx
	http://www.springframework.org/schema/tx/spring-tx-4.0.xsd http://www.springframework.org/schema/context
	http://www.springframework.org/schema/context/spring-context-4.0.xsd http://www.springframework.org/schema/mvc
	http://www.springframework.org/schema/mvc/spring-mvc.xsd http://www.springframework.org/schema/aop
	http://www.springframework.org/schema/aop/spring-aop-4.0.xsd http://www.springframework.org/schema/util
	http://www.springframework.org/schema/util/spring-util.xsd">


	<!-- 配置shiro的过滤器工厂类,id- shiroFilter要和我们在web.xml中配置的过滤器一致 -->
	<bean id="shiroFilter" class="org.apache.shiro.spring.web.ShiroFilterFactoryBean">
		<!-- 调用我们配置的权限管理器 -->
		<property name="securityManager" ref="securityManager" />
		<!-- 配置我们的登录请求地址 -->
		<property name="loginUrl" value="/login" />
		<!-- 如果您请求的资源不再您的权限范围,则跳转到/403请求地址 -->
		<property name="unauthorizedUrl" value="/noPermission" />
		<!-- 退出 -->
		<property name="filters">
			<util:map>
				<entry key="logout" value-ref="logoutFilter" />
			</util:map>
		</property>
		<!-- 权限配置 -->
		<property name="filterChainDefinitions">
			<value>
				<!-- anon表示此地址不需要任何权限即可访问 -->
				/login=anon
				/index=anon
				/static/**=anon
				/doLogout=logout
				<!--所有的请求(除去配置的静态资源请求或请求地址为anon的请求)都要通过登录验证,如果未登录则跳到/login -->
				/** = authc
			</value>
		</property>
	</bean>
	<!-- 退出过滤器 -->
	<bean id="logoutFilter" class="org.apache.shiro.web.filter.authc.LogoutFilter">
		<property name="redirectUrl" value="/index" />
	</bean>


	<!-- 安全管理器 -->
	<bean id="securityManager" class="org.apache.shiro.web.mgt.DefaultWebSecurityManager">
		<property name="realm" ref="myRealm" />
		<!--  <property name="sessionManager" ref="sessionManager" />-->
	</bean>

	<bean id="myRealm" class="Realm.myRealm"></bean>

	<!-- 保证实现了Shiro内部lifecycle函数的bean执行 -->
	<bean id="lifecycleBeanPostProcessor" class="org.apache.shiro.spring.LifecycleBeanPostProcessor" />
</beans>
五:其他
参数传递的流程:
登录页面-->Controller,调用验证-->Realm验证 ,验证通过则返回,失败则报错
访问有权限的页面->Realm->有权限则通过,没权限则报错
5.1 jsp页面
这个是登录界面<br>
<form action="login" method="post">
用户名:<input type="text" name="name" value="张三" ><br>
密码:<input type="password" name="password" value="123"><br>
<input type="submit" value="提交">
</form>
${error} <!-- 取出错误 -->
<a href="index">返回</a>
5.2Controller接收
@Controller
public class userController {
	@RequestMapping(value="/login",method=RequestMethod.POST)
	public String login(String name,String password,Model model) {
		Subject subject = SecurityUtils.getSubject();
		UsernamePasswordToken token = new UsernamePasswordToken(name, password);
		try {
                //开始验证
		subject.login(token);
		Session session = subject.getSession();
		session.setAttribute("subject", subject);
		return "index";
		}catch (Exception e){
			model.addAttribute("error", "验证失败");
			return "login";
		}
	}
}
5.3Realm验证
public class myRealm extends AuthorizingRealm {
	@Autowired
	private userService userServiceImpl;
	@Override
	protected AuthorizationInfo doGetAuthorizationInfo(PrincipalCollection principals) {
		//取出username
		String name = (String)principals.getPrimaryPrincipal();
		Set<String> Roles = userServiceImpl.getRoles(name);
		Set<String> Permission = userServiceImpl.getPermission(name);
		SimpleAuthorizationInfo info = new SimpleAuthorizationInfo();
		info.setRoles(Roles);
		info.setStringPermissions(Permission);
		return info;
	}

	@Override
	protected AuthenticationInfo doGetAuthenticationInfo(AuthenticationToken token) throws AuthenticationException {
		UsernamePasswordToken user = (UsernamePasswordToken)token;
		String name = user.getUsername();
		String password = userServiceImpl.getPassword(name);
		if(password==null||!password.equals(new String(user.getPassword()))) {
			throw new AuthenticationException();
		}
		SimpleAuthenticationInfo info = new SimpleAuthenticationInfo(name, password, getName());
		return info;
	}

}
5.4index 页面在取出
<body>
     //判断有没有验证过
    <c:if test="${empty subject.principal}">
        <a href="login">登录</a><br>
    </c:if>
    <c:if test="${!empty subject.principal}">
        <span class="desc">你好,${subject.principal},</span>
        <a href="doLogout">退出</a><br>
    </c:if>
<a href="cook">炒菜</a><br>
<a href="driver">开车</a>
</body>
这样子登入验证就做好了。
6.权限验证
两种方式:注解,非注解
注解:@RequiresPermissions("驾驶重机车") 要求有“驾驶重机车”的能力 @RequiresRoles("厨师") 要求是厨师角色
好处:简洁
@RequiresPermissions("驾驶重机车")
	@RequestMapping(value="driving")
	public String driving() {
		return "driving";
	}
	@RequiresPermissions("驾驶SUV轿车")
	@RequestMapping(value="driving2")
	public String driving2() {
		return "driving2";
	}
	@RequiresPermissions("蛋炒饭")
	@RequestMapping(value="cooking")
	public String cooking() {
		return "cooking";
	}
	@RequiresPermissions("满汉全席")
	@RequestMapping(value="cooking2")
	public String cooking2() {
		return "cooking2";
	}
坏处:权限不通过的时候,是要出现异常的,报错程序就不运行了,So我们还要手动配置异常统一处理
异常统一处理也有两种:SpringMVC框架自带的,shiro框架自带的
SpringMVC框架:必须写在springmvc.xml中
   <bean
    class="org.springframework.web.servlet.handler.SimpleMappingExceptionResolver">
    <property name="exceptionMappings">
        <props>
             //接受到的异常
            <prop key="org.apache.shiro.authz.UnauthorizedException">
                /noRole <!-- 捕获该异常时跳转的页面 -->
            </prop>
            <prop key="org.apache.shiro.authz.UnauthenticatedException">
                /noPermission <!-- 捕获该异常时跳转的路径 -->
            </prop>
        </props>
    </property>
</bean>
shiro框架:它就比较麻烦了,推荐用springmc框架的
于此不做赘述
非注解:非注解的好处:不需要添加报错后异常处理 坏处:这难道不碍眼么
	@RequestMapping(value="cook")
	public String cook() {
		Subject subject = SecurityUtils.getSubject();
		try {
		List<String> Roles = new ArrayList<String>();
		subject.checkRole("厨师");
		}catch(Exception e) {
			return "noRole";
		}
		return "cook";
	}
最后完整的pageController是这个样子的,两种权限方法都有采用。
@Controller
public class pageController {
	@RequestMapping(value="index")
	public String index() {
		return "index";
	}
	@RequestMapping(value="login",method=RequestMethod.GET)
	public String login() {
		return "login";
	}
	@RequestMapping(value="cook")
	public String cook() {
		Subject subject = SecurityUtils.getSubject();
		try {
		List<String> Roles = new ArrayList<String>();
		subject.checkRole("厨师");
		}catch(Exception e) {
			return "noRole";
		}
		return "cook";
	}
	@RequestMapping(value="driver")
	public String driver() {
		Subject subject = SecurityUtils.getSubject();
		try {
		subject.checkRole("车手");
		}catch(Exception e) {
			return "noRole";
		}

		return "driver";
	}

	@RequestMapping(value="noRole")
	public String noRole() {
		return "noRole";
	}

	@RequestMapping(value="noPermission")
	public String noPermission() {
		return "noPermission";
	}
	@RequiresPermissions("驾驶重机车")
	@RequestMapping(value="driving")
	public String driving() {
		return "driving";
	}
	@RequiresPermissions("驾驶SUV轿车")
	@RequestMapping(value="driving2")
	public String driving2() {
		return "driving2";
	}
	@RequiresPermissions("蛋炒饭")
	@RequestMapping(value="cooking")
	public String cooking() {
		return "cooking";
	}
	@RequiresPermissions("满汉全席")
	@RequestMapping(value="cooking2")
	public String cooking2() {
		return "cooking2";
	}
}
这样子就配置好全部,可以开头的效果。
7.缓存问题
如果在realm的两个方法中加入syso语句,每一次验证或者授权都会输出一条语句,那每一次都会查询数据库。有什么方法可以解决。答案是:缓存
缓存方式有三中:redis(哈哈哈,我不会),EhCache,MpCache.
redis,我不会。
EjCache:实现类,注入SecurityManager
<!-- 缓存管理器 -->
    <bean id="cacheManager" class="org.apache.shiro.cache.ehcache.EhCacheManager">
        <property name="cacheManagerConfigFile" value="classpath:shiro-ehcache.xml"/>
    </bean>
<!--securityManage-->
<!-- 安全管理器 -->
<bean id="securityManager" class="org.apache.shiro.web.mgt.DefaultWebSecurityManager">
<property name="realm" ref="customRealm" />
<!--注入缓存管理器-->
<property name="cacheManager" ref="cacheManager"/>
</bean>于此之外,编写shiro-ehcache.xml
<ehcache xmlns:xsi="http://www.w3.org/2001/XMLSchema-instance"
         xsi:noNamespaceSchemaLocation="../config/ehcache.xsd">
    <!--diskStore:缓存数据持久化的目录 地址  -->
    <diskStore path="/Users/codingboy/develop/ehcache" />
    <defaultCache
            maxElementsInMemory="1000"
            maxElementsOnDisk="10000000"
            eternal="false"
            overflowToDisk="false"
            diskPersistent="false"
            timeToIdleSeconds="120"
            timeToLiveSeconds="120"
            diskExpiryThreadIntervalSeconds="120"
            memoryStoreEvictionPolicy="LRU">
    </defaultCache>
</ehcache>
各个属性的作用:数据可以保存到磁盘中或者内存中 name:缓存名称。 maxElementsInMemory:缓存最大个数。 eternal:对象是否永久有效,一但设置了,timeout将不起作用。 timeToIdleSeconds:设置对象在失效前的允许闲置时间(单位:秒)。仅当eternal=false对象不是永久有效时使用,可选属性,默认值是0,也就是可闲置时间无穷大。 timeToLiveSeconds:设置对象在失效前允许存活时间(单位:秒)。最大时间介于创建时间和失效时间之间。仅当eternal=false对象不是永久有效时使用,默认是0.,也就是对象存活时间无穷大。 overflowToDisk:当内存中对象数量达到maxElementsInMemory时,Ehcache将会对象写到磁盘中。 diskSpoolBufferSizeMB:这个参数设置DiskStore(磁盘缓存)的缓存区大小。默认是30MB。每个Cache都应该有自己的一个缓冲区。 maxElementsOnDisk:硬盘最大缓存个数。 diskPersistent:是否缓存虚拟机重启期数据 Whether the disk store persists between restarts of the Virtual Machine. The default value is false. diskExpiryThreadIntervalSeconds:磁盘失效线程运行时间间隔,默认是120秒。 memoryStoreEvictionPolicy:当达到maxElementsInMemory限制时,Ehcache将会根据指定的策略去清理内存。默认策略是LRU(最近最少使用)。你可以设置为FIFO(先进先出)或是LFU(较少使用)。 clearOnFlush:内存数量最大时是否清除。
最后一个:MpCache.老板来个最便宜的,这个就是最便宜的
<!-- 安全管理器 -->
	<bean id="securityManager" class="org.apache.shiro.web.mgt.DefaultWebSecurityManager">
		<property name="realm" ref="myRealm" />
		<property name="CacheManager" ref="shiroSpringCacheManager"></property>
	</bean>

    <bean id = "shiroSpringCacheManager" class="org.apache.shiro.cache.MemoryConstrainedCacheManager"/>
搞定收工。
8.会话管理
我只想让我的session存在指定的时间。
创建会话管理并注入安全管理器。
	<!-- 安全管理器 -->
	<bean id="securityManager" class="org.apache.shiro.web.mgt.DefaultWebSecurityManager">
		<property name="realm" ref="myRealm" />
		<property name="CacheManager" ref="shiroSpringCacheManager"></property>
		<property name="sessionManager" ref="sessionManager"></property>
	</bean>


     <!-- 会话管理器 -->
    <bean id="sessionManager" class="org.apache.shiro.web.session.mgt.DefaultWebSessionManager">
        <!-- session的失效时长,单位毫秒 -->
        <property name="globalSessionTimeout" value="600000"/>
        <!-- 删除失效的session -->
        <property name="deleteInvalidSessions" value="true"/>
    </bean>