私服nexus使用
下载地址
nexus3:https://sonatype-download.global.ssl.fastly.net/repository/repositoryManager/3/nexus-3.13.0-01-unix.tar.gz
nexus2:https://sonatype-download.global.ssl.fastly.net/repository/repositoryManager/oss/nexus-2.14.10-01-bundle.tar.gz
- 从私服下载jar包全局配置
修改maven的settings.xml文件
添加一下代码
<!--不采用私服 使用阿里云镜像-->
	<mirror>
      <id>alimaven</id>
      <name>aliyun maven</name>
      <url>http://maven.aliyun.com/nexus/content/groups/public/</url>
      <mirrorOf>central</mirrorOf>
    </mirror>


<!--采用私服镜像-->
	<mirror>
      <id>nexus</id>
      <!--此处配置所有的构建均从私有仓库中下载 *代表所有,也可以写central -->
      <mirrorOf>*</mirrorOf>
      <name>nexus</name>
      <!--私服的公共仓库地址-->
      <url>http://192.168.65.200:8081/nexus/content/groups/public/</url>
    </mirror>

<!--公共仓库和插件仓库-->
	<profile>
		 <id>nexus</id>
		 <repositories>
			 <repository>
				 <id>nexus</id>
				 <url>http://192.168.65.200:8081/nexus/content/groups/public/</url>
				 <releases><enabled>true</enabled></releases>
			 	 <snapshots><enabled>true</enabled></snapshots>
			 </repository>
		 </repositories>
		 <pluginRepositories>
			 <pluginRepository>
				 <id>nexus</id>
				 <url>http://192.168.65.200:8081/nexus/content/groups/public/</url>
				 <releases><enabled>true</enabled></releases>
				 <snapshots><enabled>true</enabled></snapshots>
			 </pluginRepository>
		 </pluginRepositories>
	 </profile>
	 <!--激活 根据id-->
	<activeProfiles>
		<activeProfile>nexus</activeProfile>
   </activeProfiles>
- 从私服下载jar包局部配置
在pom文件中添加一下代码
	<repositories>
        <repository>
            <id>nexus</id>
            <url>http://192.168.65.200:8081/nexus/content/groups/public/</url>
            <releases>
                <enabled>true</enabled>
            </releases>
            <snapshots>
                <enabled>true</enabled>
            </snapshots>
        </repository>
    </repositories>
    <pluginRepositories>
        <pluginRepository>
            <id>nexus</id>
            <url>http://192.168.65.200:8081/nexus/content/groups/public/</url>
            <releases>
                <enabled>true</enabled>
            </releases>
            <snapshots>
                <enabled>true</enabled>
            </snapshots>
        </pluginRepository>
    </pluginRepositories>
- 上传jar包到私服
<!--配置上传到私服-->
    <distributionManagement>
        <repository>
            <!--上传到私服的仓库ID-->
            <id>department-hyp</id>
            <!--上传到私服的仓库名称-->
            <name>department-hyp</name>
            <url>http://192.168.65.200:8081/nexus/content/repositories/department-hyp/</url>
        </repository>
    </distributionManagement>
jar包上传到department-hyp仓库需要有department-hyp的权限
-
添加权限privileges
-
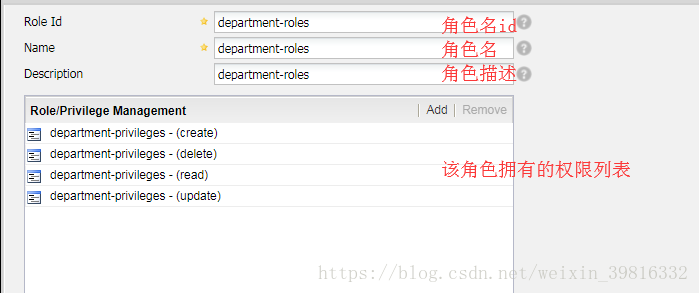
添加角色并且该角色赋权
-
创建用户并且指定该用户是什么角色

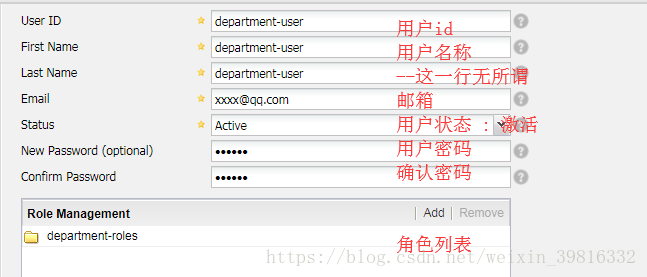
把创建好的用户配置在maven的settings.xml文件中
	<server>
		<!--这个id是私服仓库的id-->
 		<id>department-hyp</id>
 		<!--作用在该私服仓库用户名和密码-->
		<username>department-user</username>
		<password>123456</password>
	</server>
结束