首先pom.xml文件,spring boot、springcloud版本很麻烦,容易出问题
<?xml version="1.0" encoding="UTF-8"?>
<project xmlns="http://maven.apache.org/POM/4.0.0" xmlns:xsi="http://www.w3.org/2001/XMLSchema-instance"
    xsi:schemaLocation="http://maven.apache.org/POM/4.0.0 http://maven.apache.org/xsd/maven-4.0.0.xsd">
    <modelVersion>4.0.0</modelVersion>

    <groupId>com.xing</groupId>
    <artifactId>springboot-user</artifactId>
    <version>0.0.1-SNAPSHOT</version>
    <packaging>war</packaging>

    <name>springboot-user</name>
    <description>Demo project for Spring Boot</description>

    <parent>
        <groupId>org.springframework.boot</groupId>
        <artifactId>spring-boot-starter-parent</artifactId>
        <version>1.4.0.RELEASE</version>
        <relativePath/> <!-- lookup parent from repository -->
    </parent>

    <properties>
        <project.build.sourceEncoding>UTF-8</project.build.sourceEncoding>
        <project.reporting.outputEncoding>UTF-8</project.reporting.outputEncoding>
        <java.version>1.8</java.version>
    </properties>

    <dependencyManagement>
        <dependencies>
            <dependency>
                <groupId>org.springframework.cloud</groupId>
                <artifactId>spring-cloud-dependencies</artifactId>
                 <version>Camden.SR3</version><!--Edgware.SR4  Finchley.RELEASE -->
                <type>pom</type>
                <scope>import</scope>
            </dependency>
        </dependencies>
    </dependencyManagement>
<!--     <dependencyManagement> -->
<!--         <dependencies> -->
<!--             <dependency> -->
<!--                 <groupId>org.springframework.cloud</groupId> -->
<!--                 <artifactId>spring-cloud-starter-parent</artifactId> -->
<!--                 <version>Edgware.SR2</version> -->
<!--                 <type>pom</type> -->
<!--                 <scope>import</scope> -->
<!--             </dependency> -->
<!--         </dependencies> -->
<!--     </dependencyManagement> -->

    <dependencies>
        <dependency>
            <groupId>org.springframework.boot</groupId>
            <artifactId>spring-boot-starter-web</artifactId>
        </dependency>

        <dependency>
            <groupId>mysql</groupId>
            <artifactId>mysql-connector-java</artifactId>
            <scope>runtime</scope>
        </dependency>
        <dependency>
            <groupId>org.springframework.boot</groupId>
            <artifactId>spring-boot-starter-test</artifactId>
        </dependency>
        <dependency>
            <groupId>org.mybatis.spring.boot</groupId>
            <artifactId>mybatis-spring-boot-starter</artifactId>
            <version>1.3.2</version>
        </dependency>
        <dependency>
            <groupId>org.apache.commons</groupId>
            <artifactId>commons-lang3</artifactId>
            <version>3.1</version>
        </dependency>
        <dependency>
            <groupId>com.fasterxml.jackson.core</groupId>
            <artifactId>jackson-core</artifactId>
        </dependency>
        <dependency>
            <groupId>com.fasterxml.jackson.core</groupId>
            <artifactId>jackson-databind</artifactId>
        </dependency>
        <dependency>
            <groupId>com.fasterxml.jackson.datatype</groupId>
            <artifactId>jackson-datatype-joda</artifactId>
        </dependency>
        <dependency>
            <groupId>com.fasterxml.jackson.module</groupId>
            <artifactId>jackson-module-parameter-names</artifactId>
        </dependency>
        <!-- 分页插件 -->
        <dependency>
            <groupId>com.github.pagehelper</groupId>
            <artifactId>pagehelper-spring-boot-starter</artifactId>
            <version>1.2.5</version>
        </dependency>
        <!-- alibaba的druid数据库连接池 -->
        <dependency>
            <groupId>com.alibaba</groupId>
            <artifactId>druid-spring-boot-starter</artifactId>
            <version>1.1.9</version>
        </dependency>
        <!-- Swagger2的   -->
        <dependency>
            <groupId>io.springfox</groupId>
            <artifactId>springfox-swagger2</artifactId>
            <version>2.8.0</version>
        </dependency>
        <dependency>
            <groupId>io.springfox</groupId>
            <artifactId>springfox-swagger-ui</artifactId>
            <version>2.8.0</version>
        </dependency>
        <!--添加fastjson依赖-->
        <dependency>
            <groupId>com.alibaba</groupId>
            <artifactId>fastjson</artifactId>
            <version>1.2.7</version>
        </dependency>
        <!-- 热部署 -->
<!--         <dependency> -->
<!--             <groupId>org.springframework.boot</groupId> -->
<!--             <artifactId>spring-boot-devtools</artifactId> -->
<!--             <optional>true</optional> -->
<!--         </dependency> -->
        <!-- eureka依赖 -->
        <dependency>
            <groupId>org.springframework.cloud</groupId>
            <artifactId>spring-cloud-starter-eureka-server</artifactId>
        </dependency>
        <!-- 用于注册中心账号登录 -->
<!--         <dependency> -->
<!--             <groupId>org.springframework.boot</groupId> -->
<!--             <artifactId>spring-boot-starter-security</artifactId> -->
<!--         </dependency> -->
    </dependencies>

    <build>
        <plugins>
            <plugin>
                <groupId>org.springframework.boot</groupId>
                <artifactId>spring-boot-maven-plugin</artifactId>
                <!-- 热部署配置  -->
<!--                 <configuration> -->
<!--                     <fork>true</fork> -->
<!--                 </configuration> -->
            </plugin>
            <!-- mybatis generator 自动生成代码插件 -->
<!--             <plugin> -->
<!--                 <groupId>org.mybatis.generator</groupId> -->
<!--                 <artifactId>mybatis-generator-maven-plugin</artifactId> -->
<!--                 <version>1.3.2</version> -->
<!--                 <configuration> -->
<!--                     <configurationFile>${basedir}/src/main/resources/generator/generatorConfig.xml</configurationFile> -->
<!--                     <overwrite>true</overwrite> -->
<!--                     <verbose>true</verbose> -->
<!--                 </configuration> -->
<!--             </plugin> -->

        </plugins>
    </build>
    <!-- 配置多个实例  -->
    <profiles>
        <profile>
            <id>first</id>
            <activation>
                <!--  默认激活 -->
                <activeByDefault>true</activeByDefault>
            </activation>
            <properties>
                <spring.profiles.active>first</spring.profiles.active>
            </properties>
        </profile>
        <profile>
            <id>second</id>
            <properties>
                <spring.profiles.active>second</spring.profiles.active>
            </properties>
        </profile>
    </profiles>

</project>
此处为了实现负载均衡,所以采用多实例运行在不同端口模拟集群的方式。所以配置多个yml文件(eclipse需配置多个yml,IDEA不需要,IDEA可以动态传入参数,多端口启动)
application.yml如下:
spring:
  profiles:
    active: first
application-first.yml如下:
server:
  port: 8070


spring:
    application:
      name: xing-user #指定服务名
    datasource:
        name: test
        type: com.alibaba.druid.pool.DruidDataSource
        #druid相关配置
        druid:
          #监控统计拦截的filters
          filters: stat
          driver-class-name: com.mysql.jdbc.Driver
          #基本属性
          url: jdbc:mysql://192.168.***.***:3306/test?useUnicode=true&characterEncoding=UTF-8&allowMultiQueries=true
          username: root
          password: root
          #配置初始化大小/最小/最大
          initial-size: 1
          min-idle: 1
          max-active: 20
          #获取连接等待超时时间
          max-wait: 60000
          #间隔多久进行一次检测,检测需要关闭的空闲连接
          time-between-eviction-runs-millis: 60000
          #一个连接在池中最小生存的时间
          min-evictable-idle-time-millis: 300000
          validation-query: SELECT 'x'
          test-while-idle: true
          test-on-borrow: false
          test-on-return: false
          #打开PSCache,并指定每个连接上PSCache的大小。oracle设为true,mysql设为false。分库分表较多推荐设置为false
          pool-prepared-statements: false
          max-pool-prepared-statement-per-connection-size: 20

eureka:
  client:
    registerWithEureka: true #是否将自己注册到Eureka服务中,默认为true
    fetchRegistry:  true  #是否从Eureka中获取注册信息,默认为true
    serviceUrl: #Eureka客户端与Eureka服务端进行交互的地址
      defaultZone: http://xing-eurekaServer:8090/eureka/
    eurekaServerConnectTimeoutSeconds: 60
    eurekaServerReadTimeoutSeconds: 60
  instance:
    prefer-ip-address: true  #将自己的ip地址注册到Eureka服务中
    ip-address: 127.0.0.1
    instance-id: xing-user:8070 #指定实例id
    lease-expiration-duration-in-seconds: 30 #续约更新时间间隔(默认30秒)
    lease-renewal-interval-in-seconds: 10 # 续约到期时间(默认90秒)
    leaseRenewalIntervalInSeconds: 10 #心跳时间
    hostname: xing-user


## 该配置节点为独立的节点,有很多同学容易将这个配置放在spring的节点下,导致配置无法被识别
#mybatis:
#  mapper-locations: classpath:mapper/*.xml  #注意:一定要对应mapper映射xml文件的所在路径
#  type-aliases-package: com.winterchen.model  # 注意:对应实体类的路径

#pagehelper
pagehelper:
    helperDialect: mysql
    reasonable: true
    supportMethodsArguments: true
    params: count=countSql
    returnPageInfo: check
application-second.yml 如下:
server:
  port: 8071


spring:
    application:
      name: xing-user #指定服务名
    datasource:
        name: test
        type: com.alibaba.druid.pool.DruidDataSource
        #druid相关配置
        druid:
          #监控统计拦截的filters
          filters: stat
          driver-class-name: com.mysql.jdbc.Driver
          #基本属性
          url: jdbc:mysql://192.168.254.128:3306/test?useUnicode=true&characterEncoding=UTF-8&allowMultiQueries=true
          username: root
          password: root
          #配置初始化大小/最小/最大
          initial-size: 1
          min-idle: 1
          max-active: 20
          #获取连接等待超时时间
          max-wait: 60000
          #间隔多久进行一次检测,检测需要关闭的空闲连接
          time-between-eviction-runs-millis: 60000
          #一个连接在池中最小生存的时间
          min-evictable-idle-time-millis: 300000
          validation-query: SELECT 'x'
          test-while-idle: true
          test-on-borrow: false
          test-on-return: false
          #打开PSCache,并指定每个连接上PSCache的大小。oracle设为true,mysql设为false。分库分表较多推荐设置为false
          pool-prepared-statements: false
          max-pool-prepared-statement-per-connection-size: 20

eureka:
  client:
    registerWithEureka: true #是否将自己注册到Eureka服务中,默认为true
    fetchRegistry:  true  #是否从Eureka中获取注册信息,默认为true
    serviceUrl: #Eureka客户端与Eureka服务端进行交互的地址
      defaultZone: http://xing-eurekaServer:8091/eureka/
    eurekaServerConnectTimeoutSeconds: 60
    eurekaServerReadTimeoutSeconds: 60
  instance:
    prefer-ip-address:  true  #将自己的ip地址注册到Eureka服务中
    ip-address: 127.0.0.1
    instance-id: xing-user:8071 #指定实例id
    lease-expiration-duration-in-seconds: 30 #续约更新时间间隔(默认30秒)
    lease-renewal-interval-in-seconds: 10 # 续约到期时间(默认90秒)
    leaseRenewalIntervalInSeconds: 10 #心跳时间
    hostname: xing-user
## 该配置节点为独立的节点,有很多同学容易将这个配置放在spring的节点下,导致配置无法被识别
#mybatis:
#  mapper-locations: classpath:mapper/*.xml  #注意:一定要对应mapper映射xml文件的所在路径
#  type-aliases-package: com.winterchen.model  # 注意:对应实体类的路径

#pagehelper
pagehelper:
    helperDialect: mysql
    reasonable: true
    supportMethodsArguments: true
    params: count=countSql
    returnPageInfo: check
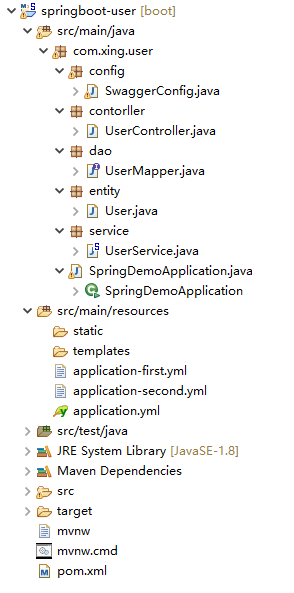
先整体看一下项目结构:
先创建一个实体类user.java:
 U
U

package com.xing.user.entity;

import java.io.Serializable;

public class User implements Serializable{
    // @Fields serialVersionUID : TODO
    private static final long serialVersionUID = 1L;
    private int id;
    private String name;
    private String nameEn;
    private int age;
    public int getId() {
        return id;
    }
    public void setId(int id) {
        this.id = id;
    }
    public String getName() {
        return name;
    }
    public void setName(String name) {
        this.name = name;
    }
    public String getNameEn() {
        return nameEn;
    }
    public void setNameEn(String nameEn) {
        this.nameEn = nameEn;
    }
    public int getAge() {
        return age;
    }
    public void setAge(int age) {
        this.age = age;
    }
    @Override
    public String toString() {
        return "User [id=" + id + ", name=" + name + ", nameEn=" + nameEn + ", age=" + age + "]";
    }
    public User(String name, String nameEn, int age) {
        super();
        this.name = name;
        this.nameEn = nameEn;
        this.age = age;
    }
    public User() {
        super();
    }

}
创建mapper,我这里直接使用注解方式,没有使用xml方式
package com.xing.user.dao;

import org.apache.ibatis.annotations.Insert;
import org.apache.ibatis.annotations.Mapper;
import org.apache.ibatis.annotations.Param;
import org.apache.ibatis.annotations.Select;

import com.xing.user.entity.User;

@Mapper
public interface UserMapper {
     //这里的表名区分大小写
     @Select("SELECT * FROM user WHERE NAME = #{name}")
     User selectByName(@Param("name") String name);

     @Insert("insert into user (name,nameEn,age) value (#{name},#{nameEn},#{age})")
     int insertUser(@Param("name") String name ,@Param("nameEn") String nameEn ,@Param("age") int age);

}
创建service
package com.xing.user.service;


import org.springframework.beans.factory.annotation.Autowired;
import org.springframework.stereotype.Service;
import org.springframework.transaction.annotation.Transactional;

import com.xing.user.dao.UserMapper;
import com.xing.user.entity.User;

@Service
public class UserService {

    @Autowired
    private UserMapper userMapper;

    @Transactional
    public User findByName(String name) {
        return userMapper.selectByName(name);
    }
}
创建controller
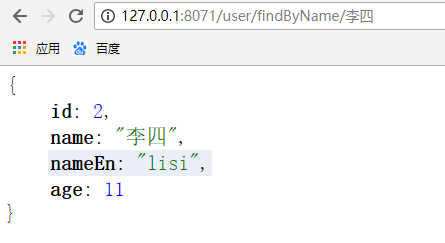
package com.xing.user.contorller;

import org.springframework.beans.factory.annotation.Autowired;
import org.springframework.web.bind.annotation.GetMapping;
import org.springframework.web.bind.annotation.PathVariable;
import org.springframework.web.bind.annotation.RequestMapping;
import org.springframework.web.bind.annotation.RestController;
import org.springframework.http.MediaType;
import com.xing.user.entity.User;
import com.xing.user.service.UserService;
import io.swagger.annotations.Api;
import io.swagger.annotations.ApiImplicitParam;
import io.swagger.annotations.ApiOperation;
import io.swagger.annotations.ApiResponse;
import io.swagger.annotations.ApiResponses;

@RestController
@Api(tags="用户接口", produces = MediaType.APPLICATION_JSON_VALUE)
@RequestMapping("/user")
public class UserController {

    @Autowired
    private UserService userService;

    @ApiOperation(value = "查询用户", notes = "查询用户")//方法说明
//    @ApiResponses({ @ApiResponse(code = CommonStatus.OK, message = "操作成功"),
//        @ApiResponse(code = CommonStatus.EXCEPTION, message = "服务器内部异常"),
//        @ApiResponse(code = CommonStatus.FORBIDDEN, message = "权限不足") })
    @ApiResponses(value = {@ApiResponse(code = 200, message = "成功", response = User.class)})//响应数据说明,可以有多个
    @ApiImplicitParam(name = "name", value = "用户名", paramType = "path", required = true, dataType = "String")
    //produces = { "application/json;charset=UTF-8" } 这段代码是因为集成了EurekaServer,又需要jackson-dataformat-xml这个依赖,如果不设置这段代码,会返回xml格式,而不是json
    @GetMapping(value = "/findByName/{name}",produces = { "application/json;charset=UTF-8" })
    public User findByName(@PathVariable String name) {
        System.out.println("----------------------------"+name);
        return userService.findByName(name);
    }
}
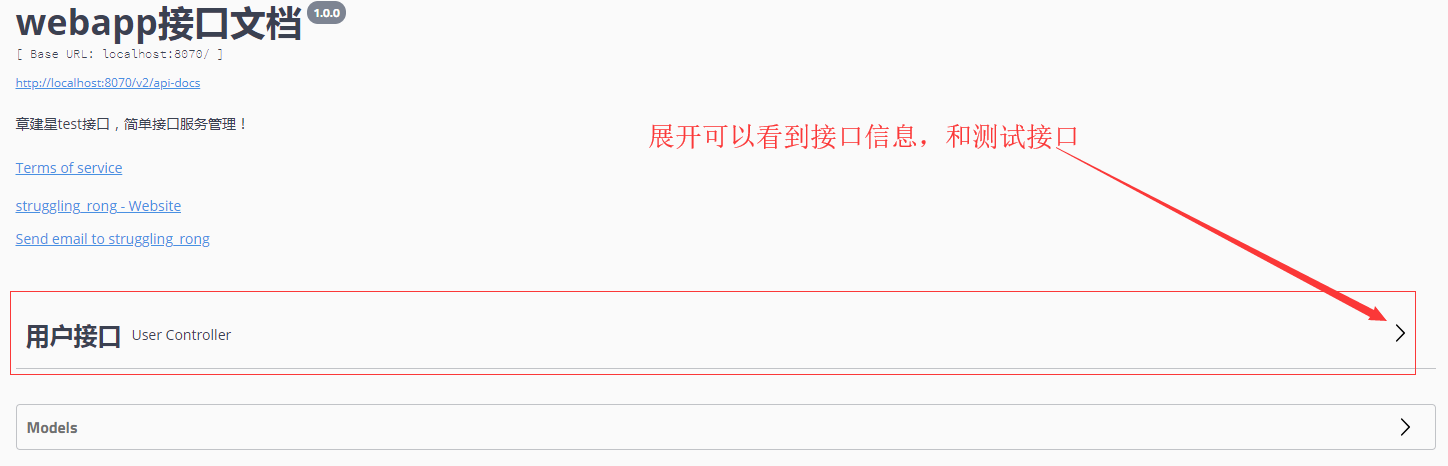
增加SwaggerConfig,使用 swagger2管理RestFul API配置swagger2
package com.xing.user.config;

import org.springframework.context.annotation.Bean;
import org.springframework.context.annotation.Configuration;
import org.springframework.web.context.request.async.DeferredResult;

import com.google.common.base.Predicate;
import com.google.common.base.Predicates;

import io.swagger.annotations.ApiOperation;
import springfox.documentation.builders.ApiInfoBuilder;
import springfox.documentation.builders.PathSelectors;
import springfox.documentation.builders.RequestHandlerSelectors;
import springfox.documentation.service.ApiInfo;
import springfox.documentation.service.Contact;
import springfox.documentation.spi.DocumentationType;
import springfox.documentation.spring.web.plugins.Docket;
import springfox.documentation.swagger2.annotations.EnableSwagger2;

/**
 */
@Configuration
@EnableSwagger2
public class SwaggerConfig {
    @Bean
    public Docket createRestApi() {
        return new Docket(DocumentationType.SWAGGER_2)
                .apiInfo(apiInfo())
                .enableUrlTemplating(true)
                .select()
                // 扫描所有有注解的api,用这种方式更灵活
                .apis(RequestHandlerSelectors.withMethodAnnotation(ApiOperation.class))
                .paths(PathSelectors.any())
                .build();
    }

    private ApiInfo apiInfo() {
        return new ApiInfoBuilder()
                .title("webapp接口文档")
                .description("章建星test接口,简单接口服务管理!")
                .termsOfServiceUrl("https://www.baidu.com")
                .contact(new Contact("struggling_rong", "https://www.baidu.com", "[email protected]"))
                .version("1.0.0")
                .build();
    }
}
配置好swagger可以看到swagger2的页面如下:
去eureka界面查看服务已经注册成功

服务也能正常工作,致此,简单的一个一个服务注册和管理就完成了