Tensorflow
简介
TensorFlow是谷歌基于DistBelief进行研发的第二代人工智能学习系统,其命名来源于本身的运行原理。Tensor(张量)意味着N维数组,Flow(流)意味着基于数据流图的计算,TensorFlow为张量从流图的一端流动到另一端计算过程。TensorFlow是将复杂的数据结构传输至人工智能神经网中进行分析和处理过程的系统。
TensorFlow可被用于语音识别或图像识别等多项机器深度学习领域,对2011年开发的深度学习基础架构DistBelief进行了各方面的改进,它可在小到一部智能手机、大到数千台数据中心服务器的各种设备上运行。TensorFlow将完全开源,任何人都可以用。
MNIST手写数据集入门
数据下载数据http://yann.lecun.com/exdb/mnist/
其中mnist_softmax.py脚本: MNIST机器学习入门
Tensorflow依赖于一个高效的C++后端来进行计算。与后端的这个连接叫做session。一般而言,使用TensorFlow程序的流程是先创建一个图,然后在session中启动它。
# Import data
#from tensorflow.examples.tutorials.mnist import input_data
import input_data
import tensorflow as tf
mnist = input_data.read_data_sets(“Mnist_data/”, one_hot=True)
sess = tf.InteractiveSession()
# Create the model
W = tf.Variable(tf.zeros([784, 10])) # placeholder是个占位符
b = tf.Variable(tf.zeros([10]))
y = tf.nn.softmax(tf.matmul(x, W) + b)
# Define loss and optimizer
y_ = tf.placeholder(tf.float32, [None, 10])
cross_entropy = -tf.reduce_sum(y_ * tf.log(y))
train_step = tf.train.GradientDescentOptimizer(0.01).minimize(cross_entropy)
# Train
tf.initialize_all_variables().run()
for i in range(1000):
batch_xs, batch_ys = mnist.train.next_batch(100)
train_step.run({x: batch_xs, y_: batch_ys})
# Test trained model
correct_prediction = tf.equal(tf.argmax(y, 1), tf.argmax(y_, 1))
accuracy = tf.reduce_mean(tf.cast(correct_prediction, tf.float32))
print(accuracy.eval({x: mnist.test.images, y_: mnist.test.labels}))
accuracy.eval()时,会触发Tensorflow执行计算图,从而获取output计算结点的结果。
TensorBoard
TensorBoard可以将训练过程中的各种绘制数据展示出来,包括标量(scalars),图片(images),音频(Audio),计算图(graph),数据分布,直方图(histograms)和嵌入式向量。
使用TensorBoard展示数据,需要在执行Tensorflow就算图的过程中,将各种类型的数据汇总并记录到日志文件中。然后使用TensorBoard读取这些日志文件,解析数据并生产数据可视化的Web页面,让我们可以在浏览器中观察各种汇总数据。
mnist_with_summaries.py主要提供了一种在Tensorboard可视化方法,首先,编译运行代码:
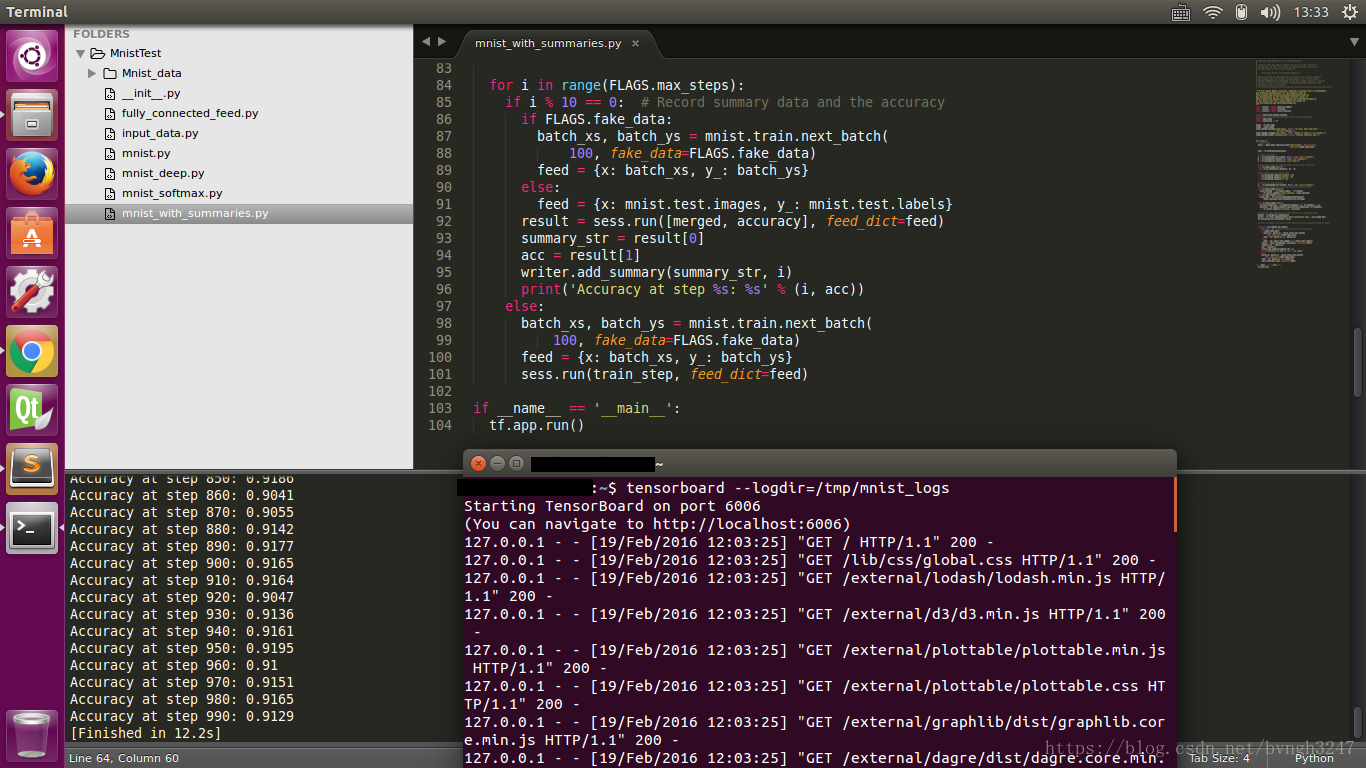
运行完毕后,打开终端Terminal,使用sh窗口输入
tensorboard
–logdir=\~/tensorflow_demo/mnist_run/mnist_logs(与文件中输出路径一径)
终端中就会运行显示:Starting TensorBoard on port 6006 (You can navigate to
http://localhost:6006),如果
如果使用sh窗口的话,那么就需要在vnc中打开浏览器,输入 http://127.0.1.1:6006
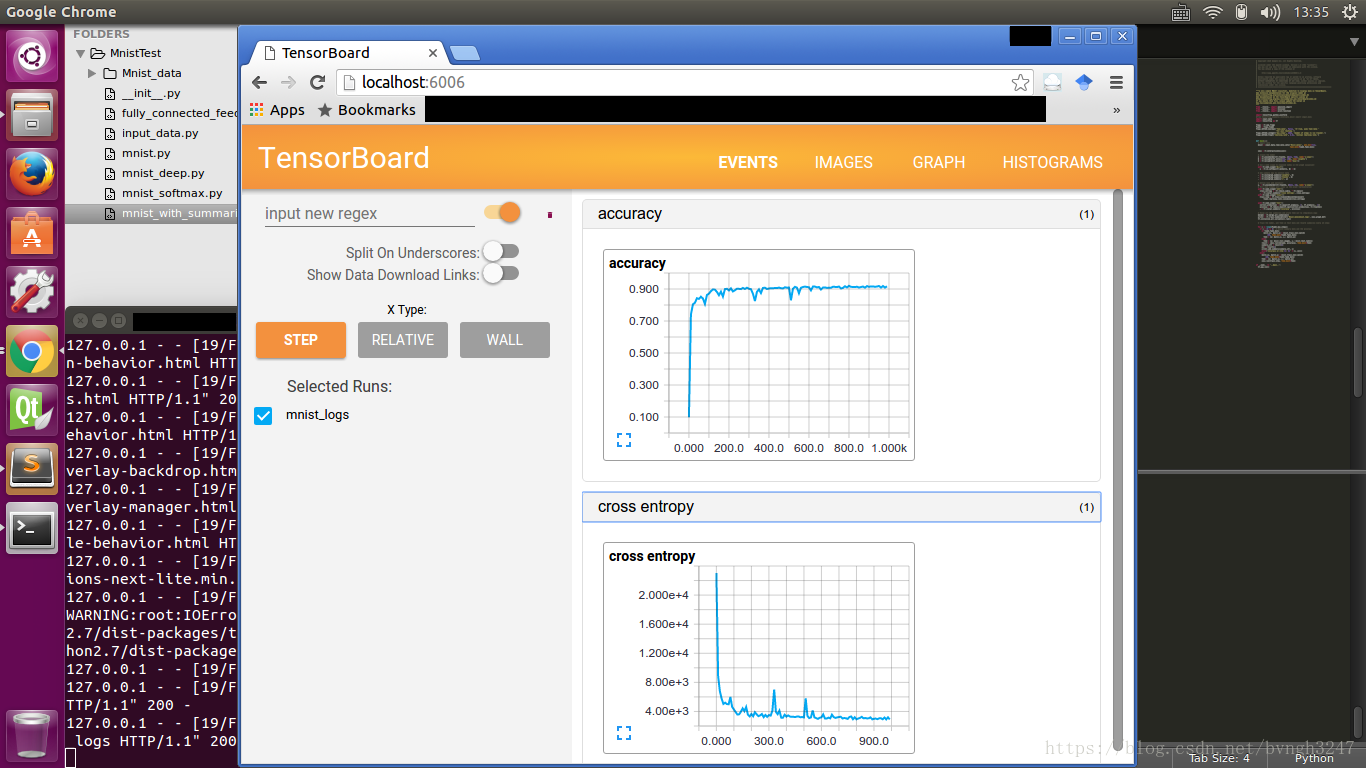
其中,有一些选项,例如菜单栏里包括EVENTS, IMAGES, GRAPH,
HISTOGRAMS,都可以一一点开查看\~
训练一个神经网络,能让她认得我
如果你自己有照片,但前提是你的照片足够多。这次用到的照片数是10000张,如果照片不够多,那么就多复制几次。
另外需要下载cifar10数据库。
程序中使用的是dlib来识别人脸部分,Dlib是一个机器学习的C++库,包含了许多机器学习常用的算法。
提取自己图像人脸
#coding: utf-8
import sys
import os
import cv2
import dlib
input_dir = ‘./input_img’
output_dir = ‘./other_faces’
size = 64
if not os.path.exists(output_dir):
os.makedirs(output_dir)
#使用dlib自带的frontal_face_detector作为我们的特征提取器
detector = dlib.get_frontal_face_detector()
index = 1
for (path, dirnames, filenames) in os.walk(input_dir):
print(path)
#print(dirnames)
for filename in filenames:
if filename.endswith(‘.jpg’):
print(‘Being processed picture %s’ % index)
img_path = path+’/’+filename
print(filenames)
# 从文件读取图片
img = cv2.imread(img_path)
print(img_path)
# 转为灰度图片
gray_img = cv2.cvtColor(img, cv2.COLOR_BGR2GRAY)
# 使用detector进行人脸检测 dets为返回的结果
dets = detector(gray_img, 1)
#使用enumerate 函数遍历序列中的元素以及它们的下标
#下标i即为人脸序号
#left:人脸左边距离图片左边界的距离 ;right:人脸右边距离图片左边界的距离
#top:人脸上边距离图片上边界的距离 ;bottom:人脸下边距离图片上边界的距离
for i, d in enumerate(dets):
x1 = d.top() if d.top() > 0 else 0
y1 = d.bottom() if d.bottom() > 0 else 0
x2 = d.left() if d.left() > 0 else 0
y2 = d.right() if d.right() > 0 else 0
# img[y:y+h,x:x+w]
face = img[x1:y1,x2:y2]
# 调整图片的尺寸
face = cv2.resize(face, (size,size))
cv2.imshow(‘image’,face)
# 保存图片
cv2.imwrite(output_dir+’/’+str(index)+’.jpg’, face)
index += 1
key = cv2.waitKey(30) & 0xff
if key == 27:
sys.exit(0)
训练模型
#coding: utf-8
import tensorflow as tf
import cv2
import numpy as np
import os
import random
import sys
from sklearn.model_selection import train_test_split
my_faces_path = ‘./my_faces’
other_faces_path = ‘./other_faces’
size = 64
imgs = []
labs = []
def getPaddingSize(img):
h, w, _ = img.shape
top, bottom, left, right = (0,0,0,0)
longest = max(h, w)
if w \< longest:
tmp = longest - w
# //表示整除符号
left = tmp // 2
right = tmp - left
elif h \< longest:
tmp = longest - h
top = tmp // 2
bottom = tmp - top
else:
pass
return top, bottom, left, right
def readData(path , h=size, w=size):
for filename in os.listdir(path):
if filename.endswith(‘.jpg’):
filename = path + ‘/’ + filename
img = cv2.imread(filename)
top,bottom,left,right = getPaddingSize(img)
# 将图片放大, 扩充图片边缘部分
img = cv2.copyMakeBorder(img, top, bottom, left, right, cv2.BORDER_CONSTANT,
value=[0,0,0])
img = cv2.resize(img, (h, w))
imgs.append(img)
labs.append(path)
readData(my_faces_path)
readData(other_faces_path)
# 将图片数据与标签转换成数组
imgs = np.array(imgs)
labs = np.array([[0,1] if lab == my_faces_path else [1,0] for lab in labs])
# 随机划分测试集与训练集
train_x,test_x,train_y,test_y = train_test_split(imgs, labs, test_size=0.05,
random_state=random.randint(0,100))
# 参数:图片数据的总数,图片的高、宽、通道
train_x = train_x.reshape(train_x.shape[0], size, size, 3)
test_x = test_x.reshape(test_x.shape[0], size, size, 3)
# 将数据转换成小于1的数
train_x = train_x.astype(‘float32’)/255.0
test_x = test_x.astype(‘float32’)/255.0
print(‘train size:%s, test size:%s’ % (len(train_x), len(test_x)))
#print(train_x)
#debug
#sys.exit()
# 图片块,每次取100张图片
batch_size = 100
num_batch = len(train_x) // batch_size
x = tf.placeholder(tf.float32, [None, size, size, 3])
y_ = tf.placeholder(tf.float32, [None, 2])
keep_prob_5 = tf.placeholder(tf.float32)
keep_prob_75 = tf.placeholder(tf.float32)
def weightVariable(shape):
init = tf.random_normal(shape, stddev=0.01)
return tf.Variable(init)
def biasVariable(shape):
init = tf.random_normal(shape)
return tf.Variable(init)
def conv2d(x, W):
return tf.nn.conv2d(x, W, strides=[1,1,1,1], padding=’SAME’)
def maxPool(x):
return tf.nn.max_pool(x, ksize=[1,2,2,1], strides=[1,2,2,1], padding=’SAME’)
def dropout(x, keep):
return tf.nn.dropout(x, keep)
def cnnLayer():
# 第一层
W1 = weightVariable([3,3,3,32]) # 卷积核大小(3,3), 输入通道(3), 输出通道(32)
b1 = biasVariable([32])
# 卷积
conv1 = tf.nn.relu(conv2d(x, W1) + b1)
# 池化
pool1 = maxPool(conv1)
# 减少过拟合,随机让某些权重不更新
drop1 = dropout(pool1, keep_prob_5)
# 第二层
W2 = weightVariable([3,3,32,64])
b2 = biasVariable([64])
conv2 = tf.nn.relu(conv2d(drop1, W2) + b2)
pool2 = maxPool(conv2)
drop2 = dropout(pool2, keep_prob_5)
# 第三层
W3 = weightVariable([3,3,64,64])
b3 = biasVariable([64])
conv3 = tf.nn.relu(conv2d(drop2, W3) + b3)
pool3 = maxPool(conv3)
# 全连接层
Wf = weightVariable([8*8*64, 512])
bf = biasVariable([512])
drop3_flat = tf.reshape(drop3, [-1, 8*8*64])
dense = tf.nn.relu(tf.matmul(drop3_flat, Wf) + bf)
dropf = dropout(dense, keep_prob_75)
# 输出层
Wout = weightVariable([512,2])
bout = weightVariable([2])
#out = tf.matmul(dropf, Wout) + bout
out = tf.add(tf.matmul(dropf, Wout), bout)
return out
def cnnTrain():
out = cnnLayer()
cross_entropy =
tf.reduce_mean(tf.nn.softmax_cross_entropy_with_logits(logits=out, labels=y_))
train_step = tf.train.AdamOptimizer(0.01).minimize(cross_entropy)
# 比较标签是否相等,再求的所有数的平均值,tf.cast(强制转换类型)
accuracy = tf.reduce_mean(tf.cast(tf.equal(tf.argmax(out, 1), tf.argmax(y_, 1)),
tf.float32))
# 将loss与accuracy保存以供tensorboard使用
tf.summary.scalar(‘loss’, cross_entropy)
tf.summary.scalar(‘accuracy’, accuracy)
merged_summary_op = tf.summary.merge_all()
# 数据保存器的初始化
saver = tf.train.Saver()
with tf.Session() as sess:
sess.run(tf.global_variables_initializer())
summary_writer = tf.summary.FileWriter(‘./tmp’, graph=tf.get_default_graph())
for n in range(10):
# 每次取128(batch_size)张图片
for i in range(num_batch):
batch_x = train_x[i*batch_size : (i+1)*batch_size]
batch_y = train_y[i*batch_size : (i+1)*batch_size]
# 开始训练数据,同时训练三个变量,返回三个数据
_,loss,summary = sess.run([train_step, cross_entropy, merged_summary_op],
feed_dict={x:batch_x,y_:batch_y, keep_prob_5:0.5,keep_prob_75:0.75})
summary_writer.add_summary(summary, n*num_batch+i)
# 打印损失
print(n*num_batch+i, loss)
#print(“=========================”)
if (n*num_batch+i) % 100 == 0:
# 获取测试数据的准确率
acc = accuracy.eval({x:test_x, y_:test_y, keep_prob_5:1.0, keep_prob_75:1.0})
print(“======acc”)
print(n*num_batch+i, acc)
# 准确率大于0.98时保存并退出
if acc > 0.98 and n > 2:
saver.save(sess, ‘./train_faces.model’, global_step=n*num_batch+i)
sys.exit(0)
sys.exit(0)
print(‘accuracy less 0.98, exited!’)
cnnTrain()
使用模型识别
output = cnnLayer()
predict = tf.argmax(output, 1)
saver = tf.train.Saver()
sess = tf.Session()
saver.restore(sess, tf.train.latest_checkpoint(‘.’))
#sess = tf_debug.LocalCLIDebugWrapperSession(sess)
def is_my_face(image):
res = sess.run(predict, feed_dict={x: [image/255.0], keep_prob_5:1.0,
keep_prob_75: 1.0})