Android系统中,默认提供三种字体: sans , serif , monospace
如果设置字体为系统字体之一,在XML中,直接设置字体格式:
1、sans
<TextView
          Android:id="@+id/sans"
          Android:text="sans"
          Android:textSize="10sp"
          Android:typeface="sans" />
<TextView
          Android:id="@+id/monospace"
          Android:text="monospace"
          Android:textSize="10sp"
          Android:typeface="monospace" />
3、serif
<TextView
          Android:id="@+id/serif"
          Android:text="serif"
          Android:textSize="10sp"
          Android:typeface="serif" />
使用自定义字体
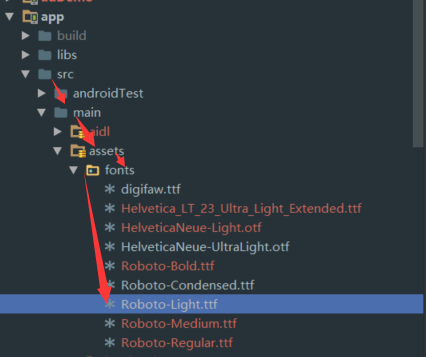
首先要引入自定义的字体文件,例如引入Roboto-Light字体,将Roboto-Light.ttf放入assets\fonts\目录下
在XML布局中,不做任何修改:
<TextView
            Android:id="@+id/textview "
            Android:text="custom"
            Android:textSize="10sp" />
得到TextView对象
TextView textView =(TextView)findViewById(R.id.textview);Typeface typeFace =Typeface.createFromAsset(getAssets(),"fonts/Roboto-Light.ttf");textView.setTypeface(typeFace);简单的三步,搞定。
2、上面是针对部分字体修改,但有时设计为了App的整体美观或者App产品本身的定位,绝大部分甚至所有字体,都需要使用自定义的字体。
如果再使用上面的方法逐一修改,对开发者来说无异于噩耗,而且,这种毫无意义的重复劳动,也不符合我们能懒就懒得程序员风格
那就想点省事的方法吧:
(1)、获取系统字体,并替换
public final class FontsOverride {

    public static void setDefaultFont(Context context,
            String staticTypefaceFieldName, String fontAssetName) {
        final Typeface regular = Typeface.createFromAsset(context.getAssets(),
                fontAssetName);
        replaceFont(staticTypefaceFieldName, regular);
    }

    protected static void replaceFont(String staticTypefaceFieldName,
            final Typeface newTypeface) {
        try {
            final Field staticField = Typeface.class
                    .getDeclaredField(staticTypefaceFieldName);
            staticField.setAccessible(true);
            staticField.set(null, newTypeface);
        } catch (NoSuchFieldException e) {
            e.printStackTrace();
        } catch (IllegalAccessException e) {
            e.printStackTrace();
        }
public final class App extends Application {
    @Override
    public void onCreate() {
        super.onCreate();
        FontsOverride.setDefaultFont(this, "DEFAULT", "Roboto-Light.ttf");
    }
}
(2)、上面是全局替换,但更多时候开发中只需要替换一部分,甚至有时想在XML中设置字体:
自定义CustomTextView对象
public class CustomTextView extends TextView {

public CustomTextView(Context context, AttributeSet attrs, int defStyle) {
    super(context, attrs, defStyle);
    init();
}

public CustomTextView(Context context, AttributeSet attrs) {
    super(context, attrs);
    init();
}

public CustomTextView(Context context) {
    super(context);
    init();
}

private void init() {
    if (!isInEditMode()) {
        Typeface tf = Typeface.createFromAsset(getContext().getAssets(), "Roboto-Light.ttf");
        setTypeface(tf);
    }
}
XML中使用自定义的CustomTextView
<com.packagename.CustomTextView
                    android:id="@+id/custom"
                    android:layout_width="match_parent"
                    android:layout_height="wrap_content"
                    android:text="Custom TextView"
                    android:textappearance="?android:attr/textAppearanceLarge"/>
如果使用自定义字体,则根据具体需求,选择对应的方法
原文地址