组件的出现就是为了解决页面布局等等一些列的问题。
vue中的组件分为两种,全局组件和局部组件。
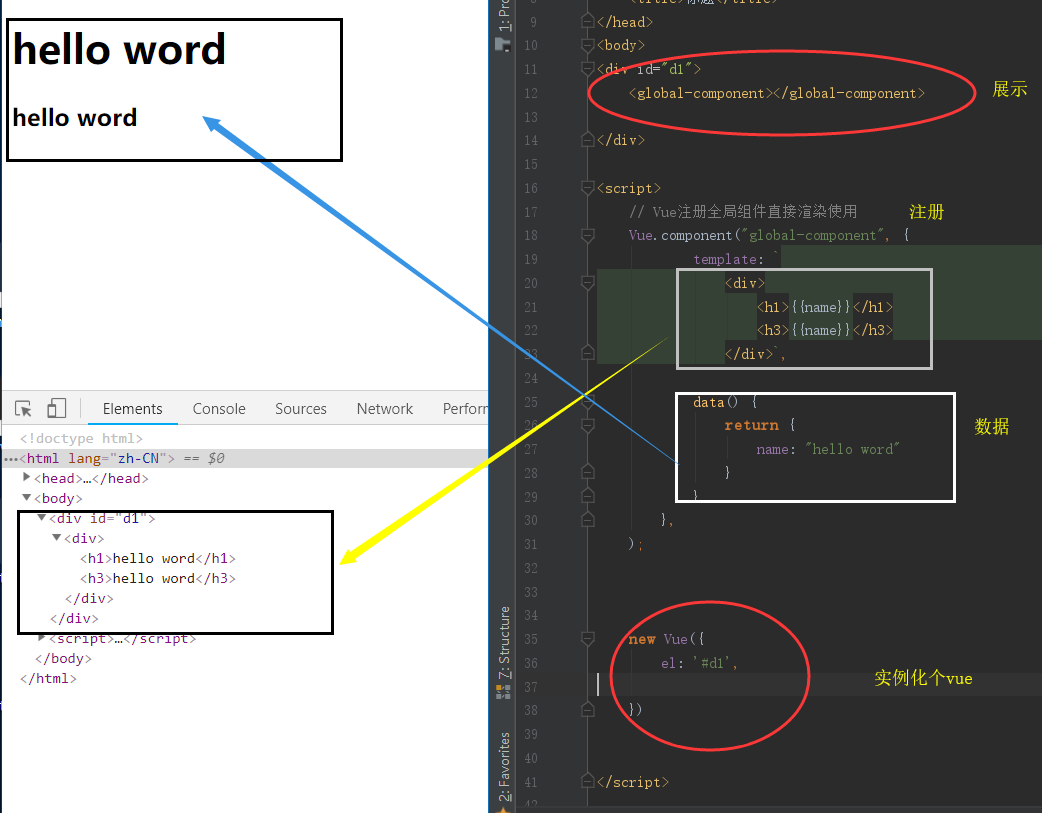
一 、 注册全局组件
通过Vue.component()创建一个全局组件之后,我们可以在一个通过 new Vue 创建的 Vue 根实例中,把这个组件作为自定义元素来使用。


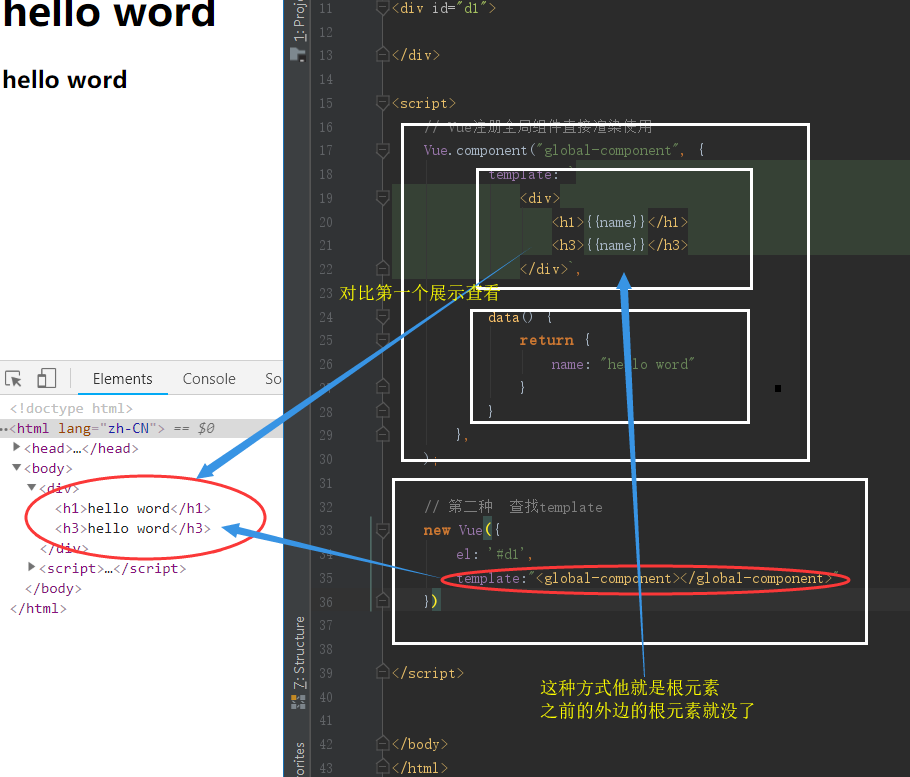
<script>
    // Vue注册全局组件直接渲染使用
    Vue.component("global-component", {
            template: `
                <div>
                    <h1>{{name}}</h1>
                    <h3>{{name}}</h3>
                </div>`,

            data() {
                return {
                    name: "hello word"
                }
            }
        },
    );

    // 第二种  查找template
    new Vue({
        el: '#d1',
    })


</script>
2. 第二种展示方法
示例
<!DOCTYPE html>
<html lang="zh-CN">
<head>
    <meta http-equiv="content-type" content="text/html; charset=UTF-8">
    <meta http-equiv="X-UA-Compatible" content="IE=edge">
    <script src="vue.js"></script>
    <title>标题</title>
</head>
<body>
<div id="d1">

</div>

<script>
    // Vue注册全局组件直接渲染使用
    Vue.component("global-component", {
            template: `
                <div>
                    <h1>{{name}}</h1>
                    <h3>{{name}}</h3>
                </div>`,

            data() {
                return {
                    name: "hello word"
                }
            }
        },
    );

    // 第二种  查找template
    new Vue({
        el: '#d1',
        template: "<global-component></global-component>"
    })

</script>

<!-- 实例二 -->
<div id="components-demo">
    <button-counter></button-counter>
</div>
<script>
    Vue.component('button-counter', {
        data(){
            return {
                count: 0
            }
        },
        template: '<button v-on:click="count++">你点击了 {{ count }} 次.</button>'
    })

    new Vue({el: '#components-demo'})
</script>

</body>
</html>
二 、 组件的复用性
每个实例维护自己的一份独立的数据。
<!DOCTYPE html>
<html lang="zh-CN">
<head>
    <meta http-equiv="content-type" content="text/html; charset=UTF-8">
    <meta http-equiv="X-UA-Compatible" content="IE=edge">
    <script src="vue.js"></script>
    <title>标题</title>
</head>
<body>

<div id="d1">
    <global-component></global-component>
    <global-component></global-component>
    <global-component></global-component>
</div>

<script>
    // Vue注册全局组件直接渲染使用
    Vue.component("global-component", {
            template: `
                <div>
                    <h3>{{name}}</h3>
                    <h6>{{name}}</h6>
                </div>`,

            data() {
                return {
                    name: "hello word"
                }
            }
        },
    );

    // 第二种  查找template
    new Vue({el: '#d1', })

</script>

<!-- 实例二 -->
<div id="components-demo">
    <button-counter></button-counter>
    <button-counter></button-counter>
    <button-counter></button-counter>
</div>
<script>
    Vue.component('button-counter', {
        data(){
            return {
                count: 0
            }
        },
        template: '<button v-on:click="count++">你点击了 {{ count }} 次.</button>'
    });

    new Vue({el: '#components-demo'})
</script>

</body>
</html>
注意当点击按钮时,每个组件都会各自独立维护它的 count。因为你每用一次组件,就会有一个它的新实例被创建。
data(){ }
data 必须是一个函数,因此每个实例可以维护一份被返回对象的独立的拷贝
页面显示

三 、局部组件注册和使用
1.全局注册往往是不够理想的。比如,如果你使用一个像 webpack 这样的构建系统,全局注册所有的组件意味着即便你已经不再使用一个组件了,它仍然会被包含在你最终的构建结果中。这造成了用户下载的 JavaScript 的无谓的增加。
全局组件适中是存在的,除非程序结束,如果组件越来越大,那么程序所占用的空间和消耗的性能就会更大。
所以我们需要局部组件。不用的时候,被垃圾回收。
<!DOCTYPE html>
<html lang="zh-CN">
<head>
    <meta http-equiv="content-type" content="text/html; charset=UTF-8">
    <meta http-equiv="X-UA-Compatible" content="IE=edge">
    <script src="vue.js"></script>
    <title>标题</title>
</head>
<body>
<div id="d1">
    <!--局部组件使用 第一种展示  以DOM去展示 -->
    <App></App>
</div>

<script>
    // 创建局部组件
    let Header = {
        template: `
        <div>
            <h1>{{name}}</h1>
        </div>
        `,
        data() {
            return {
                name: 'hello word'
            }
        },
    };
    //声明一个Vue局部组件的入口
    // 所有组件都可以统一 一个接口
    let App = {
        template: `
        <div>
            <app-header></app-header>
        </div>
        `,
        components: {
            'app-header': Header  //所以的子组件都可以注册到这接口
            // 、、、、、  其他子组件等等
        }
    };
    //实例化一个Vue 注册 入口局部组件
    new Vue({
        el: "#d1",
        // template: `<App></App>`,
        //  第二种方法 就是作为根组件去展示
        components: {
            App,    //把入口组件注册下  不用注册所有的组件了
        },
    })
</script>


</body>
</html>
注意:在 ES2015+ 中,在对象中放一个类似 ComponentA 的变量名其实是 ComponentA: ComponentA 的缩写,即这个变量名同时是:
- 用在模板中的自定义元素的名称
- 包含了这个组件选项的变量名
2.在模块中系统中局部注册
如果你还在阅读,说明你使用了诸如 Babel 和 webpack 的模块系统。在这些情况下,我们推荐创建一个 components 目录,并将每个组件放置在其各自的文件中。
然后你需要在局部注册之前导入每个你想使用的组件。例如,在一个假设的 ComponentB.js 或 ComponentB.vue 文件中:
import ComponentA from './ComponentA' |
现在 ComponentA 和 ComponentC 都可以在 ComponentB 的模板中使用了。
四 父子组件的通讯
1.props
props 可以是数组或对象,用于接收来自父组件的数据。props 可以是简单的数组,或者使用对象作为替代,对象允许配置高级选项,如类型检测、自定义校验和设置默认值。
porps:[数组 or object]
<!DOCTYPE html>
<html lang="zh-CN">
<head>
    <meta http-equiv="content-Type" charset="UTF-8">
    <meta http-equiv="x-ua-compatible" content="IE=edge">
    <meta name="viewport" content="width=device-width, initial-scale=1">
    <title>Title</title>
    <script src="./static/vue.min.js"></script>
</head>
<body>
    <div id="app"></div>

<script>
    // 创建一个局部组件
    let Header = {
        template: `<div>
                <h2>{{ greeting }}</h2>
                <h3>{{ fData }}</h3>
            </div>
        `,
        props: ['fData'],  // 相当于相应复制一份数据用来子父之间数据交流
        data() {
            return {
                greeting: 'Hello, World'
            }
        },
    };

    // 在入口组件中注册你写的局部组件
    let App = {
        template: `
            <div>
                <page-header v-bind:fData="fatherData"></page-header>
            </div>
        `,
        // 绑定一个属性  对应父组件的 数据    通过在子组件 porps 设置的的 fData 来响应式获得父组件的数据
        components: {
            'page-header': Header,
        },

        data(){
            return {
                fatherData: "我是父组件中的数据"
            }
        }
    };

    new Vue({
        el: '#app',
        // 在Vue实例中注册你的所有组件的入口
        template: `<App></App>`,
        components: {
            App,
        }
    })
</script>


</body>
</html>
2..vm.$emit( eventName, […args] )
参数:
{string} eventName[...args]
触发当前实例上的事件。附加参数都会传给监听器回调。
实例:只配合一个事件名使用 $emit:
<!DOCTYPE html>
<html lang="zh-CN">
<head>
    <meta http-equiv="content-type" content="text/html; charset=UTF-8">
    <meta http-equiv="X-UA-Compatible" content="IE=edge">
    <script src="vue.js"></script>
    <title>标题</title>
</head>
<body>
<div id="d1">
    <welcome-button v-on:welcome="sayHi"></welcome-button>
    <!-- 展示元素 -->
</div>


<script>

    Vue.component('welcome-button', {
        template: `<button v-on:click="$emit('welcome')">
                        Click me to be welcomed
                    </button>`
        // 要生成元素的样式     绑定触发welcome   welcome的value是sayHi  sayHi的对应的函数的  弹窗
    });

    new Vue({
        el: '#d1',
        methods: {
            sayHi: function () {
                alert('Hi!')
            }
        }
    })
</script>


</body>
</html><!DOCTYPE html>
<html lang="zh-CN">
<head>
    <meta http-equiv="content-type" content="text/html; charset=UTF-8">
    <meta http-equiv="X-UA-Compatible" content="IE=edge">
    <script src="vue.js"></script>
    <title>标题</title>
</head>
<body>
<div id="d1">
    <welcome-button v-on:welcome="sayHi"></welcome-button>
    <!-- 展示元素 -->
</div>


<script>

    Vue.component('welcome-button', {
        template: `<button v-on:click="$emit('welcome')">
                        Click me to be welcomed
                    </button>`
        // 要生成元素的样式     绑定触发welcome   welcome的value是sayHi  sayHi的对应的函数的  弹窗
    });

    new Vue({
        el: '#d1',
        methods: {
            sayHi: function () {
                alert('Hi!')
            }
        }
    })
</script>


</body>
</html>
实例:配合额外的参数使用
<!DOCTYPE html>
<html lang="zh-CN">
<head>
    <meta http-equiv="content-type" content="text/html; charset=UTF-8">
    <meta http-equiv="X-UA-Compatible" content="IE=edge">
    <script src="vue.js"></script>
    <title>标题</title>
</head>
<body>
<div id="d1">

</div>

<script>
    // 创建局部组件
    let Header = {
        template: `
        <div>
            <button @click="sonClick">点击变大</button>
        </div>>
        `,
        // 给按钮点击绑定上sonClick
        methods: {
            sonClick: function () {
                this.$emit('FatherSize', 0.1)  // 触发FatherSize,传参0.1
            }
        }
    };
    //创建一个父组件
    let App = {
        template: `
        <div>
            <span :style="{fontSize:postFontSize + 'em'}">我是父组件,我要变大</span>
            <my-header v-on:FatherSize="fatherClick"></my-header>
        </div>
        `,
        components: {
            "my-header": Header  // 注册子组件
        },
        data() {
            return {
                postFontSize: 1,  // 初始数据是1
            }
        },
        methods: {
            fatherClick: function (value) {
                // fatherClick 对应的方法是     默认初始数据 + 参数
                this.postFontSize += value

            }
        }
    };
    //实例化一个Vue 注册 入口局部组件
    new Vue({
        el: "#d1",
        template: `<App></App>`,
        components: {
            App,
        },
    })
</script>


</body>
</html>
五 、混入:混入可以提高代码的重用性。
<!DOCTYPE html>
<html lang="zh-CN">
<head>
    <meta http-equiv="content-type" content="text/html; charset=UTF-8">
    <meta http-equiv="X-UA-Compatible" content="IE=edge">
    <script src="vue.js"></script>
    <title>标题</title>
</head>
<body>

<div id="d1">
    <my-xiaoming></my-xiaoming>
    <my-xiaohong></my-xiaohong>
</div>

<script>
    // 当组件和混入对象含有同名选项时,这些选项将以恰当的方式混合。
    // 组件 1和 2 都是执行show和hide方法   那我就定义mixins  混合使用这个函数
    let mixs = {  // 定义一个混入对象
        methods: {
            show: function (name) {
                console.log(name + '来了');
            },
            hide: function (name) {
                console.log(name + '去了');
            }
        }
    };


    // 声明第一个使用混入的组件
    let name1 = {
        template: `<div>
                        <button @click="show('小明')">点击显示小明来了</button>
                        <button @click="hide('小明')">点击显示小明走了</button>
                    </div>`,
        mixins: [mixs],
    };

    //声明第二个使用混入的组件
    let name2 = {
        template: `<div>
                        <button @mouseenter="show('小红')">鼠标移入显示小红来了</button>
                        <button @mouseenter="hide('小红')">鼠标移入显示小红走了</button>
                    </div>`,
        mixins: [mixs],
    };

    //声明一个Vue实例
    new Vue({
        el: "#d1",
        components: {
            "my-xiaoming": name1,  // name1组件注册
            "my-xiaohong": name2,  // name2组件注册
        }
    })

</script>

</body>
</html>
六 、 插槽
Vue 实现了一套内容分发的 API,这套 API 基于当前的 Web Components 规范草案,将 <slot> 元素作为承载分发内容的出口。
1.插槽
有时候需要给组件传递一些数据,这时候可以使用插槽
<!DOCTYPE html>
<html lang="zh-CN">
<head>
    <meta http-equiv="content-Type" charset="UTF-8">
    <meta http-equiv="x-ua-compatible" content="IE=edge">
    <meta name="viewport" content="width=device-width, initial-scale=1">
    <title>Title</title>
    <script src="./static/vue.min.js"></script>
    <style>
        body {
            margin: 0;
        }
        .box {
            width: 50px;
            height: 50px;
            background-color: cornflowerblue;
            float: left;
            margin-left: 5px;
        }
    </style>
</head>
<body>
    <div id="app">
        <global-component>首页</global-component>
        <global-component>免费课程</global-component>
        <global-component>轻课</global-component>
        <global-component>智能题库</global-component>
        <global-component>学位课程</global-component>
    </div>
<script>
    Vue.component("global-component", {
        template: `
            <div class="box"><slot></slot></div>
        `
    });
    //
    new Vue({
        el: "#app",
    })
</script>
</body>
</html>
当组件渲染的时候,这个 <slot> 元素将会被替换为“首页”、"免费课程"、、等等 你需要曹汝的数据。插槽内可以包含任何模板代码,包括 HTML
2.具名插槽
有些时候我们需要多个插槽 并且需要按照自己的顺序展示
<!DOCTYPE html>
<html lang="zh-CN">
<head>
    <meta http-equiv="content-Type" charset="UTF-8">
    <meta http-equiv="x-ua-compatible" content="IE=edge">
    <meta name="viewport" content="width=device-width, initial-scale=1">
    <title>Title</title>
    <script src="./static/vue.min.js"></script>
    <style>
        body {
            margin: 0;
        }
        .box {
            width: 50px;
            height: 50px;
            background-color: cornflowerblue;
            float: left;
            margin-left: 5px;
        }
    </style>
</head>
<body>
    <div id="app">
        <global-component>
            <div slot="home">首页</div>
            <div slot="Qing">轻课</div>
            <div slot="Ke">课程</div>
        </global-component>

    </div>
<script>
    Vue.component("global-component", {
        template: `
            <div >
                <slot name="Qing"></slot>
                <slot name="Ke"></slot>
                <slot name="home"></slot>
            </div>
        `
    });  // 页面展示顺序 是按照template中的顺序  插入数据 按照自己的顺序展示
    // 轻课
    // 课程
    // 首页

    new Vue({
        el: "#app",
    })
</script>
</body>
</html>