最近做了一个超市订单管理系统的项目,使用的是Spring MVC 和Spring 框架。
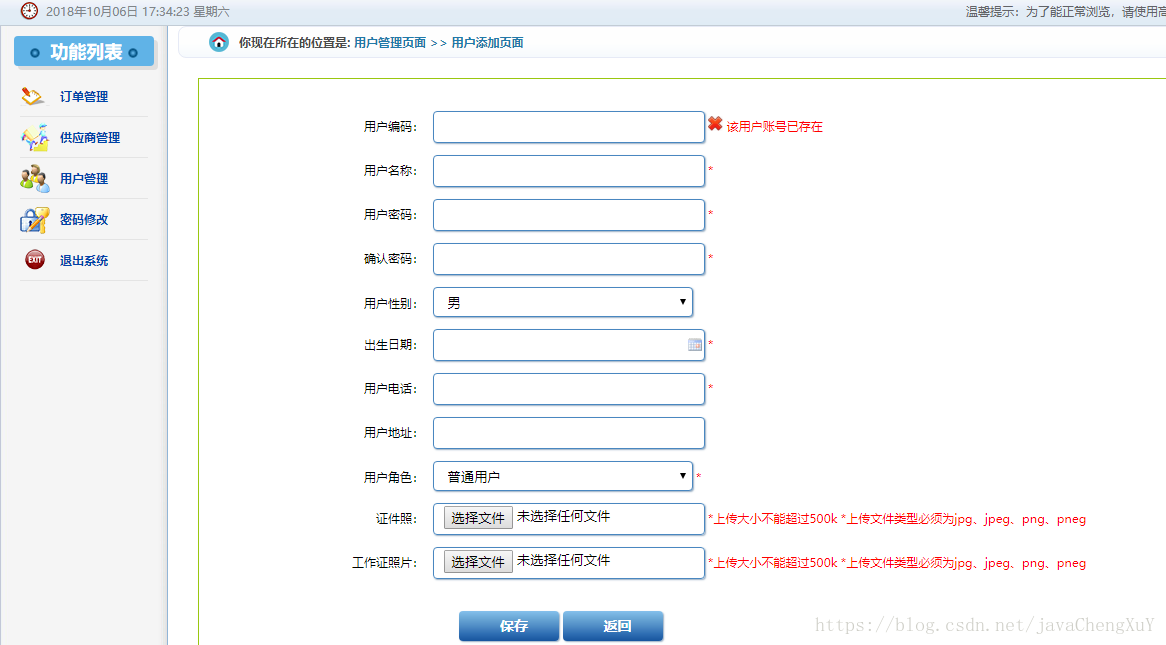
如上图:进行新用户添加。此处jsp页面代码如下:
<div class="right">
        <div class="location">
            <strong>你现在所在的位置是:</strong>
            <span>用户管理页面 >> 用户添加页面</span>
        </div>
        <div class="providerAdd">
            <form id="userForm" name="userForm" method="post"
             enctype="multipart/form-data"
            action="${pageContext.request.contextPath }/user/addsave.html">
				<input type="hidden" name="method" value="add">
                <!--div的class 为error是验证错误,ok是验证成功-->
                <div>
                    <label for="userCode">用户编码:</label>
                    <input type="text" name="userCode" id="userCode" value="">
					<!-- 放置提示信息 -->
					<font color="red"></font>
                </div>
                <div>
                    <label for="userName">用户名称:</label>
                    <input type="text" name="userName" id="userName" value="">
					<font color="red"></font>
                </div>
                <div>
                    <label for="userPassword">用户密码:</label>
                    <input type="password" name="userPassword" id="userPassword" value="">
					<font color="red"></font>
                </div>
                <div>
                    <label for="ruserPassword">确认密码:</label>
                    <input type="password" name="ruserPassword" id="ruserPassword" value="">
					<font color="red"></font>
                </div>
                <div>
                    <label >用户性别:</label>
					<select name="gender" id="gender">
					    <option value="1" selected="selected">男</option>
					    <option value="2">女</option>
					 </select>
                </div>
                <div>
                    <label for="birthday">出生日期:</label>
                    <input type="text" Class="Wdate" id="birthday" name="birthday"
					readonly="readonly" onclick="WdatePicker();">
					<font color="red"></font>
                </div>
                <div>
                    <label for="phone">用户电话:</label>
                    <input type="text" name="phone" id="phone" value="">
					<font color="red"></font>
                </div>
                <div>
                    <label for="address">用户地址:</label>
                   <input name="address" id="address"  value="">
                </div>
                <div>
                    <label >用户角色:</label>
                    <!-- 列出所有的角色分类 -->
		    <!-- <select name="userRole" id="userRole"></select> -->
		    <select name="userRole" id="userRole"> 			<option value="1">系统管理员</option> 			<option value="2">经理</option> 			<option value="3" selected="selected">普通用户</option>
		    </select>
	            <font color="red"></font>
                </div>
                <div>
                  <input type="hidden" id="errorinfo" value="${uploadFileError}">
                 <label for="a_idPicPath">证件照:</label>
                   <input type="file" name="attachs" id="a_idPicPath"  value="">
                     <font color="red"></font>
                </div>
                <div>
                  <input type="hidden" id="errorinfo_wp" value="${uploadwpError}">
                 <label for="a_workPicPath">工作证照片:</label>
                   <input type="file" name="attachs" id="a_workPicPath"  value="">
                     <font color="red"></font>
                </div>
                <div class="providerAddBtn">
                    <input type="button" name="add" id="add" value="保存" >
					<input type="button" id="back" name="back" value="返回" >
                </div>
            </form>
        </div> </div>
下面的是实体类代码:
package cn.smbms.pojo;

import java.util.Date;

import javax.validation.constraints.NotNull;
import javax.validation.constraints.Past;

import org.hibernate.validator.constraints.Length;
import org.hibernate.validator.constraints.NotEmpty;
import org.springframework.format.annotation.DateTimeFormat;

public class User {
	private Integer id; //id
	@NotEmpty(message="用户编码不能为空")         //服务器进行验证
	private String userCode; //用户编码
	@NotEmpty(message="用户名称不能为空")
	private String userName; //用户名称
	@NotNull(message="用户密码不能为空")
	@Length(min=6,max=16,message="用户密码长度为6-10位")
	private String userPassword; //用户密码
	private Integer gender;  //性别
	@Past(message="必须是一个过去时间")
	@DateTimeFormat(pattern="yyyy-MM-dd")
	private Date birthday;  //出生日期
	private String phone;   //电话
	private String address; //地址
	private Integer userRole;    //用户角色
	private Integer createdBy;   //创建者
	private Date creationDate; //创建时间
	private Integer modifyBy;     //更新者
	private Date modifyDate;   //更新时间

	private Integer age;//年龄

	private String userRoleName;    //用户角色名称
	private String idPicPath;   //文件上传路径
	private String workPicPath; //工作证上传路径

	public String getWorkPicPath() {
		return workPicPath;
	}

	public void setWorkPicPath(String workPicPath) {
		this.workPicPath = workPicPath;
	}

	public void setAge(Integer age) {
		this.age = age;
	}

	public String getIdPicPath() {
		return idPicPath;
	}

	public void setIdPicPath(String idPicPath) {
		this.idPicPath = idPicPath;
	}

	public User(){}

	public User(Integer id,String userCode,String userName,String userPassword,Integer gender,Date birthday,String phone,
			String address,Integer userRole,Integer createdBy,Date creationDate,Integer modifyBy,Date modifyDate){
		this.id = id;
		this.userCode = userCode;
		this.userName = userName;
		this.userPassword = userPassword;
		this.gender = gender;
		this.birthday = birthday;
		this.phone = phone;
		this.address = address;
		this.userRole = userRole;
		this.createdBy = createdBy;
		this.creationDate = creationDate;
		this.modifyBy = modifyBy;
		this.modifyDate = modifyDate;
	}
	public String getUserRoleName() {
		return userRoleName;
	}
	public void setUserRoleName(String userRoleName) {
		this.userRoleName = userRoleName;
	}
	public Integer getAge() {
		/*long time = System.currentTimeMillis()-birthday.getTime();
		Integer age = Long.valueOf(time/365/24/60/60/1000).IntegerValue();*/
		Date date = new Date();
		Integer age = date.getYear()-birthday.getYear();
		return age;
	}
	public Integer getId() {
		return id;
	}
	public void setId(Integer id) {
		this.id = id;
	}
	public String getUserCode() {
		return userCode;
	}
	public void setUserCode(String userCode) {
		this.userCode = userCode;
	}
	public String getUserName() {
		return userName;
	}
	public void setUserName(String userName) {
		this.userName = userName;
	}
	public String getUserPassword() {
		return userPassword;
	}
	public void setUserPassword(String userPassword) {
		this.userPassword = userPassword;
	}
	public Integer getGender() {
		return gender;
	}
	public void setGender(Integer gender) {
		this.gender = gender;
	}
	public Date getBirthday() {
		return birthday;
	}
	public void setBirthday(Date birthday) {
		this.birthday = birthday;
	}
	public String getPhone() {
		return phone;
	}
	public void setPhone(String phone) {
		this.phone = phone;
	}
	public String getAddress() {
		return address;
	}
	public void setAddress(String address) {
		this.address = address;
	}
	public Integer getUserRole() {
		return userRole;
	}
	public void setUserRole(Integer userRole) {
		this.userRole = userRole;
	}
	public Integer getCreatedBy() {
		return createdBy;
	}
	public void setCreatedBy(Integer createdBy) {
		this.createdBy = createdBy;
	}
	public Date getCreationDate() {
		return creationDate;
	}
	public void setCreationDate(Date creationDate) {
		this.creationDate = creationDate;
	}
	public Integer getModifyBy() {
		return modifyBy;
	}
	public void setModifyBy(Integer modifyBy) {
		this.modifyBy = modifyBy;
	}
	public Date getModifyDate() {
		return modifyDate;
	}
	public void setModifyDate(Date modifyDate) {
		this.modifyDate = modifyDate;
	}
}
下面的是控制层的用户增加方法:
@RequestMapping(value="/addsave.html",method=RequestMethod.POST)
	public String addSave( User user,HttpSession session,
                            HttpServletRequest request,
       @RequestParam(value="attachs",required=false)MultipartFile[] attachs){
		String idPicPath=null;
		String workPicPath=null;
		String errorInfo=null;
		boolean flag=true;
		//定义上传目标路径
		String path = request.getSession().getServletContext().
				getRealPath("statics"+File.separator+"uploadfiles");
		for(int i=0;i<attachs.length;i++){
			MultipartFile attach=attachs[i];
			//判断上传文件是否为空
			if(!attach.isEmpty()){
				 if(i==0){
					 errorInfo="uploadFileError";
				 }else if(i==1){
					 errorInfo="uploadwpError";
				 }


				logger.info("uploadFile path ============== > "+path);
				//获取原文件名
				String oldFileName=attach.getOriginalFilename();
				logger.info("uploadFile oldFileName ============== > "+oldFileName);
				//获取文件后缀
				String prefix=FilenameUtils.getExtension(oldFileName);
				 logger.debug("uploadFile prefix============> " + prefix);

				int filesize=500000;
				logger.debug("uploadFile size============> " + attach.getSize());
				//判断文件大小
				if(attach.getSize()>filesize){
				  request.setAttribute(errorInfo, "上传文件大小不能超过500k");
				  flag=false;
				}else if(prefix.equalsIgnoreCase("jpg")
					   ||prefix.equalsIgnoreCase("jpeg")
					   ||prefix.equalsIgnoreCase("png")
					   ||prefix.equalsIgnoreCase("pneg")
					){
						//判断格式是否正确  和给图片重命名: 当前系统时间+随机数+"_Personal.jpg"
					String fileName=System.currentTimeMillis()+RandomUtils.nextInt(1000000)+"_Personal.jpg";
					  logger.debug("new fileName======== " + fileName);
					//创界文件用来接收上传的文件流
					File targetFile=new File(path,fileName);
					if(!targetFile.exists()){
						targetFile.mkdirs();
					}

					try {
						attach.transferTo(targetFile);
					} catch (Exception e) {

						e.printStackTrace();
						request.setAttribute(errorInfo, "*上传失败");
						flag=false;
					}
					//File.separator自适应分隔符/,linux系统或则其他系统/可能不兼容
					if(i==0){
					idPicPath=path+File.separator+fileName;
					}else if(i==1){
					 workPicPath=path+File.separator+fileName;
					}

				}else{
					request.setAttribute(errorInfo, "上传图片格式不正确");
					flag=false;
				}

			}
		}
在增加方法中,直接以实体对象的方式入参,Spring MVC框架自动将属性封装成对象,在没用框架的时候,一般是在servlet中通过request.getParameter("")的方法来获取属性,在通过实体类的set方法给实体类赋值,而Spring MVC框架恰好将此步骤省略,注意:input标签中的name属性名称要与实体类中的属性名称一致.
此处代码也介绍了多文件上传的过程,使用数组方式实现多文件上传,在控制层中,在for循环中进行判断,需要注意的是要注意后台的顺序要和上传的顺序一致。此处是两文件上传也可以用两个单文件上传完成,也比较清晰明了。