-
Home:首页根组件,用于管理子组件以及数据请求
-
<template>:子组件管理
-
引入所有子组件,并进行属性绑定(父组件向子组件传递数据的方式)
  <template>
    <div>
      <home-header :city="city"></home-header>
      <home-swiper :list="swiperList"></home-swiper>
      <home-icons :list="iconList"></home-icons>
      <home-recommend :list="recommendList"></home-recommend>
      <home-weekend :list="weekendList"></home-weekend>
    </div>
  </template>
-
-
<script>:数据请求
-
引入子组件
import HomeHeader from './components/Header' import HomeSwiper from './components/Swiper' import HomeIcons from './components/Icons' import HomeRecommend from './components/Recommend' import HomeWeekend from './components/Weekend' -
子组件声明
components: { HomeHeader, HomeSwiper, HomeIcons, HomeRecommend, HomeWeekend }, -
引入axios库
// 引入axios库 import axios from 'axios' -
关于axios:axios 是一个基于Promise 用于浏览器和 nodejs 的 HTTP 客户端,它本身具有以下特征:
从浏览器中创建 XMLHttpRequest 从 node.js 发出 http 请求 支持 Promise API 拦截请求和响应 转换请求和响应数据 取消请求 自动转换JSON数据 客户端支持防止 CSRF/XSRF -
安装axios
npm install axios -
ajax数据请求及成功回调函数
-
数据接收列表初始化:对应<template>中绑定的属性名称
data() { return { city: '', swiperList: [], iconList: [], recommendList: [], weekendList: [] } }, -
在生命周期钩子函数mounted中进行数据请求
// 借助生命周期函数进行ajax请求 mounted() { this.getHomeInfo() } -
ajax请求以及成功回调
// 发送ajax请求 getHomeInfo() { axios.get('/api/index.json').then(this.getHomeInfoSucc) }, // ajax成功回调 getHomeInfoSucc(res) { res = res.data // ret 表征请求是否成功True or False,只有请求成功并且数据域不为空进行数据列表赋值 if (res.ret && res.data) { // 获取成功回调对象的data列表 const data = res.data this.city = data.city this.swiperList = data.swiperList this.iconList = data.iconList this.recommendList = data.recommendList this.weekendList = data.weekendList } } -
TIPS:关于ajax请求路径的定义,项目中采用的访问静态json文件(static/mock)的方式,实际环境中可能请求路径可能是类似/api/xx的请求路径,在项目中可以进行项目路径的路由配置。
  坐标:./config/index.js
  // Paths
  assetsSubDirectory: 'static',
  assetsPublicPath: '/',
  proxyTable: {
    // 代理工具中数据请求的设置,将所有的/api请求转发至当前项目static/mock路径下
    '/api': {
      target: 'http://localhost:8080',
      pathRewrite: {
  	  // 此处可以配置请求路径的路由
        '^/api': '/static/mock'
      }
    }
  },
-
-
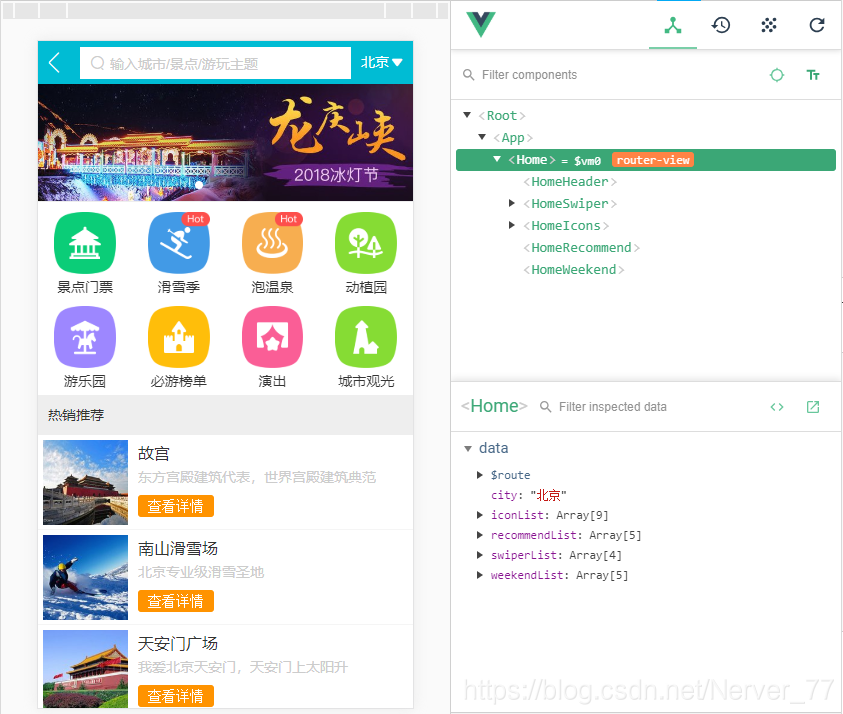
首页截图
-
-
-
Header
-
iconfont:图标矢量库引入
 	建立目录:src/assets/styles/iconfont
 	以上新建目录保存在http://www.iconfont.cn/选定图标的字体文件
 	在目录:src/assets/styles 引入iconfont.css文件
打开iconfont.css文件,修改图标字体文件的配置地址后即可使用:

在入口文件 main.js 添加iconfont.css 的引入:
		// 引入iconfont 图表矢量库
		import 'styles/iconfont.css'
使用的时候我们采用图标对应的编码即可直接引用图标icon:
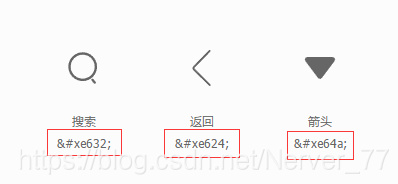
-
Stylus:Stylus 是一种新型语言,可以创建健壮的、动态的、富有表现力的CSS。是一个CSS的预处理框架。Stylus默认使用 .styl 的作为文件扩展名,支持多样性的CSS语法。
安装Stylus:
npm install stylus stylus-loader --save-dev使用Stylus:
-
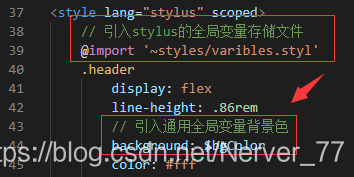
在.vue文件中style块中使用:在style标签上添加lang="stylus"即可,添加scoped可以时当前样式组件独立性。
<style scoped lang="stylus"> img width: 60px; height: 60px; display: inline-block; border-radius: 30px; </style> -
外部引用.styl文件
坐标:src/assets/styles/ **建立varibles.styl外部文件,并填入一下内容:$bgColor = #00bcd4**
在<style>标签中引用外部文件中的样式变量,如下图所示:
-
-
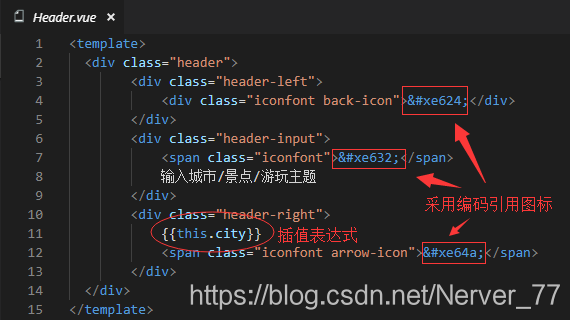
<template>
-
<script>:子组件采用props接收父组件的传值,在这里进行了传递参数类型的判断。
<script> export default { name: 'HomeHeader', props: { city: String } </script> -
Swiper:轮播图区域,该区域引用了vue-awesome-swiper插件,并对接收数据进行分组轮播展示。
-
vue-awesome-swiper:基于Vue改写的Swiper插件,用于在vue项目中的轮播效果实现。
这里需要说明一点,项目中使用的是2.6.7版本,由于当前最新的Swiper4会有些许问题,这里选取了稳定版本。
以下引用参考自:https://github.com/surmon-china/vue-awesome-swiper
关于vue-awesome-swiper的使用以及API介绍可以参考:https://segmentfault.com/a/1190000014609379
安装vue-awesome-swiper插件:
npm install [email protected] --save入口文件main.js引入vue-awesome-swiper插件:
 	// 1. 引入vue-awesome-swiper
 	import VueAwesomeSwiper from 'vue-awesome-swiper'

 	// 2. vue-awesome-swiper所依赖的CSS样式
 	import 'swiper/dist/css/swiper.css'

 	// 3. 全局使用vue-awesome-swiper
 	Vue.use(VueAwesomeSwiper)
vue-awesome-swiper的使用:例子参考官方SPA
<swiper :options="swiperOption" ref="mySwiper" @someSwiperEvent="callback"> <!-- slides --> <swiper-slide>I'm Slide 1</swiper-slide> <swiper-slide>I'm Slide 2</swiper-slide> <swiper-slide>I'm Slide 3</swiper-slide> <swiper-slide>I'm Slide 4</swiper-slide> <swiper-slide>I'm Slide 5</swiper-slide> <swiper-slide>I'm Slide 6</swiper-slide> <swiper-slide>I'm Slide 7</swiper-slide> <!-- Optional controls --> <div class="swiper-pagination" slot="pagination"></div> //页码 <div class="swiper-button-prev" slot="button-prev"></div> //下一项 <div class="swiper-button-next" slot="button-next"></div> //上一项 <div class="swiper-scrollbar" slot="scrollbar"></div> //滚动条 </swiper> -
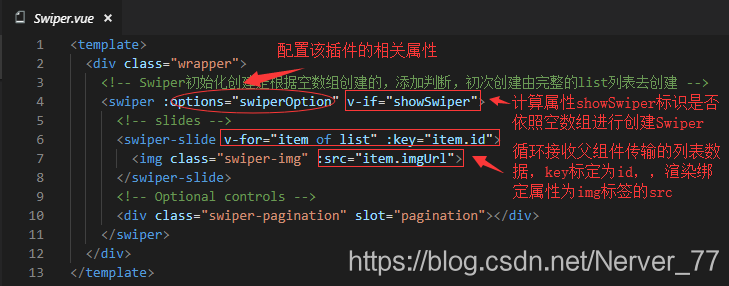
<template>
-
<script>:通过props接收父组件数据列表,data中配置了swiperOption的属性,开启了轮播图坐标以及循环轮播,通过计算属性showSwiper控制轮播组件的数据渲染。
 	<script>
 	export default {
 	  name: 'HomeSwiper',
 	  props: {
 	    list: Array
 	  },
 	  data() {
 	    return {
 	      swiperOption: {
 	        // 开启轮播图坐标展示
 	        pagination: '.swiper-pagination',
 	        // 开启循环轮播
 	        loop: true
 	      }
 	    }
 	  },
 	  computed: {
 	    showSwiper() {
 		  // 通过数据列表的长度判断是否存在数据
 	      return this.list.length
 	    }
 	  }
 	}
 	</script>