既然springcloud是一个微服务架构生态体系,而且上一章我们也介绍了 微服务体系中一个核心组件“服务的发现与注册”eureka,接下来我们来简单探索以下微服务体系中另一个核心组件“rpc”;在springcloud体系中实现rpc的组件有2个,一个是ribbon,另一个是feign,而且feign在底层封装了ribbon,以更友好,更灵活的形式展现在了我们眼前,所以今天我们研究的重心放在了feign身上。
(摘抄一段话,帮助大家更清晰的认识feign)
feign是netflix提供的服务间基于http的rpc调用框架,在spring cloud得到广泛应用。默认情况下,一个feign client是在hystrix断路器中执行,并利用ribbon进行软负载选择远程服务(service),所以可以想象出一个feign client的层次架构是包裹的层次,hystrix控制整个rpc从调用到方法返回,而ribbon控制从选址到socket返回;
那么什么是hystrix呢?
首先我们先置身于这样一个场景在微服务架构中,我们将业务拆分成一个个的服务,而服务与服务之间可以相互调用(RPC方式)。为了保证其高可用,单个服务又可能回事集群环境部署。所以可能存在由于网络原因或者自身的原因,并不能保证服务的100%可用,如果单个服务出现问题,调用这个服务就会出现网络延迟,此时若有大量的网络涌入,会形成任务累计,导致服务瘫痪,甚至导致服务“雪崩”。
为了解决这个问题,就出现断路器模型。
而hystrix就是Netflix的一个库并且实现了断路器模式。
(摘抄自一位网友的图)
较底层的服务如果出现故障,会导致连锁故障。当对特定的服务的调用达到一个阀值(hystric 是5秒20次) 断路器将会被打开。
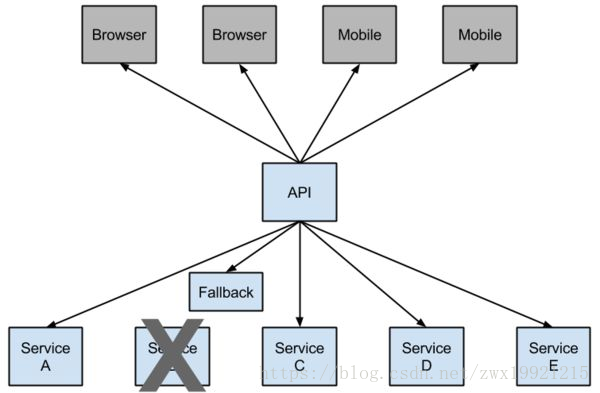
断路打开后,可用避免连锁故障,fallback方法可以直接返回一个固定值。
好了,接下来我们来配置一下实际环境中我们应该怎样使用feign + hystrix?
注:基于test项目(我新建的另一个springboot项目)和demo-springboot项目;
1.打开test项目的pom.xml加入相关依赖:
<!--feign-->
<dependency>
   <groupId>org.springframework.cloud</groupId>
   <artifactId>spring-cloud-starter-feign</artifactId>
   <version>1.3.4.RELEASE</version>
</dependency>
2.打开application-dev.properties加入以下内容:
#feign read timeout(10s)
hystrix.command.default.execution.isolation.thread.timeoutInMilliseconds=10000
#feign read timout disable(该配置,用于禁用Hystrix的超时时间 )
#hystrix.command.default.execution.timeout.enabled=false
#关闭hystrix功能
#feign.hystrix.enabled=false
切记feign read timeout配置一个合适的超时时间,不要用默认的,我刚开始的时候没有配置,结构一直调用返回error,发现是超时了。
3.在demo-springboot中添加测试controller:
package com.example.demo.controller;

import org.springframework.web.bind.annotation.RequestMapping;
import org.springframework.web.bind.annotation.RequestParam;
import org.springframework.web.bind.annotation.RestController;

/**
 * @author xiaofeng
 * @version V1.0
 * @title: TestController.java
 * @package: com.example.demo.controller
 * @description: TODO
 * @date 2018/4/3 0003 下午 2:10
 */
@RestController
@RequestMapping(value = "/test")
public class TestController {

    @RequestMapping(value = "/info")
    public String info(@RequestParam(value = "msg") String msg) {
        return "welcome to demo-springboot: " + msg;
    }
}
4.在test项目中增加rpc相关服务类:
@FeignClient(value = "demo-springboot", fallback = RpcServiceImpl.class)
public interface RpcService {

    /**
     * 查询test
     *
     * @param msg
     * @return
     */
    @RequestMapping(value = "/test/info", method = RequestMethod.GET)
    String query(@RequestParam(value = "msg") String msg);
}
@Service
public class RpcServiceImpl implements RpcService {
    /**
     * 查询test
     *
     * @param msg
     * @return
     */
    @Override
    public String query(String msg) {
        return "error";
    }
}
5.在test项目中编写测试controller:
@RestController
public class TestController {

    @Autowired
    RpcService rpcService;

    @RequestMapping(value = "/test/index")
    public String index(@RequestParam(value = "msg") String msg) {
        return rpcService.query(msg);
    }
}
然后再启动类中开启注解@EnableFeignClients(basePackages = {"com.xx.xx.test.service"}):表示feign 需要扫描的package路径(我的rpcService放在service包下)。
@EnableFeignClients(basePackages = {"com.xx.xx.test.service"})
@EnableAutoConfiguration
@EnableEurekaClient
@SpringBootApplication
public class Xsignal2TestApplication {

    public static void main(String[] args) {
        SpringApplication.run(Xsignal2TestApplication.class, args);
    }
}
6.最后分别启动discover-server、demo-springboot、test三个服务
查看eureka控制面板三个服务是否都已经启动:

ok,接下来开始测试,首先是正常测试,打开浏览器:

出现的是我们理想的结果,说明我们的rpc已经走通了哦,是不是有点小鸡冻啊。
7.介绍一些常用配置
以上这种配置也是全局配置,如果我们想针对某一个接口配置,比如/hello接口,那么可以按照下面这种写法,如下:
# 设置熔断超时时间
hystrix.command.hello.execution.isolation.thread.timeoutInMilliseconds=10000
# 关闭熔断功能
hystrix.command.hello.execution.timeout.enabled=false
# 配置请求GZIP压缩
feign.compression.request.enabled=true
# 配置响应GZIP压缩
feign.compression.response.enabled=true
# 配置压缩支持的MIME TYPE
feign.compression.request.mime-types=text/xml,application/xml,application/json
# 配置压缩数据大小的下限
feign.compression.request.min-request-size=2048
注意点:
1.有些公共的组件抽出来其他模块的maven依赖,此时要在使用的项目中加载此jar包的spring component以及feign组件,仅仅依靠@ComponentScan是不够的,还需要在@EnableFeignClients(basePackages = {"com.xx.xx.test.service"})中标注basekPackages。
2.springcloud feign 注入bean null问题
解决办法:
1. 如果swagger版本是v1.x,那么请参考:https://segmentfault.com/a/1190000006595187
2. 如果swagger版本是v2.x,那么请将升级swagger版本到2.5.0以上即可。
<dependency>
    <groupId>io.springfox</groupId>
    <artifactId>springfox-swagger2</artifactId>
    <version>2.5.0</version>
</dependency>
<dependency>
    <groupId>io.springfox</groupId>
    <artifactId>springfox-swagger-ui</artifactId>
    <version>2.5.0</version>
</dependency>
2.接口返回对象转换:
ResponseModel<Long> responseModel = JsonUtils.json2Obj(data, new TypeReference<ResponseModel<Long>>(){});
new TypeReference<ResponseModel<Long>>(){}