什么是springboot?它和春天的区别是什么?
springboot相比弹簧来说它“约定大于配置”,相信大家都被弹簧的复杂的配置给烦恼过,springboot提供一个免配置的解决方案,无需使用大量的XML配置文件来配置项目,让开发更简单,并且Spring Boot并不重复造轮子,而且在原有Spring的框架基础上封装了一层。换句话说,Spring Boot是一个容器。
SpringBoot官网:Spring Projects
Spring Boot官方推荐使用Maven或Gradle来构建项目本篇将使用maven来构建项目。
创建第一个Spring Boot项目
这里就以helloWolrd为例子
springboot提供两种创建的项目的方式,本文章通过springboot的官网来创建第一个springboot项目地址如下。
https://start.spring.io/start.spring.io
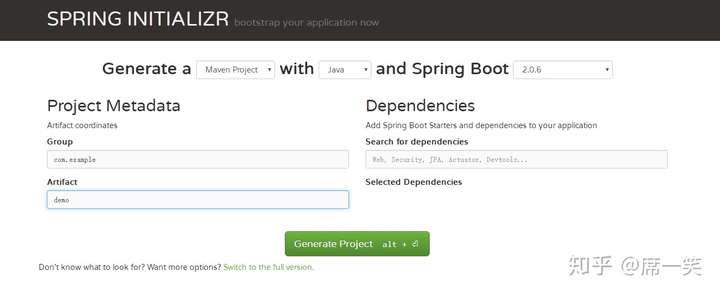
以maven构建项目 - > Generator Project创建第一个springboot项目
导入代码到eclipse - > maven install构建项目
相关的依赖文件
的的pom.xml

<parent>
<groupId>org.springframework.boot</groupId>
<artifactId>spring-boot-starter-parent</artifactId>
<version>2.0.1.RELEASE</version>
</parent>
<dependencies>
<dependency>
<groupId>org.springframework.boot</groupId>
<artifactId>spring-boot-starter-web</artifactId>
</dependency>
</dependencies>
创建一个控制器类位于例子的子包下HelloController中:
import org.springframework.boot.SpringApplication;
import org.springframework.boot.autoconfigure.SpringBootApplication;
import org.springframework.web.bind.annotation.RequestMapping;
import org.springframework.web.bind.annotation.RestController;

@RestController
@SpringBootApplication
public class HelloController {

@RequestMapping("hello")
String hello() {
return "Hello World!";
}

}
运行主方法(该方法自动生成不需要手写)
package com.example.demo;

import org.springframework.boot.SpringApplication;
import org.springframework.boot.autoconfigure.SpringBootApplication;

@SpringBootApplication
public class DemoApplication {

	public static void main(String[] args) {
		SpringApplication.run(DemoApplication.class, args);
	}
}
(需要安装STS工具来运行)
Springboot的启动需要eclipse插件sts下载方式帮助
- > marketplace - >热门
选择springbootTools工具 - >安装安装sts插件
springboot会使用内嵌的tomcat的服务器来启动,启动成功后
浏览器访问:http:// localhost:8080 / hello
即可看到我们的欢迎页面了。
属性以及yaml
springboot中只有一个配置文件就是属性或者yaml
springboot中对配置文件都有默认值,我们也可以通过application.properties
来定义我们自己的配置
在资源目录下的application.xml中里定义。
常用的注解
@SpringBootConfiguration 表示springboot的常用的配置注解
EnableAutoConfiguration 表示自动注解
@ComponentScan组件扫描 用于configuration配置类的扫描指令,可以对指定的包进行扫描。
@Configuration 配置注解类
如果我们想用代码来配置,则需要在这个类上加入这个注解
整合其他开源框架mybatis
Spring Boot是一个容器,它将很多第三方框架都进行了集成,我们在实际项目中用到哪个模块,再引入哪个模块。比如我们项目中的持久化框架用MyBatis,则在pom .xml添加如 下依赖:
        <dependency>
            <groupId>org.mybatis.spring.boot</groupId>
            <artifactId>mybatis-spring-boot-starter</artifactId>
            <version>1.1.1</version>
        </dependency>
        <dependency>
            <groupId>mysql</groupId>
            <artifactId>mysql-connector-java</artifactId>
            <version>5.1.40</version>
        </dependency>
在application.xml添加以下配置文件
datasource:url:jdbc:mysql://localhost:3306/database?useUnicode=true&characterEncoding=UTF-8&useSSL=trueusername: root password: root driverClassName: com.mysql.jdbc.Driver #mybatis mybatis.type-aliases-package=com.example.demo.pojo mybatis.mapper-locations=classpath:mapper/*.xml #mapper #mappers mapper.mappers=com.example.utils.MyMapper mapper.not-empty=false mapper.identity=MYSQL
更多的配置信息可以参照官网 SpringBoot官网:Spring Projects。
统一异常处理类
我们在通常需要捕捉异常,并且友好的对用户进行提示,如果在页面上报出异常信息
那么对于用户来说是一种很不友好的体验,如果单单在每一个代码上都捕捉异常然后抛出
异常页面,代码就会显得特别的臃肿,全局异常处理类就出现了。 @ControllerAdvice,不用任何的配置,只要把这个类放在项目中,Spring能扫描到的地方。就可以实现全局异常的回调。@ExceptionHandler标注处理异常的方法
package com.example.demo.exception;

import javax.servlet.http.HttpServletRequest;
import javax.servlet.http.HttpServletResponse;

import org.springframework.http.HttpRequest;
import org.springframework.web.bind.annotation.ControllerAdvice;
import org.springframework.web.bind.annotation.ExceptionHandler;
import org.springframework.web.servlet.ModelAndView;

import com.example.demo.pojo.XYFJSONResult;

@ControllerAdvice
/**
 * 全局异常捕获
 */
public class XuYuanFengExceptionHandler {

	public static final String ERROR_VIEW = "error";

	@ExceptionHandler(value = Exception.class)
	public Object errorHandler(HttpServletRequest request, HttpServletResponse resp, Exception e) throws Exception {
		e.printStackTrace();
		if (isAjax(request)) {
			new XYFJSONResult();
			return XYFJSONResult.errorException(e.getMessage());
		} else {

			ModelAndView mav = new ModelAndView();
			mav.addObject("exception", e);
			mav.addObject("url", request.getRequestURL());
			mav.setViewName(ERROR_VIEW);
			return e;
		}
	}

	public static boolean isAjax(HttpServletRequest request) {

		return (request.getHeaders("X-Requested-With") != null
				&& "XMLHttpReqeust".equals(request.getHeaders("X-Requested-With").toString()));
	}

}
错误页面的代码
<!DOCTYPE html>
<html>
<head>
<meta charset="UTF-8">
<title>Insert title here</title>
</head>
<body>
<h1 style="color:red">发生异常</h1>
<div th:text="${e}"> </div>
</body>
</html>
单元测试
@SpringBootTest(classes = Application.class)
@RunWith(SpringJUnit4ClassRunner.class)
public class TestDB {

    @Test
    public void test(){
    }
}
模板引擎
springboot 支持 FreeMark、Thymeleaf等模板引擎 来开发前后分离的项目。同时也支持jsp等模板引擎。
整合Thymeleaf
相关的pom文件
                 <dependency>
			<groupId>org.springframework.boot</groupId>
			<artifactId>spring-boot-starter-thymeleaf</artifactId>
		</dependency>
在application,xml中配置thymeleaf 的基本格式
spring.thymeleaf.prefix = classpath:/ templates /
spring.thymeleaf.suffix = .html
spring.thymeleaf.mode = HTML5
spring.thymeleaf.encoding = UTF-8
spring.thymeleaf.servlet.content-type = text / html; charset = utf-8
spring.thymeleaf.cache = false
spring.mvc.static-path-pattern = / static / **
spring.mvc.static-path-pattern = / static / **
表示映射的thymeleaf的路径在静目录下
thymeleaf的基本语法参考
http://link.zhihu.com/?target=https%3A//blog.csdn.net/RAVEEE/article/details/83378445
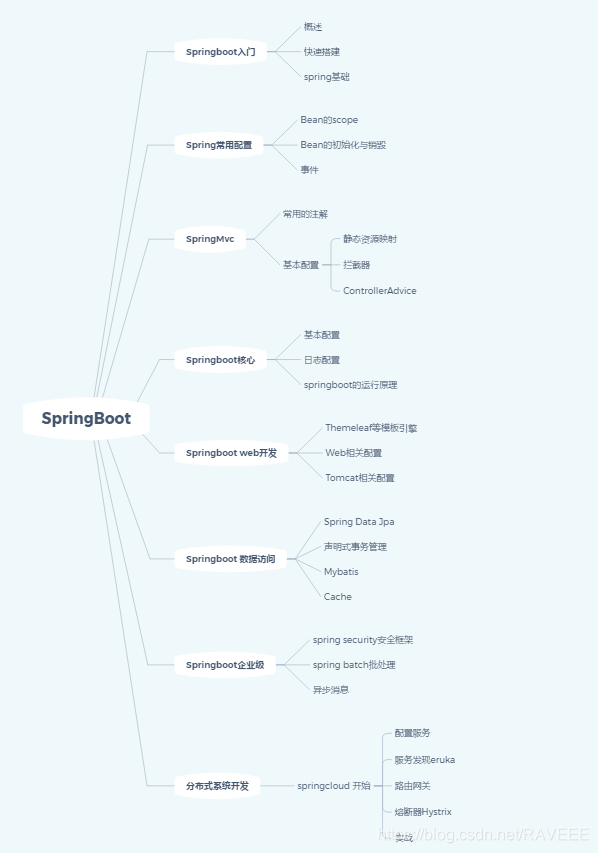
最后 :思维导图