分享一下我老师大神的人工智能教程!零基础,通俗易懂!http://blog.csdn.net/jiangjunshow
也欢迎大家转载本篇文章。分享知识,造福人民,实现我们中华民族伟大复兴!
本文来自http://blog.csdn.net/hellogv/ ,引用必须注明出处!
越来越多互联网企业都在Android平台上部署其客户端,为了提升用户体验,这些客户端都做得布局合理而且美观.......Android的Style设计就是提升用户体验的关键之一。Android上的Style分为了两个方面:
-
Theme是针对窗体级别的,改变窗体样式;
-
Style是针对窗体元素级别的,改变指定控件或者Layout的样式。
Android系统的themes.xml和style.xml(位于/base/core/res/res/values/)包含了很多系统定义好的style,建议在里面挑个合适的,然后再继承修改。以下属性是在Themes中比较常见的,源自Android系统本身的themes.xml:
- <!-- Window attributes -->
- <item name="windowBackground">@android:drawable/screen_background_dark</item>
- <item name="windowFrame">@null</item>
- <item name="windowNoTitle">false</item>
- <item name="windowFullscreen">false</item>
- <item name="windowIsFloating">false</item>
- <item name="windowContentOverlay">@android:drawable/title_bar_shadow</item>
- <item name="windowTitleStyle">@android:style/WindowTitle</item>
- <item name="windowTitleSize">25dip</item>
- <item name="windowTitleBackgroundStyle">@android:style/WindowTitleBackground</item>
- <item name="android:windowAnimationStyle">@android:style/Animation.Activity</item>
至于控件的Style设计就范围大多了,看看Eclipse的Android控件属性编辑器[Properties]就大概知道有哪些条目,而Android内置的style.xml也只是定义每个控件的默认样式而已....不过控件的style不建议大改,耐看的style更能让用户长时间使用软件。另外,控件的Style在很多情况下都用到9.png,学习9.png就必须到/base/core/res/res/drawable-hdpi里面看看,里面有很多系统内置的9.png。
PS:为了研究Android的Style和Theme,强烈建议下载Android的base.git!
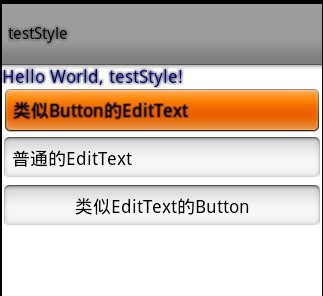
接下来看看本文程序的效果图:
本文程序的themes.xml代码如下,自定义了WindowTitle,:
<?xml version="1.0" encoding="UTF-8"?>
<resources>
<!--继承Android内置的Theme.Light,位于/base/core/res/res/values/themes.xml -->
<style name="Theme" parent="android:Theme.Light">
<item name="android:windowFullscreen">true</item>
<item name="android:windowTitleSize">60dip</item>
<item name="android:windowTitleStyle">@style/WindowTitle</item>
</style>
<style name="WindowTitle" parent="android:WindowTitle">
<item name="android:singleLine">true</item>
<item name="android:shadowColor">#BB000000</item>
<item name="android:shadowRadius">2.75</item>
</style>
</resources>
要为Activity使用theme,要么使用代码 setTheme(R.style.Theme),要么在Application Manifest里面设置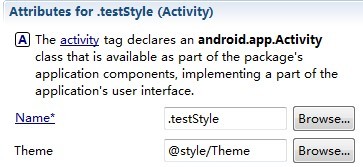 。
。
本文程序的styles.xml代码如下,background默认使用的是9.png,xml定义在/base/core/res/res/drawable/之下:
<?xml version="1.0" encoding="UTF-8"?>
<resources>
<style name="TextView">
<item name="android:textSize">18sp</item>
<item name="android:textColor">#008</item>
<item name="android:shadowColor">@android:color/black</item>
<item name="android:shadowRadius">2.0</item>
</style>
<style name="EditText">
<item name="android:shadowColor">@android:color/black</item>
<item name="android:shadowRadius">1.0</item>
<item name="android:background">@android:drawable/btn_default</item>
<item name="android:textAppearance">?android:attr/textAppearanceMedium</item>
</style>
<style name="Button">
<item name="android:background">@android:drawable/edit_text</item>
<item name="android:textAppearance">?android:attr/textAppearanceMedium</item>
</style>
</resources>
main.xml代码如下:
- <?xml version="1.0" encoding="utf-8"?>
- <LinearLayout xmlns:android="http://schemas.android.com/apk/res/android"
- android:orientation="vertical" android:layout_width="fill_parent"
- android:layout_height="fill_parent">
- <TextView android:layout_width="fill_parent"
- android:layout_height="wrap_content" android:text="@string/hello"
- style="@style/TextView" />
- <EditText android:id="@+id/EditText01" android:layout_height="wrap_content"
- style="@style/EditText" android:layout_width="fill_parent"
- android:text="类似Button的EditText"></EditText>
- <EditText android:id="@+id/EditText02" android:layout_height="wrap_content"
- android:layout_width="fill_parent" android:text="普通的EditText"></EditText>
- <Button android:id="@+id/Button01" android:layout_height="wrap_content"
- style="@style/Button" android:layout_width="fill_parent" android:text="类似EditText的Button"></Button>
- </LinearLayout>
给我老师的人工智能教程打call!http://blog.csdn.net/jiangjunshow

新的改变
我们对Markdown编辑器进行了一些功能拓展与语法支持,除了标准的Markdown编辑器功能,我们增加了如下几点新功能,帮助你用它写博客:
- 全新的界面设计 ,将会带来全新的写作体验;
- 在创作中心设置你喜爱的代码高亮样式,Markdown 将代码片显示选择的高亮样式 进行展示;
- 增加了 图片拖拽 功能,你可以将本地的图片直接拖拽到编辑区域直接展示;
- 全新的 KaTeX数学公式 语法;
- 增加了支持甘特图的mermaid语法1 功能;
- 增加了 多屏幕编辑 Markdown文章功能;
- 增加了 焦点写作模式、预览模式、简洁写作模式、左右区域同步滚轮设置 等功能,功能按钮位于编辑区域与预览区域中间;
- 增加了 检查列表 功能。
功能快捷键
撤销:Ctrl/Command + Z
重做:Ctrl/Command + Y
加粗:Ctrl/Command + B
斜体:Ctrl/Command + I
标题:Ctrl/Command + Shift + H
无序列表:Ctrl/Command + Shift + U
有序列表:Ctrl/Command + Shift + O
检查列表:Ctrl/Command + Shift + C
插入代码:Ctrl/Command + Shift + K
插入链接:Ctrl/Command + Shift + L
插入图片:Ctrl/Command + Shift + G
合理的创建标题,有助于目录的生成
直接输入1次#,并按下space后,将生成1级标题。
输入2次#,并按下space后,将生成2级标题。
以此类推,我们支持6级标题。有助于使用TOC语法后生成一个完美的目录。
如何改变文本的样式
强调文本 强调文本
加粗文本 加粗文本
标记文本
删除文本
引用文本
H2O is是液体。
210 运算结果是 1024.
插入链接与图片
链接: link.
图片: 
带尺寸的图片: ![]()
当然,我们为了让用户更加便捷,我们增加了图片拖拽功能。
如何插入一段漂亮的代码片
去博客设置页面,选择一款你喜欢的代码片高亮样式,下面展示同样高亮的 代码片.
// An highlighted block var foo = 'bar'; 生成一个适合你的列表
- 项目
- 项目
- 项目
- 项目
- 项目1
- 项目2
- 项目3
- 计划任务
- 完成任务
创建一个表格
一个简单的表格是这么创建的:
| 项目 | Value |
|---|---|
| 电脑 | $1600 |
| 手机 | $12 |
| 导管 | $1 |
设定内容居中、居左、居右
使用:---------:居中
使用:----------居左
使用----------:居右
| 第一列 | 第二列 | 第三列 |
|---|---|---|
| 第一列文本居中 | 第二列文本居右 | 第三列文本居左 |
SmartyPants
SmartyPants将ASCII标点字符转换为“智能”印刷标点HTML实体。例如:
| TYPE | ASCII | HTML |
|---|---|---|
| Single backticks | 'Isn't this fun?' |
‘Isn’t this fun?’ |
| Quotes | "Isn't this fun?" |
“Isn’t this fun?” |
| Dashes | -- is en-dash, --- is em-dash |
– is en-dash, — is em-dash |
创建一个自定义列表
- Markdown
- Text-to- HTML conversion tool
- Authors
- John
- Luke
如何创建一个注脚
一个具有注脚的文本。2
注释也是必不可少的
Markdown将文本转换为 HTML。
KaTeX数学公式
您可以使用渲染LaTeX数学表达式 KaTeX:
Gamma公式展示 是通过欧拉积分
你可以找到更多关于的信息 LaTeX 数学表达式here.
新的甘特图功能,丰富你的文章
gantt
        dateFormat  YYYY-MM-DD
        title Adding GANTT diagram functionality to mermaid
        section 现有任务
        已完成               :done,    des1, 2014-01-06,2014-01-08
        进行中               :active,  des2, 2014-01-09, 3d
        计划一               :         des3, after des2, 5d
        计划二               :         des4, after des3, 5d
- 关于 甘特图 语法,参考 这儿,
UML 图表
可以使用UML图表进行渲染。 Mermaid. 例如下面产生的一个序列图::
这将产生一个流程图。:
- 关于 Mermaid 语法,参考 这儿,
FLowchart流程图
我们依旧会支持flowchart的流程图:
- 关于 Flowchart流程图 语法,参考 这儿.
导出与导入
导出
如果你想尝试使用此编辑器, 你可以在此篇文章任意编辑。当你完成了一篇文章的写作, 在上方工具栏找到 文章导出 ,生成一个.md文件或者.html文件进行本地保存。
导入
如果你想加载一篇你写过的.md文件或者.html文件,在上方工具栏可以选择导入功能进行对应扩展名的文件导入,
继续你的创作。
注脚的解释 ↩︎