PS一句:最终还是选择CSDN来整理发表这几年的知识点,该文章平行迁移到CSDN。因为CSDN也支持MarkDown语法了,牛逼啊!
【工匠若水 http://blog.csdn.net/yanbober 转载烦请注明出处,尊重分享成果】
最近相对来说比较闲,加上养病,所以没事干就撸些自己之前的知识点为博客,方便自己也方便别人。
1 背景
之所以选择这个知识点来分析有以下几个原因:
- 逛GitHub时发现关注的isuss中有人不停的在讨论Android中的Looper , Handler , Message有什么关系。
- 其实这个知识点对于Android初学者来说很常用,但是初学者可能前期一直处于会用不知其原理的阶段。
- 这个知识点也是Android面试中一个高频问题。
基于以上几点也得拿出来分析分析,该篇博客从实例到源码完全进行了剖析(包含Handler、Message、MessageQueue、Looper、HandlerThread等源码),不同于网上很多只是分析局部的博客。
你可能在刚开始接触Android开发时就会知道如下问题:
Android的UI时线程不安全的,如果在线程中更新UI会出现异常,导致程序崩溃;同时如果UI中做耗时操作又会导致臭名昭著的ANR异常。
为了解决如上这些问题,我们怎办呢?很简单,通常最经典常用的做法就是使用Android的异步消息机制实现即可(创建一个Message对象,使用Handler发送出去,然后在Handler的handleMessage()方法中获得刚才发送的Message对象,然后在这里进行UI操作)。所以说还是很有必要了解异步消息机制的Looper , Handler , Message等原理的。
如下开始一个示例使用,然后通过源码分析吧。
2 示例展示
如下示例展示了UI Thread与Child Thread之间互相发送消息,同时在UI Thread与Child Thread中分别定义Handler。这样如果没有mCount的判断,这段程序会一直死循环打印下去。

public class MainActivity extends ActionBarActivity {
    private int mCount = 0;
    private Handler mHandlerThr = null;
    private Handler mHandler = new Handler() {
        @Override
        public void handleMessage(Message msg) {
            super.handleMessage(msg);
            Log.d(null, ">>>>>>>>>>>>>UI# mHandler--handleMessage--msg.what="+msg.what);
            //接收发送到UI线程的消息,然后向线程中的Handler发送msg 1。
            mHandlerThr.sendEmptyMessage(1);
            mCount++;
            if (mCount >= 3) {
                //由于mHandlerThr是在Child Thread创建,Looper手动死循环阻塞,所以需要quit。
                mHandlerThr.getLooper().quit();
            }
        }
    };

    @Override
    protected void onCreate(Bundle savedInstanceState) {
        super.onCreate(savedInstanceState);
        setContentView(R.layout.activity_main);

        initData();
    }

    @Override
    protected void onStop() {
        super.onStop();
        //删除所有call与msg
        mHandler.removeCallbacksAndMessages(null);
    }

    private void initData() {
        Log.d(null, ">>>>>>>>>>>>>UI# begin start thread!!!");
        new Thread() {
            @Override
            public void run() {
                super.run();
                Looper.prepare();
                mHandlerThr = new Handler() {
                    @Override
                    public void handleMessage(Message msg) {
                        super.handleMessage(msg);
                        Log.d(null, ">>>>>>>>>>>>>Child# mHandlerThr--handleMessage--msg.what=" + msg.what);
                        //接收发送到子线程的消息,然后向UI线程中的Handler发送msg 0。
                        mHandler.sendEmptyMessage(0);
                    }
                };

                Log.d(null, ">>>>>>>>>>>>>Child# begin start send msg!!!");
                //Activity中启动Thread,在Thread结束前发送msg 0到UI Thread。
                mHandler.sendEmptyMessage(0);

                Looper.loop(); //不能在这个后面添加代码,程序是无法运行到这行之后的。
            }
        }.start();
    }
}
运行结果展示如下:
>>>>>>>>>>>>>UI# begin start thread!!!
>>>>>>>>>>>>>Child# begin start send msg!!!
>>>>>>>>>>>>>UI# mHandler--handleMessage--msg.what=0
>>>>>>>>>>>>>Child# mHandlerThr--handleMessage--msg.what=1
>>>>>>>>>>>>>UI# mHandler--handleMessage--msg.what=0
>>>>>>>>>>>>>Child# mHandlerThr--handleMessage--msg.what=1
>>>>>>>>>>>>>UI# mHandler--handleMessage--msg.what=0
怎么样,这和你平时用的Handler一样吧,对于Handler异步处理的简单基础示例先说到这,接下来依据上面示例的写法分析原因与源代码原理。
3 分析Android 5.1.1(API 22)异步消息机制源码
3-1 看看Handler的实例化过程源码
3-1-1 Handler实例化源码
从哪着手分析呢?当然是实例化构造函数呀,所以我们先从Handler的默认构造函数开始分析,如下:
    /**
     * Default constructor associates this handler with the {@link Looper} for the
     * current thread.
     *
     * If this thread does not have a looper, this handler won't be able to receive messages
     * so an exception is thrown.
     */
    public Handler() {
        this(null, false);
    }
通过注释也能看到,默认构造函数没有参数,而且调运了带有两个参数的其他构造函数,第一个参数传递为null,第二个传递为false。
这个构造函数得到的Handler默认属于当前线程,而且如果当前线程如果没有Looper则通过这个默认构造实例化Handler时会抛出异常,至于是啥异常还有为啥咱们继续往下分析,this(null, false)的实现如下:
    public Handler(Callback callback, boolean async) {
        if (FIND_POTENTIAL_LEAKS) {
            final Class<? extends Handler> klass = getClass();
            if ((klass.isAnonymousClass() || klass.isMemberClass() || klass.isLocalClass()) &&
                    (klass.getModifiers() & Modifier.STATIC) == 0) {
                Log.w(TAG, "The following Handler class should be static or leaks might occur: " +
                    klass.getCanonicalName());
            }
        }

        mLooper = Looper.myLooper();
        if (mLooper == null) {
            throw new RuntimeException(
                "Can't create handler inside thread that has not called Looper.prepare()");
        }
        mQueue = mLooper.mQueue;
        mCallback = callback;
        mAsynchronous = async;
}可以看到,在第11行调用了mLooper = Looper.myLooper();语句,然后获取了一个Looper对象mLooper ,如果mLooper实例为空,则会抛出一个运行时异常(Can’t create handler inside thread that has not called Looper.prepare()!)。
3-1-2 Looper实例化源码
好奇的你指定在想什么时候mLooper 对象才可能为空呢?很简单,跳进去看下吧,Looper类的静态方法myLooper如下:
    /**
     * Return the Looper object associated with the current thread.  Returns
     * null if the calling thread is not associated with a Looper.
     */
    public static Looper myLooper() {
        return sThreadLocal.get();
    }
咦?这里好简单。单单就是从sThreadLocal对象中get了一个Looper对象返回。跟踪了一下sThreadLocal对象,发现他定义在Looper中,是一个static final类型的ThreadLocal<Looper>对象(在Java中,一般情况下,通过ThreadLocal.set() 到线程中的对象是该线程自己使用的对象,其他线程是不需要访问的,也访问不到的,各个线程中访问的是不同的对象。)。所以可以看出,如果sThreadLocal中有Looper存在就返回Looper,没有Looper存在自然就返回null了。
这时候你一定有疑惑,既然这里是通过sThreadLocal的get获得Looper,那指定有地方对sThreadLocal进行set操作吧?是的,我们在Looper类中跟踪发现如下:
    private static void prepare(boolean quitAllowed) {
        if (sThreadLocal.get() != null) {
            throw new RuntimeException("Only one Looper may be created per thread");
        }
        sThreadLocal.set(new Looper(quitAllowed));
    }
看着这个Looper的static方法prepare没有?这段代码首先判断sThreadLocal中是否已经存在Looper了,如果还没有则创建一个新的Looper设置进去。
那就看下Looper的实例化,如下:
    private Looper(boolean quitAllowed) {
        mQueue = new MessageQueue(quitAllowed);
        mThread = Thread.currentThread();
    }
可以看见Looper构造函数无非就是创建了一个MessageQueue(它是一个消息队列,用于将所有收到的消息以队列的形式进行排列,并提供入队和出队的方法。)和货到当前Thread实例引用而已。通过这里可以发现,一个Looper只能对应了一个MessageQueue。
你可能会说上面的例子在子线程中明明先调运的是Looper.prepare();方法,这里怎么有参数了?那就继续看吧,如下:
    public static void prepare() {
        prepare(true);
    }
可以看见,prepare()仅仅是对prepare(boolean quitAllowed) 的封装而已,默认传入了true,也就是将MessageQueue对象中的quitAllowed标记标记为true而已,至于MessageQueue后面会分析。
稀奇古怪的事情来了!如果你足够留意上面的例子,你会发现我们在UI Thread中创建Handler时没有调用Looper.prepare();,而在initData方法中创建的Child Thread中首先就调运了Looper.prepare();。你指定很奇怪吧?UI Thread为啥不需要呢?上面源码分析明明需要先保证mLooper对象不为null呀?
这是由于在UI线程(Activity等)启动的时候系统已经帮我们自动调用了Looper.prepare()方法。
那么在哪启动的呢?这个涉及Android系统架构问题比较多,后面文章会分析Activity的启动流程。这里你只要知道,以前一直都说Activity的人口是onCreate方法,其实android上一个应用的入口应该是ActivityThread类的main方法就行了。
所以为了解开UI Thread为何不需要创建Looper对象的原因,我们看下ActivityThread的main方法,如下:
    public static void main(String[] args) {
        SamplingProfilerIntegration.start();

        // CloseGuard defaults to true and can be quite spammy.  We
        // disable it here, but selectively enable it later (via
        // StrictMode) on debug builds, but using DropBox, not logs.
        CloseGuard.setEnabled(false);

        Environment.initForCurrentUser();

        // Set the reporter for event logging in libcore
        EventLogger.setReporter(new EventLoggingReporter());

        Security.addProvider(new AndroidKeyStoreProvider());

        // Make sure TrustedCertificateStore looks in the right place for CA certificates
        final File configDir = Environment.getUserConfigDirectory(UserHandle.myUserId());
        TrustedCertificateStore.setDefaultUserDirectory(configDir);

        Process.setArgV0("<pre-initialized>");

        Looper.prepareMainLooper();

        ActivityThread thread = new ActivityThread();
        thread.attach(false);

        if (sMainThreadHandler == null) {
            sMainThreadHandler = thread.getHandler();
        }

        if (false) {
            Looper.myLooper().setMessageLogging(new
                    LogPrinter(Log.DEBUG, "ActivityThread"));
        }

        Looper.loop();

        throw new RuntimeException("Main thread loop unexpectedly exited");
}看见22行没?没说错吧?Looper.prepareMainLooper();,我们跳到Looper看下prepareMainLooper方法,如下:
    public static void prepareMainLooper() {
        prepare(false);
        synchronized (Looper.class) {
            if (sMainLooper != null) {
                throw new IllegalStateException("The main Looper has already been prepared.");
            }
            sMainLooper = myLooper();
        }
    }
可以看到,UI线程中会始终存在一个Looper对象(sMainLooper 保存在Looper类中,UI线程通过getMainLooper方法获取UI线程的Looper对象),从而不需要再手动去调用Looper.prepare()方法了。如下Looper类提供的get方法:
    public static Looper getMainLooper() {
        synchronized (Looper.class) {
            return sMainLooper;
        }
    }
看见没有,到这里整个Handler实例化与为何子线程在实例化Handler之前需要先调运Looper.prepare();语句的原理分析完毕。
3-1-3 Handler与Looper实例化总结
到此先初步总结下上面关于Handler实例化的一些关键信息,具体如下:
-
在主线程中可以直接创建Handler对象,而在子线程中需要先调用Looper.prepare()才能创建Handler对象,否则运行抛出”Can’t create handler inside thread that has not called Looper.prepare()”异常信息。
-
每个线程中最多只能有一个Looper对象,否则抛出异常。
-
可以通过Looper.myLooper()获取当前线程的Looper实例,通过Looper.getMainLooper()获取主(UI)线程的Looper实例。
-
一个Looper只能对应了一个MessageQueue。
-
一个线程中只有一个Looper实例,一个MessageQueue实例,可以有多个Handler实例。
Handler对象也创建好了,接下来就该用了吧,所以下面咱们从Handler的收发消息角度来分析分析源码。
3-2 继续看看Handler消息收发机制源码
3-2-1 通过Handler发消息到消息队列
还记得上面的例子吗?我们在Child Thread的最后通过主线程的Handler对象调运sendEmptyMessage方法发送出去了一条消息。
当然,其实Handler类提供了许发送消息的方法,我们这个例子只是用了最简单的发送一个empty消息而已,有时候我们会先定义一个Message,然后通过Handler提供的其他方法进行发送。通过分析Handler源码发现Handler中提供的很多个发送消息方法中除了sendMessageAtFrontOfQueue()方法之外,其它的发送消息方法最终都调用了sendMessageAtTime()方法。所以,咱们先来看下这个sendMessageAtTime方法,如下:
    public boolean sendMessageAtTime(Message msg, long uptimeMillis) {
        MessageQueue queue = mQueue;
        if (queue == null) {
            RuntimeException e = new RuntimeException(
                    this + " sendMessageAtTime() called with no mQueue");
            Log.w("Looper", e.getMessage(), e);
            return false;
        }
        return enqueueMessage(queue, msg, uptimeMillis);
    }
再看下Handler中和其他发送方法不同的sendMessageAtFrontOfQueue方法,如下:
    public final boolean sendMessageAtFrontOfQueue(Message msg) {
        MessageQueue queue = mQueue;
        if (queue == null) {
            RuntimeException e = new RuntimeException(
                this + " sendMessageAtTime() called with no mQueue");
            Log.w("Looper", e.getMessage(), e);
            return false;
        }
        return enqueueMessage(queue, msg, 0);
    }
对比上面两个方法可以发现,表面上说Handler的sendMessageAtFrontOfQueue方法和其他发送方法不同,其实实质是相同的,仅仅是sendMessageAtFrontOfQueue方法是sendMessageAtTime方法的一个特例而已(sendMessageAtTime最后一个参数传递0就变为了sendMessageAtFrontOfQueue方法)。所以咱们现在继续分析sendMessageAtTime方法,如下分析:
sendMessageAtTime(Message msg, long uptimeMillis)方法有两个参数;msg是我们发送的Message对象,uptimeMillis表示发送消息的时间,uptimeMillis的值等于从系统开机到当前时间的毫秒数再加上延迟时间。
在该方法的第二行可以看到queue = mQueue,而mQueue是在Handler实例化时构造函数中实例化的。在Handler的构造函数中可以看见mQueue = mLooper.mQueue;,而Looper的mQueue对象上面分析过了,是在Looper的构造函数中创建的一个MessageQueue。
接着第9行可以看到,上面说的两个参数和刚刚得到的queue对象都传递到了enqueueMessage(queue, msg, uptimeMillis)方法中,那就看下这个方法吧,如下:
    private boolean enqueueMessage(MessageQueue queue, Message msg, long uptimeMillis) {
        msg.target = this;
        if (mAsynchronous) {
            msg.setAsynchronous(true);
        }
        return queue.enqueueMessage(msg, uptimeMillis);
    }
这个方法首先将我们要发送的消息Message的target属性设置为当前Handler对象(进行关联);接着将msg与uptimeMillis这两个参数都传递到MessageQueue(消息队列)的enqueueMessage()方法中,所以接下来我们就继续分析MessageQueue类的enqueueMessage方法,如下:
    boolean enqueueMessage(Message msg, long when) {
        if (msg.target == null) {
            throw new IllegalArgumentException("Message must have a target.");
        }
        if (msg.isInUse()) {
            throw new IllegalStateException(msg + " This message is already in use.");
        }

        synchronized (this) {
            if (mQuitting) {
                IllegalStateException e = new IllegalStateException(
                        msg.target + " sending message to a Handler on a dead thread");
                Log.w("MessageQueue", e.getMessage(), e);
                msg.recycle();
                return false;
            }

            msg.markInUse();
            msg.when = when;
            Message p = mMessages;
            boolean needWake;
            if (p == null || when == 0 || when < p.when) {
                // New head, wake up the event queue if blocked.
                msg.next = p;
                mMessages = msg;
                needWake = mBlocked;
            } else {
                // Inserted within the middle of the queue.  Usually we don't have to wake
                // up the event queue unless there is a barrier at the head of the queue
                // and the message is the earliest asynchronous message in the queue.
                needWake = mBlocked && p.target == null && msg.isAsynchronous();
                Message prev;
                for (;;) {
                    prev = p;
                    p = p.next;
                    if (p == null || when < p.when) {
                        break;
                    }
                    if (needWake && p.isAsynchronous()) {
                        needWake = false;
                    }
                }
                msg.next = p; // invariant: p == prev.next
                prev.next = msg;
            }

            // We can assume mPtr != 0 because mQuitting is false.
            if (needWake) {
                nativeWake(mPtr);
            }
        }
        return true;
    }
通过这个方法名可以看出来通过Handler发送消息实质就是把消息Message添加到MessageQueue消息队列中的过程而已。
通过上面遍历等next操作可以看出来,MessageQueue消息队列对于消息排队是通过类似c语言的链表来存储这些有序的消息的。其中的mMessages对象表示当前待处理的消息;然后18到49行可以看出,消息插入队列的实质就是将所有的消息按时间(uptimeMillis参数,上面有介绍)进行排序。所以还记得上面sendMessageAtFrontOfQueue方法吗?它的实质就是把消息添加到MessageQueue消息队列的头部(uptimeMillis为0,上面有分析)。
到此Handler的发送消息及发送的消息如何存入到MessageQueue消息队列的逻辑分析完成。
那么问题来了!既然消息都存入到了MessageQueue消息队列,当然要取出来消息吧,不然存半天有啥意义呢?我们知道MessageQueue的对象在Looper构造函数中实例化的;一个Looper对应一个MessageQueue,所以说Handler发送消息是通过Handler构造函数里拿到的Looper对象的成员MessageQueue的enqueueMessage方法将消息插入队列,也就是说出队列一定也与Handler和Looper和MessageQueue有关系。
还记不记得上面实例部分中Child Thread最后调运的Looper.loop();方法呢?这个方法其实就是取出MessageQueue消息队列里的消息方法。具体在下面分析。
3-2-2 通过Handler接收发送的消息
先来看下上面例子中Looper.loop();这行代码调运的方法,如下:
    /**
     * Run the message queue in this thread. Be sure to call
     * {@link #quit()} to end the loop.
     */
    public static void loop() {
        final Looper me = myLooper();
        if (me == null) {
            throw new RuntimeException("No Looper; Looper.prepare() wasn't called on this thread.");
        }
        final MessageQueue queue = me.mQueue;

        // Make sure the identity of this thread is that of the local process,
        // and keep track of what that identity token actually is.
        Binder.clearCallingIdentity();
        final long ident = Binder.clearCallingIdentity();

        for (;;) {
            Message msg = queue.next(); // might block
            if (msg == null) {
                // No message indicates that the message queue is quitting.
                return;
            }

            // This must be in a local variable, in case a UI event sets the logger
            Printer logging = me.mLogging;
            if (logging != null) {
                logging.println(">>>>> Dispatching to " + msg.target + " " +
                        msg.callback + ": " + msg.what);
            }

            msg.target.dispatchMessage(msg);

            if (logging != null) {
                logging.println("<<<<< Finished to " + msg.target + " " + msg.callback);
            }

            // Make sure that during the course of dispatching the
            // identity of the thread wasn't corrupted.
            final long newIdent = Binder.clearCallingIdentity();
            if (ident != newIdent) {
                Log.wtf(TAG, "Thread identity changed from 0x"
                        + Long.toHexString(ident) + " to 0x"
                        + Long.toHexString(newIdent) + " while dispatching to "
                        + msg.target.getClass().getName() + " "
                        + msg.callback + " what=" + msg.what);
            }

            msg.recycleUnchecked();
        }
    }
可以看到,第6行首先得到了当前线程的Looper对象me,接着第10行通过当前Looper对象得到与Looper对象一一对应的MessageQueue消息队列(也就类似上面发送消息部分,Handler通过myLoop方法得到Looper对象,然后获取Looper的MessageQueue消息队列对象)。17行进入一个死循环,18行不断地调用MessageQueue的next()方法,进入MessageQueue这个类查看next方法,如下:
    Message next() {
        // Return here if the message loop has already quit and been disposed.
        // This can happen if the application tries to restart a looper after quit
        // which is not supported.
        final long ptr = mPtr;
        if (ptr == 0) {
            return null;
        }

        int pendingIdleHandlerCount = -1; // -1 only during first iteration
        int nextPollTimeoutMillis = 0;
        for (;;) {
            if (nextPollTimeoutMillis != 0) {
                Binder.flushPendingCommands();
            }

            nativePollOnce(ptr, nextPollTimeoutMillis);

            synchronized (this) {
                // Try to retrieve the next message.  Return if found.
                final long now = SystemClock.uptimeMillis();
                Message prevMsg = null;
                Message msg = mMessages;
                if (msg != null && msg.target == null) {
                    // Stalled by a barrier.  Find the next asynchronous message in the queue.
                    do {
                        prevMsg = msg;
                        msg = msg.next;
                    } while (msg != null && !msg.isAsynchronous());
                }
                if (msg != null) {
                    if (now < msg.when) {
                        // Next message is not ready.  Set a timeout to wake up when it is ready.
                        nextPollTimeoutMillis = (int) Math.min(msg.when - now, Integer.MAX_VALUE);
                    } else {
                        // Got a message.
                        mBlocked = false;
                        if (prevMsg != null) {
                            prevMsg.next = msg.next;
                        } else {
                            mMessages = msg.next;
                        }
                        msg.next = null;
                        if (false) Log.v("MessageQueue", "Returning message: " + msg);
                        return msg;
                    }
                } else {
                    // No more messages.
                    nextPollTimeoutMillis = -1;
                }

                // Process the quit message now that all pending messages have been handled.
                if (mQuitting) {
                    dispose();
                    return null;
                }

                // If first time idle, then get the number of idlers to run.
                // Idle handles only run if the queue is empty or if the first message
                // in the queue (possibly a barrier) is due to be handled in the future.
                if (pendingIdleHandlerCount < 0
                        && (mMessages == null || now < mMessages.when)) {
                    pendingIdleHandlerCount = mIdleHandlers.size();
                }
                if (pendingIdleHandlerCount <= 0) {
                    // No idle handlers to run.  Loop and wait some more.
                    mBlocked = true;
                    continue;
                }

                if (mPendingIdleHandlers == null) {
                    mPendingIdleHandlers = new IdleHandler[Math.max(pendingIdleHandlerCount, 4)];
                }
                mPendingIdleHandlers = mIdleHandlers.toArray(mPendingIdleHandlers);
            }

            // Run the idle handlers.
            // We only ever reach this code block during the first iteration.
            for (int i = 0; i < pendingIdleHandlerCount; i++) {
                final IdleHandler idler = mPendingIdleHandlers[i];
                mPendingIdleHandlers[i] = null; // release the reference to the handler

                boolean keep = false;
                try {
                    keep = idler.queueIdle();
                } catch (Throwable t) {
                    Log.wtf("MessageQueue", "IdleHandler threw exception", t);
                }

                if (!keep) {
                    synchronized (this) {
                        mIdleHandlers.remove(idler);
                    }
                }
            }

            // Reset the idle handler count to 0 so we do not run them again.
            pendingIdleHandlerCount = 0;

            // While calling an idle handler, a new message could have been delivered
            // so go back and look again for a pending message without waiting.
            nextPollTimeoutMillis = 0;
        }
    }
可以看出来,这个next方法就是消息队列的出队方法(与上面分析的MessageQueue消息队列的enqueueMessage方法对比)。可以看见上面代码就是如果当前MessageQueue中存在待处理的消息mMessages就将这个消息出队,然后让下一条消息成为mMessages,否则就进入一个阻塞状态(在上面Looper类的loop方法上面也有英文注释,明确说到了阻塞特性),一直等到有新的消息入队。
继续看loop()方法的第30行(msg.target.dispatchMessage(msg);),每当有一个消息出队就将它传递到msg.target的dispatchMessage()方法中。其中这个msg.target其实就是上面分析Handler发送消息代码部分Handler的enqueueMessage方法中的msg.target = this;语句,也就是当前Handler对象。所以接下来的重点自然就是回到Handler类看看我们熟悉的dispatchMessage()方法,如下:
    /**
     * Handle system messages here.
     */
    public void dispatchMessage(Message msg) {
        if (msg.callback != null) {
            handleCallback(msg);
        } else {
            if (mCallback != null) {
                if (mCallback.handleMessage(msg)) {
                    return;
                }
            }
            handleMessage(msg);
        }
    }
可以看见dispatchMessage方法中的逻辑比较简单,具体就是如果mCallback不为空,则调用mCallback的handleMessage()方法,否则直接调用Handler的handleMessage()方法,并将消息对象作为参数传递过去。
这样我相信大家就都明白了为什么handleMessage()方法中可以获取到之前发送的消息了吧!
对了,既然上面说了获取消息在MessageQueue消息队列中是一个死循环的阻塞等待,所以Looper的quit方法也很重要,这样在不需要时可以退出这个死循环,如上面实例部分使用所示。
3-2-3 结束MessageQueue消息队列阻塞死循环源码分析
如下展示了Looper类的quit方法源码:
    public void quit() {
        mQueue.quit(false);
    }
看见没有,quit方法实质就是调运了MessageQueue消息队列的quit,如下:
    void quit(boolean safe) {
        if (!mQuitAllowed) {
            throw new IllegalStateException("Main thread not allowed to quit.");
        }

        synchronized (this) {
            if (mQuitting) {
                return;
            }
            mQuitting = true;

            if (safe) {
                removeAllFutureMessagesLocked();
            } else {
                removeAllMessagesLocked();
            }

            // We can assume mPtr != 0 because mQuitting was previously false.
            nativeWake(mPtr);
        }
    }
看见上面2到4行代码没有,通过判断标记mQuitAllowed来决定该消息队列是否可以退出,然而当mQuitAllowed为fasle时抛出的异常竟然是”Main thread not allowed to quit.”,Main Thread,所以可以说明Main Thread关联的Looper一一对应的MessageQueue消息队列是不能通过该方法退出的。
你可能会疑惑这个mQuitAllowed在哪设置的?
其实他是MessageQueue构造函数传递参数传入的,而MessageQueue对象的实例化是在Looper的构造函数实现的,所以不难发现mQuitAllowed参数实质是从Looper的构函数传入的。上面实例化Handler模块源码分析时说过,Looper实例化是在Looper的静态方法prepare(boolean quitAllowed)中处理的,也就是说mQuitAllowed是由Looper.prpeare(boolean quitAllowed)参数传入的。追根到底说明mQuitAllowed就是Looper.prpeare的参数,我们默认调运的Looper.prpeare();其中对mQuitAllowed设置为了true,所以可以通过quit方法退出,而主线程ActivityThread的main中使用的是Looper.prepareMainLooper();,这个方法里对mQuitAllowed设置为false,所以才会有上面说的”Main thread not allowed to quit.”。
回到quit方法继续看,可以发现实质就是对mQuitting标记置位,这个mQuitting标记在MessageQueue的阻塞等待next方法中用做了判断条件,所以可以通过quit方法退出整个当前线程的loop循环。
到此整个Android的一次完整异步消息机制分析使用流程结束。接下来进行一些总结提升与拓展。
3-3 简单小结下Handler整个使用过程与原理
通过上面的源码分析原理我们可以总结出整个异步消息处理流程的关系图如下:
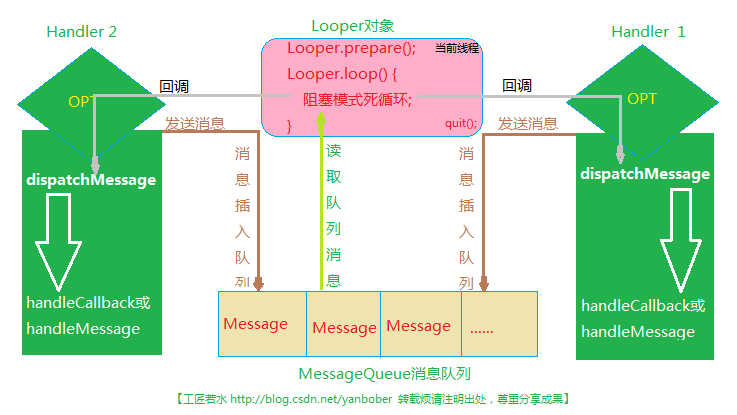
这幅图很明显的表达出了Handler异步机制的来龙去脉,不做过多解释。
上面实例部分我们只是演示了Handler的局部方法,具体Handler还有很多方法,下面详细介绍。
3-4 再来看看Handler源码的其他常用方法
在上面例子中我们只是演示了发送消息的sendEmptyMessage(int what)方法,其实Handler有如下一些发送方式:
sendMessage(Message msg); sendEmptyMessage(int what);
sendEmptyMessageDelayed(int what, long delayMillis);sendEmptyMessageAtTime(int what, long uptimeMillis); sendMessageDelayed(Message msg, long delayMillis); sendMessageAtTime(Message msg, long uptimeMillis); sendMessageAtFrontOfQueue(Message msg);方法。
这些方法不再做过多解释,用法雷同,顶一个Message决定啥时发送到target去。
post(Runnable r); postDelayed(Runnable r, long delayMillis);等post系列方法。
该方法实质源码其实就是如下:
    public final boolean postDelayed(Runnable r, long delayMillis)
    {
        return sendMessageDelayed(getPostMessage(r), delayMillis);
    }
额,原来post方法的实质也是调运sendMessageDelayed()方法去处理的额,看见getPostMessage(r)方法没?如下源码:
    private static Message getPostMessage(Runnable r) {
        Message m = Message.obtain();
        m.callback = r;
        return m;
    }
如上方法仅仅是将消息的callback字段指定为传入的Runnable对象r。其实这个Message对象的m.callback就是上面分析Handler接收消息回调处理dispatchMessage()方法中调运的。在Handler的dispatchMessage方法中首先判断如果Message的callback等于null才会去调用handleMessage()方法,否则就调用handleCallback()方法。那就再看下Handler的handleCallback()方法源码,如下:
    private static void handleCallback(Message message) {
        message.callback.run();
    }
额,这里竟然直接执行了Runnable对象的run()方法。所以说我们在Runnable对象的run()方法里更新UI的效果完全和在handleMessage()方法中更新UI相同,特别强调这个Runnable的run方法还在当前线程中阻塞执行,没有创建新的线程(很多人以为是Runnable就创建了新线程)。
Activity.runOnUiThread(Runnable);方法。
首先看下Activity的runOnUiThread方法源码:
    public final void runOnUiThread(Runnable action) {
        if (Thread.currentThread() != mUiThread) {
            mHandler.post(action);
        } else {
            action.run();
        }
    }
看见没有,实质还是在UI线程中执行了Runnable的run方法。不做过多解释。
View.post(Runnable);和View.postDelayed(Runnable action, long delayMillis);方法。
首先看下View的postDelayed方法源码:
    public boolean postDelayed(Runnable action, long delayMillis) {
        final AttachInfo attachInfo = mAttachInfo;
        if (attachInfo != null) {
            return attachInfo.mHandler.postDelayed(action, delayMillis);
        }
        // Assume that post will succeed later
        ViewRootImpl.getRunQueue().postDelayed(action, delayMillis);
        return true;
    }
看见没有,实质还是在UI线程中执行了Runnable的run方法。不做过多解释。
到此基本上关于Handler的所有发送消息方式都被解释明白了。既然会用了基本的那就得提高下,接下来看看关于Message的一点优化技巧。
3-5 关于Handler发送消息的一点优化分析
还记得我们说过,当发送一个消息时我们首先会new一个Message对象,然后再发送吗?你是不是觉得每次new Message很浪费呢?那么我们就来分析一下这个问题。
如下是我们正常发送消息的代码局部片段:
    Message message = new Message();
    message.arg1 = 110;
    message.arg2 = 119;
    message.what = 0x120;
    message.obj = "Test Message Content!";

    mHandler.sendMessage(message);
相信很多初学者都是这么发送消息的吧?当有大量多次发送时如上写法会不太高效。不卖关子,先直接看达到同样效果的优化写法,如下:
mHandler.sendMessage(mHandler.obtainMessage(0x120, 110, 119, "\"Test Message Content!\""));- 1
咦?怎么send时没实例化Message?这是咋回事?我们看下
mHandler.obtainMessage(0x120, 110, 119, "\"Test Message Content!\"")这一段代码,obtainMessage是Handler提供的一个方法,看下源码:
    public final Message obtainMessage(int what, int arg1, int arg2, Object obj)
    {
        return Message.obtain(this, what, arg1, arg2, obj);
    }
这方法竟然直接调运了Message类的静态方法obtain,我们再去看看obtain的源码,如下:
    public static Message obtain(Handler h, int what,
            int arg1, int arg2, Object obj) {
        Message m = obtain();
        m.target = h;
        m.what = what;
        m.arg1 = arg1;
        m.arg2 = arg2;
        m.obj = obj;

        return m;
    }
看见没有?首先又调运一个无参的obtain方法,然后设置Message各种参数后返回。我们继续看下这个无参方法,如下:
    /**
     * Return a new Message instance from the global pool. Allows us to
     * avoid allocating new objects in many cases.
     */
    public static Message obtain() {
        synchronized (sPoolSync) {
            if (sPool != null) {
                Message m = sPool;
                sPool = m.next;
                m.next = null;
                m.flags = 0; // clear in-use flag
                sPoolSize--;
                return m;
            }
        }
        return new Message();
    }
真相大白了!看见注释没有?从整个Messge池中返回一个新的Message实例,在许多情况下使用它,因为它能避免分配新的对象。
所以看见这两种获取Message写法的优缺点没有呢?明显可以看见通过调用Handler的obtainMessage方法获取Message对象就能避免创建对象,从而减少内存的开销了。所以推荐这种写法!!!
3-6 关于Handler导致内存泄露的分析与解决方法
正如上面我们实例部分的代码,使用Android Lint会提示我们这样一个Warning,如下:
In Android, Handler classes should be static or leaks might occur.- 1
意思是说在Android中Handler类应该是静态的否则可能发生泄漏。
啥是内存泄漏呢?
Java通过GC自动检查内存中的对象,如果GC发现一个或一组对象为不可到达状态,则将该对象从内存中回收。也就是说,一个对象不被任何引用所指向,则该对象会在被GC发现的时候被回收;另外,如果一组对象中只包含互相的引用,而没有来自它们外部的引用(例如有两个对象A和B互相持有引用,但没有任何外部对象持有指向A或B的引用),这仍然属于不可到达,同样会被GC回收。本该被回收的对象没被回收就是内存泄漏。
Handler中怎么泄漏的呢?
当使用内部类(包括匿名类)来创建Handler的时候,Handler对象会隐式地持有一个外部类对象(通常是一个Activity)的引用。而Handler通常会伴随着一个耗时的后台线程一起出现,这个后台线程在任务执行完毕之后,通过消息机制通知Handler,然后Handler把消息发送到UI线程。然而,如果用户在耗时线程执行过程中关闭了Activity(正常情况下Activity不再被使用,它就有可能在GC检查时被回收掉),由于这时线程尚未执行完,而该线程持有Handler的引用,这个Handler又持有Activity的引用,就导致该Activity暂时无法被回收(即内存泄露)。
Handler内存泄漏解决方案呢?
方案一:通过程序逻辑来进行保护
-
在关闭Activity的时候停掉你的后台线程。线程停掉了,就相当于切断了Handler和外部连接的线,Activity自然会在合适的时候被回收。
-
如果你的Handler是被delay的Message持有了引用,那么使用相应的Handler的removeCallbacks()方法,把消息对象从消息队列移除就行了(如上面的例子部分的onStop中代码)。
方案二:将Handler声明为静态类
静态类不持有外部类的对象,所以你的Activity可以随意被回收。代码如下:
static class TestHandler extends Handler {
    @Override
    public void handleMessage(Message msg) {
        mImageView.setImageBitmap(mBitmap);
    }
}
这时你会发现,由于Handler不再持有外部类对象的引用,导致程序不允许你在Handler中操作Activity中的对象了。所以你需要在Handler中增加一个对Activity的弱引用(WeakReference),如下:
static class TestHandler extends Handler {
    WeakReference<Activity > mActivityReference;

    TestHandler(Activity activity) {
        mActivityReference= new WeakReference<Activity>(activity);
    }

    @Override
    public void handleMessage(Message msg) {
        final Activity activity = mActivityReference.get();
        if (activity != null) {
            mImageView.setImageBitmap(mBitmap);
        }
    }
}
如上就是关于Handler内存泄漏的分析及解决方案。
可能在你会用了Handler之后见过HandlerThread这个关键字,那我们接下来就看看HandlerThread吧。
4 关于Android异步消息处理机制进阶的HandlerThread源码分析
4-1 Android 5.1.1(API 22) HandlerThread源码
很多人在会使用Handler以后会发现有些代码里出现了HandlerThread,然后就分不清HandlerThread与Handler啥关系,咋回事之类的。这里就来分析分析HandlerThread的源码。如下:
public class HandlerThread extends Thread {
    //线程的优先级
    int mPriority;
    //线程的id
    int mTid = -1;
    //一个与Handler关联的Looper对象
    Looper mLooper;

    public HandlerThread(String name) {
        super(name);
        //设置优先级为默认线程
        mPriority = android.os.Process.THREAD_PRIORITY_DEFAULT;
    }

    public HandlerThread(String name, int priority) {
        super(name);
        mPriority = priority;
    }
    //可重写方法,Looper.loop之前在线程中需要处理的其他逻辑在这里实现
    protected void onLooperPrepared() {
    }
    //HandlerThread线程的run方法
    @Override
    public void run() {
        //获取当前线程的id
        mTid = Process.myTid();
        //创建Looper对象
        //这就是为什么我们要在调用线程的start()方法后才能得到Looper(Looper.myLooper不为Null)
        Looper.prepare();
        //同步代码块,当获得mLooper对象后,唤醒所有线程
        synchronized (this) {
            mLooper = Looper.myLooper();
            notifyAll();
        }
        //设置线程优先级
        Process.setThreadPriority(mPriority);
        //Looper.loop之前在线程中需要处理的其他逻辑
        onLooperPrepared();
        //建立了消息循环
        Looper.loop();
        //一般执行不到这句,除非quit消息队列
        mTid = -1;
    }

    public Looper getLooper() {
        if (!isAlive()) {
            //线程死了
            return null;
        }

        //同步代码块,正好和上面run方法中同步块对应
        //只要线程活着并且mLooper为null,则一直等待
        // If the thread has been started, wait until the looper has been created.
        synchronized (this) {
            while (isAlive() && mLooper == null) {
                try {
                    wait();
                } catch (InterruptedException e) {
                }
            }
        }
        return mLooper;
    }

    public boolean quit() {
        Looper looper = getLooper();
        if (looper != null) {
            //退出消息循环
            looper.quit();
            return true;
        }
        return false;
    }

    public boolean quitSafely() {
        Looper looper = getLooper();
        if (looper != null) {
            //退出消息循环
            looper.quitSafely();
            return true;
        }
        return false;
    }

    public int getThreadId() {
        //返回线程id
        return mTid;
    }
}
看见没有,这就是HandlerThread的系统源码,整个HandlerThread类很简单。如上对重点都进行了注释。
现在可以很负责的告诉你Handler到底与HandlerThread啥关系,其实HandlerThread就是Thread、Looper和Handler的组合实现,Android系统这么封装体现了Android系统组件的思想,同时也方便了开发者开发。
上面源码可以看到,HandlerThread主要是对Looper进行初始化,并提供一个Looper对象给新创建的Handler对象,使得Handler处理消息事件在子线程中处理。这样就发挥了Handler的优势,同时又可以很好的和线程结合到一起。
到此HandlerThread源码原理也分析完了,那么就差实战了,如下继续。
4-2 Android HandlerThread实战
上面分析了关于HandlerThread源码,下面就来演示一个实例,如下:
public class ListenerActivity extends Activity {
    private HandlerThread mHandlerThread = null;
    private Handler mThreadHandler = null;
    private Handler mUiHandler = null;

    @Override
    public void onCreate(Bundle savedInstanceState) {
        super.onCreate(savedInstanceState);

        setContentView(R.layout.main);

        initData();
    }

    private void initData() {
        Log.i(null, "Main Thread id="+Thread.currentThread().getId());

        mHandlerThread = new HandlerThread("HandlerWorkThread");
        //必须在实例化mThreadHandler之前调运start方法,原因上面源码已经分析了
        mHandlerThread.start();
        //将当前mHandlerThread子线程的Looper传入mThreadHandler,使得
        //mThreadHandler的消息队列依赖于子线程(在子线程中执行)
        mThreadHandler = new Handler(mHandlerThread.getLooper()) {
            @Override
            public void handleMessage(Message msg) {
                super.handleMessage(msg);
                Log.i(null, "在子线程中处理!id="+Thread.currentThread().getId());
                //从子线程往主线程发送消息
                mUiHandler.sendEmptyMessage(0);
            }
        };

        mUiHandler = new Handler() {
            @Override
            public void handleMessage(Message msg) {
                super.handleMessage(msg);
                Log.i(null, "在UI主线程中处理!id="+Thread.currentThread().getId());
            }
        };
        //从主线程往子线程发送消息
        mThreadHandler.sendEmptyMessage(1);
    }
}
运行结果如下:
Main Thread id=1
在子线程中处理!id=113
在UI主线程中处理!id=1
好了,不做过多解释了,很简单的。
5 关于Android异步消息处理机制总结
到此整个Android的异步处理机制Handler与HandlerThread等分析完成(关于Android的另一种异步处理机制AsyncTask后面有时间再分析)。相信通过这一篇文章你对Android的Handler使用还是原理都会有一个质的飞跃。
【工匠若水 http://blog.csdn.net/yanbober 转载烦请注明出处,尊重分享成果】
基于8.0源码解析:startService 启动过程
调用startService 后会到ContextWrapper中:
@Override
    public ComponentName startService(Intent service) {
        return mBase.startService(service);
    }
这个mBase就是Context,然后到ContextImpl中看一眼:
 @Override
1459    public ComponentName startService(Intent service) {
1460        warnIfCallingFromSystemProcess();
1461        return startServiceCommon(service, false, mUser);
1462    }
1463
又调用了startServiceCommon
private ComponentName startServiceCommon(Intent service, boolean requireForeground,
1487            UserHandle user) {
1488        try {
1489            validateServiceIntent(service);
1490            service.prepareToLeaveProcess(this);
1491            ComponentName cn = ActivityManager.getService().startService(
1492                mMainThread.getApplicationThread(), service, service.resolveTypeIfNeeded(
1493                            getContentResolver()), requireForeground,
1494                            getOpPackageName(), user.getIdentifier());
1495            if (cn != null) {
1496                if (cn.getPackageName().equals("!")) {
1497                    throw new SecurityException(
1498                            "Not allowed to start service " + service
1499                            + " without permission " + cn.getClassName());
1500                } else if (cn.getPackageName().equals("!!")) {
1501                    throw new SecurityException(
1502                            "Unable to start service " + service
1503                            + ": " + cn.getClassName());
1504                } else if (cn.getPackageName().equals("?")) {
1505                    throw new IllegalStateException(
1506                            "Not allowed to start service " + service + ": " + cn.getClassName());
1507                }
1508            }
1509            return cn;
1510        } catch (RemoteException e) {
1511            throw e.rethrowFromSystemServer();
1512        }
1513    }
1514
看到其中有这么一句:
 ComponentName cn = ActivityManager.getService().startService(
1492                mMainThread.getApplicationThread(), service, service.resolveTypeIfNeeded(
1493                            getContentResolver()), requireForeground,
1494                            getOpPackageName(), user.getIdentifier());
了解Binder机制的就会知道这会调用到ActivityManagerService中,
@Override
18125    public ComponentName startService(IApplicationThread caller, Intent service,
18126            String resolvedType, boolean requireForeground, String callingPackage, int userId)
18127            throws TransactionTooLargeException {
18128        enforceNotIsolatedCaller("startService");
18129        // Refuse possible leaked file descriptors
18130        if (service != null && service.hasFileDescriptors() == true) {
18131            throw new IllegalArgumentException("File descriptors passed in Intent");
18132        }
18133
18134        if (callingPackage == null) {
18135            throw new IllegalArgumentException("callingPackage cannot be null");
18136        }
18137
18138        if (DEBUG_SERVICE) Slog.v(TAG_SERVICE,
18139                "*** startService: " + service + " type=" + resolvedType + " fg=" + requireForeground);
18140        synchronized(this) {
18141            final int callingPid = Binder.getCallingPid();
18142            final int callingUid = Binder.getCallingUid();
18143            final long origId = Binder.clearCallingIdentity();
18144            ComponentName res;
18145            try {
18146                res = mServices.startServiceLocked(caller, service,
18147                        resolvedType, callingPid, callingUid,
18148                        requireForeground, callingPackage, userId);
18149            } finally {
18150                Binder.restoreCallingIdentity(origId);
18151            }
18152            return res;
18153        }
18154    }
mServices.startServiceLocked
 ComponentName startServiceLocked(IApplicationThread caller, Intent service, String resolvedType,
328            int callingPid, int callingUid, boolean fgRequired, String callingPackage, final int userId)
329            throws TransactionTooLargeException {
330        if (DEBUG_DELAYED_STARTS) Slog.v(TAG_SERVICE, "startService: " + service
331                + " type=" + resolvedType + " args=" + service.getExtras());
332
333        final boolean callerFg;
334        if (caller != null) {
335            final ProcessRecord callerApp = mAm.getRecordForAppLocked(caller);
336            if (callerApp == null) {
337                throw new SecurityException(
338                        "Unable to find app for caller " + caller
339                        + " (pid=" + callingPid
340                        + ") when starting service " + service);
341            }
342            callerFg = callerApp.setSchedGroup != ProcessList.SCHED_GROUP_BACKGROUND;
343        } else {
344            callerFg = true;
345        }
346
347        ServiceLookupResult res =
348            retrieveServiceLocked(service, resolvedType, callingPackage,
349                    callingPid, callingUid, userId, true, callerFg, false);
350        if (res == null) {
351            return null;
352        }
353        if (res.record == null) {
354            return new ComponentName("!", res.permission != null
355                    ? res.permission : "private to package");
356        }
357
358        ServiceRecord r = res.record;
359
360        if (!mAm.mUserController.exists(r.userId)) {
361            Slog.w(TAG, "Trying to start service with non-existent user! " + r.userId);
362            return null;
363        }
364
365        // If this isn't a direct-to-foreground start, check our ability to kick off an
366        // arbitrary service
367        if (!r.startRequested && !fgRequired) {
368            // Before going further -- if this app is not allowed to start services in the
369            // background, then at this point we aren't going to let it period.
370            final int allowed = mAm.getAppStartModeLocked(r.appInfo.uid, r.packageName,
371                    r.appInfo.targetSdkVersion, callingPid, false, false);
372            if (allowed != ActivityManager.APP_START_MODE_NORMAL) {
373                Slog.w(TAG, "Background start not allowed: service "
374                        + service + " to " + r.name.flattenToShortString()
375                        + " from pid=" + callingPid + " uid=" + callingUid
376                        + " pkg=" + callingPackage);
377                if (allowed == ActivityManager.APP_START_MODE_DELAYED) {
378                    // In this case we are silently disabling the app, to disrupt as
379                    // little as possible existing apps.
380                    return null;
381                }
382                // This app knows it is in the new model where this operation is not
383                // allowed, so tell it what has happened.
384                UidRecord uidRec = mAm.mActiveUids.get(r.appInfo.uid);
385                return new ComponentName("?", "app is in background uid " + uidRec);
386            }
387        }
388
389        NeededUriGrants neededGrants = mAm.checkGrantUriPermissionFromIntentLocked(
390                callingUid, r.packageName, service, service.getFlags(), null, r.userId);
391
392        // If permissions need a review before any of the app components can run,
393        // we do not start the service and launch a review activity if the calling app
394        // is in the foreground passing it a pending intent to start the service when
395        // review is completed.
396        if (mAm.mPermissionReviewRequired) {
397            if (!requestStartTargetPermissionsReviewIfNeededLocked(r, callingPackage,
398                    callingUid, service, callerFg, userId)) {
399                return null;
400            }
401        }
402
403        if (unscheduleServiceRestartLocked(r, callingUid, false)) {
404            if (DEBUG_SERVICE) Slog.v(TAG_SERVICE, "START SERVICE WHILE RESTART PENDING: " + r);
405        }
406        r.lastActivity = SystemClock.uptimeMillis();
407        r.startRequested = true;
408        r.delayedStop = false;
409        r.fgRequired = fgRequired;
410        r.pendingStarts.add(new ServiceRecord.StartItem(r, false, r.makeNextStartId(),
411                service, neededGrants, callingUid));
412
413        final ServiceMap smap = getServiceMapLocked(r.userId);
414        boolean addToStarting = false;
415        if (!callerFg && !fgRequired && r.app == null
416                && mAm.mUserController.hasStartedUserState(r.userId)) {
417            ProcessRecord proc = mAm.getProcessRecordLocked(r.processName, r.appInfo.uid, false);
418            if (proc == null || proc.curProcState > ActivityManager.PROCESS_STATE_RECEIVER) {
419                // If this is not coming from a foreground caller, then we may want
420                // to delay the start if there are already other background services
421                // that are starting.  This is to avoid process start spam when lots
422                // of applications are all handling things like connectivity broadcasts.
423                // We only do this for cached processes, because otherwise an application
424                // can have assumptions about calling startService() for a service to run
425                // in its own process, and for that process to not be killed before the
426                // service is started.  This is especially the case for receivers, which
427                // may start a service in onReceive() to do some additional work and have
428                // initialized some global state as part of that.
429                if (DEBUG_DELAYED_SERVICE) Slog.v(TAG_SERVICE, "Potential start delay of "
430                        + r + " in " + proc);
431                if (r.delayed) {
432                    // This service is already scheduled for a delayed start; just leave
433                    // it still waiting.
434                    if (DEBUG_DELAYED_STARTS) Slog.v(TAG_SERVICE, "Continuing to delay: " + r);
435                    return r.name;
436                }
437                if (smap.mStartingBackground.size() >= mMaxStartingBackground) {
438                    // Something else is starting, delay!
439                    Slog.i(TAG_SERVICE, "Delaying start of: " + r);
440                    smap.mDelayedStartList.add(r);
441                    r.delayed = true;
442                    return r.name;
443                }
444                if (DEBUG_DELAYED_STARTS) Slog.v(TAG_SERVICE, "Not delaying: " + r);
445                addToStarting = true;
446            } else if (proc.curProcState >= ActivityManager.PROCESS_STATE_SERVICE) {
447                // We slightly loosen when we will enqueue this new service as a background
448                // starting service we are waiting for, to also include processes that are
449                // currently running other services or receivers.
450                addToStarting = true;
451                if (DEBUG_DELAYED_STARTS) Slog.v(TAG_SERVICE,
452                        "Not delaying, but counting as bg: " + r);
453            } else if (DEBUG_DELAYED_STARTS) {
454                StringBuilder sb = new StringBuilder(128);
455                sb.append("Not potential delay (state=").append(proc.curProcState)
456                        .append(' ').append(proc.adjType);
457                String reason = proc.makeAdjReason();
458                if (reason != null) {
459                    sb.append(' ');
460                    sb.append(reason);
461                }
462                sb.append("): ");
463                sb.append(r.toString());
464                Slog.v(TAG_SERVICE, sb.toString());
465            }
466        } else if (DEBUG_DELAYED_STARTS) {
467            if (callerFg || fgRequired) {
468                Slog.v(TAG_SERVICE, "Not potential delay (callerFg=" + callerFg + " uid="
469                        + callingUid + " pid=" + callingPid + " fgRequired=" + fgRequired + "): " + r);
470            } else if (r.app != null) {
471                Slog.v(TAG_SERVICE, "Not potential delay (cur app=" + r.app + "): " + r);
472            } else {
473                Slog.v(TAG_SERVICE,
474                        "Not potential delay (user " + r.userId + " not started): " + r);
475            }
476        }
477
478        ComponentName cmp = startServiceInnerLocked(smap, service, r, callerFg, addToStarting);
479        return cmp;
480    }
最后调用了ComponentName cmp = startServiceInnerLocked(smap, service, r, callerFg, addToStarting);
 ComponentName startServiceInnerLocked(ServiceMap smap, Intent service, ServiceRecord r,
527            boolean callerFg, boolean addToStarting) throws TransactionTooLargeException {
528        ServiceState stracker = r.getTracker();
529        if (stracker != null) {
530            stracker.setStarted(true, mAm.mProcessStats.getMemFactorLocked(), r.lastActivity);
531        }
532        r.callStart = false;
533        synchronized (r.stats.getBatteryStats()) {
534            r.stats.startRunningLocked();
535        }
536        String error = bringUpServiceLocked(r, service.getFlags(), callerFg, false, false);
537        if (error != null) {
538            return new ComponentName("!!", error);
539        }
540
541        if (r.startRequested && addToStarting) {
542            boolean first = smap.mStartingBackground.size() == 0;
543            smap.mStartingBackground.add(r);
544            r.startingBgTimeout = SystemClock.uptimeMillis() + mAm.mConstants.BG_START_TIMEOUT;
545            if (DEBUG_DELAYED_SERVICE) {
546                RuntimeException here = new RuntimeException("here");
547                here.fillInStackTrace();
548                Slog.v(TAG_SERVICE, "Starting background (first=" + first + "): " + r, here);
549            } else if (DEBUG_DELAYED_STARTS) {
550                Slog.v(TAG_SERVICE, "Starting background (first=" + first + "): " + r);
551            }
552            if (first) {
553                smap.rescheduleDelayedStartsLocked();
554            }
555        } else if (callerFg || r.fgRequired) {
556            smap.ensureNotStartingBackgroundLocked(r);
557        }
558
559        return r.name;
560    }
这个方法中又调用到了 String error = bringUpServiceLocked(r, service.getFlags(), callerFg, false, false);
然后掉用到:
sendServiceArgsLocked(r, execInFg, false);
进而调用到:
realStartServiceLocked(r, app, execInFg);
private final void realStartServiceLocked(ServiceRecord r,
2190            ProcessRecord app, boolean execInFg) throws RemoteException {
2191        if (app.thread == null) {
2192            throw new RemoteException();
2193        }
2194        if (DEBUG_MU)
2195            Slog.v(TAG_MU, "realStartServiceLocked, ServiceRecord.uid = " + r.appInfo.uid
2196                    + ", ProcessRecord.uid = " + app.uid);
2197        r.app = app;
2198        r.restartTime = r.lastActivity = SystemClock.uptimeMillis();
2199
2200        final boolean newService = app.services.add(r);
2201        bumpServiceExecutingLocked(r, execInFg, "create");
2202        mAm.updateLruProcessLocked(app, false, null);
2203        updateServiceForegroundLocked(r.app, /* oomAdj= */ false);
2204        mAm.updateOomAdjLocked();
2205
2206        boolean created = false;
2207        try {
2208            if (LOG_SERVICE_START_STOP) {
2209                String nameTerm;
2210                int lastPeriod = r.shortName.lastIndexOf('.');
2211                nameTerm = lastPeriod >= 0 ? r.shortName.substring(lastPeriod) : r.shortName;
2212                EventLogTags.writeAmCreateService(
2213                        r.userId, System.identityHashCode(r), nameTerm, r.app.uid, r.app.pid);
2214            }
2215            synchronized (r.stats.getBatteryStats()) {
2216                r.stats.startLaunchedLocked();
2217            }
2218            mAm.notifyPackageUse(r.serviceInfo.packageName,
2219                                 PackageManager.NOTIFY_PACKAGE_USE_SERVICE);
2220            app.forceProcessStateUpTo(ActivityManager.PROCESS_STATE_SERVICE);
2221            app.thread.scheduleCreateService(r, r.serviceInfo,
2222                    mAm.compatibilityInfoForPackageLocked(r.serviceInfo.applicationInfo),
2223                    app.repProcState);
2224            r.postNotification();
2225            created = true;
2226        } catch (DeadObjectException e) {
2227            Slog.w(TAG, "Application dead when creating service " + r);
2228            mAm.appDiedLocked(app);
2229            throw e;
2230        } finally {
2231            if (!created) {
2232                // Keep the executeNesting count accurate.
2233                final boolean inDestroying = mDestroyingServices.contains(r);
2234                serviceDoneExecutingLocked(r, inDestroying, inDestroying);
2235
2236                // Cleanup.
2237                if (newService) {
2238                    app.services.remove(r);
2239                    r.app = null;
2240                }
2241
2242                // Retry.
2243                if (!inDestroying) {
2244                    scheduleServiceRestartLocked(r, false);
2245                }
2246            }
2247        }
2248
2249        if (r.whitelistManager) {
2250            app.whitelistManager = true;
2251        }
2252
2253        requestServiceBindingsLocked(r, execInFg);
2254
2255        updateServiceClientActivitiesLocked(app, null, true);
2256
2257        // If the service is in the started state, and there are no
2258        // pending arguments, then fake up one so its onStartCommand() will
2259        // be called.
2260        if (r.startRequested && r.callStart && r.pendingStarts.size() == 0) {
2261            r.pendingStarts.add(new ServiceRecord.StartItem(r, false, r.makeNextStartId(),
2262                    null, null, 0));
2263        }
2264
2265        sendServiceArgsLocked(r, execInFg, true);
2266
2267        if (r.delayed) {
2268            if (DEBUG_DELAYED_STARTS) Slog.v(TAG_SERVICE, "REM FR DELAY LIST (new proc): " + r);
2269            getServiceMapLocked(r.userId).mDelayedStartList.remove(r);
2270            r.delayed = false;
2271        }
2272
2273        if (r.delayedStop) {
2274            // Oh and hey we've already been asked to stop!
2275            r.delayedStop = false;
2276            if (r.startRequested) {
2277                if (DEBUG_DELAYED_STARTS) Slog.v(TAG_SERVICE,
2278                        "Applying delayed stop (from start): " + r);
2279                stopServiceLocked(r);
2280            }
2281        }
2282    }
app.thread.scheduleCreateService,这个thread就是IApplicationThread,就是ActivityThread对象,于是我们回到ActivityThread中:
public final void scheduleCreateService(IBinder token,
                ServiceInfo info, CompatibilityInfo compatInfo, int processState) {
            updateProcessState(processState, false);
            CreateServiceData s = new CreateServiceData();
            s.token = token;
            s.info = info;
            s.compatInfo = compatInfo;

            sendMessage(H.CREATE_SERVICE, s);
        }
我们去到H中找到对应的handleMessage处理CREATE_SERVICE的方法:
case CREATE_SERVICE:
                    Trace.traceBegin(Trace.TRACE_TAG_ACTIVITY_MANAGER, ("serviceCreate: " + String.valueOf(msg.obj)));
                    handleCreateService((CreateServiceData)msg.obj);
                    Trace.traceEnd(Trace.TRACE_TAG_ACTIVITY_MANAGER);
                    break;
然后handleCreateService:
private void handleCreateService(CreateServiceData data) {
        // If we are getting ready to gc after going to the background, well
        // we are back active so skip it.
        unscheduleGcIdler();

        LoadedApk packageInfo = getPackageInfoNoCheck(
                data.info.applicationInfo, data.compatInfo);
        Service service = null;
        try {
            java.lang.ClassLoader cl = packageInfo.getClassLoader();
            service = (Service) cl.loadClass(data.info.name).newInstance();
        } catch (Exception e) {
            if (!mInstrumentation.onException(service, e)) {
                throw new RuntimeException(
                    "Unable to instantiate service " + data.info.name
                    + ": " + e.toString(), e);
            }
        }

        try {
            if (localLOGV) Slog.v(TAG, "Creating service " + data.info.name);

            ContextImpl context = ContextImpl.createAppContext(this, packageInfo);
            context.setOuterContext(service);

            Application app = packageInfo.makeApplication(false, mInstrumentation);
            service.attach(context, this, data.info.name, data.token, app,
                    ActivityManagerNative.getDefault());
            service.onCreate();
            mServices.put(data.token, service);
            try {
                ActivityManagerNative.getDefault().serviceDoneExecuting(
                        data.token, SERVICE_DONE_EXECUTING_ANON, 0, 0);
            } catch (RemoteException e) {
                throw e.rethrowFromSystemServer();
            }
        } catch (Exception e) {
            if (!mInstrumentation.onException(service, e)) {
                throw new RuntimeException(
                    "Unable to create service " + data.info.name
                    + ": " + e.toString(), e);
            }
        }
    }
这个方法中service = (Service) cl.loadClass(data.info.name).newInstance();
用反射的方式创建了service对象;
然后ContextImpl context = ContextImpl.createAppContext(this, packageInfo);又创建了context对象;
然后用service.attach将context对象进行参数设置;
然后就调用了service.onCreate();
这就是Service的启动过程。
在刚刚realStartServiceLocked方法中:调用了 app.thread.scheduleCreateService方法后又调用了:
sendServiceArgsLocked(r, execInFg, true);
 private final void sendServiceArgsLocked(ServiceRecord r, boolean execInFg,
2285            boolean oomAdjusted) throws TransactionTooLargeException {
2286        final int N = r.pendingStarts.size();
2287        if (N == 0) {
2288            return;
2289        }
2290
2291        ArrayList<ServiceStartArgs> args = new ArrayList<>();
2292
2293        while (r.pendingStarts.size() > 0) {
2294            ServiceRecord.StartItem si = r.pendingStarts.remove(0);
2295            if (DEBUG_SERVICE) {
2296                Slog.v(TAG_SERVICE, "Sending arguments to: "
2297                        + r + " " + r.intent + " args=" + si.intent);
2298            }
2299            if (si.intent == null && N > 1) {
2300                // If somehow we got a dummy null intent in the middle,
2301                // then skip it.  DO NOT skip a null intent when it is
2302                // the only one in the list -- this is to support the
2303                // onStartCommand(null) case.
2304                continue;
2305            }
2306            si.deliveredTime = SystemClock.uptimeMillis();
2307            r.deliveredStarts.add(si);
2308            si.deliveryCount++;
2309            if (si.neededGrants != null) {
2310                mAm.grantUriPermissionUncheckedFromIntentLocked(si.neededGrants,
2311                        si.getUriPermissionsLocked());
2312            }
2313            mAm.grantEphemeralAccessLocked(r.userId, si.intent,
2314                    r.appInfo.uid, UserHandle.getAppId(si.callingId));
2315            bumpServiceExecutingLocked(r, execInFg, "start");
2316            if (!oomAdjusted) {
2317                oomAdjusted = true;
2318                mAm.updateOomAdjLocked(r.app, true);
2319            }
2320            if (r.fgRequired && !r.fgWaiting) {
2321                if (!r.isForeground) {
2322                    if (DEBUG_BACKGROUND_CHECK) {
2323                        Slog.i(TAG, "Launched service must call startForeground() within timeout: " + r);
2324                    }
2325                    scheduleServiceForegroundTransitionTimeoutLocked(r);
2326                } else {
2327                    if (DEBUG_BACKGROUND_CHECK) {
2328                        Slog.i(TAG, "Service already foreground; no new timeout: " + r);
2329                    }
2330                    r.fgRequired = false;
2331                }
2332            }
2333            int flags = 0;
2334            if (si.deliveryCount > 1) {
2335                flags |= Service.START_FLAG_RETRY;
2336            }
2337            if (si.doneExecutingCount > 0) {
2338                flags |= Service.START_FLAG_REDELIVERY;
2339            }
2340            args.add(new ServiceStartArgs(si.taskRemoved, si.id, flags, si.intent));
2341        }
2342
2343        ParceledListSlice<ServiceStartArgs> slice = new ParceledListSlice<>(args);
2344        slice.setInlineCountLimit(4);
2345        Exception caughtException = null;
2346        try {
2347            r.app.thread.scheduleServiceArgs(r, slice);
2348        } catch (TransactionTooLargeException e) {
2349            if (DEBUG_SERVICE) Slog.v(TAG_SERVICE, "Transaction too large for " + args.size()
2350                    + " args, first: " + args.get(0).args);
2351            Slog.w(TAG, "Failed delivering service starts", e);
2352            caughtException = e;
2353        } catch (RemoteException e) {
2354            // Remote process gone...  we'll let the normal cleanup take care of this.
2355            if (DEBUG_SERVICE) Slog.v(TAG_SERVICE, "Crashed while sending args: " + r);
2356            Slog.w(TAG, "Failed delivering service starts", e);
2357            caughtException = e;
2358        } catch (Exception e) {
2359            Slog.w(TAG, "Unexpected exception", e);
2360            caughtException = e;
2361        }
2362
2363        if (caughtException != null) {
2364            // Keep nesting count correct
2365            final boolean inDestroying = mDestroyingServices.contains(r);
2366            for (int i = 0; i < args.size(); i++) {
2367                serviceDoneExecutingLocked(r, inDestroying, inDestroying);
2368            }
2369            if (caughtException instanceof TransactionTooLargeException) {
2370                throw (TransactionTooLargeException)caughtException;
2371            }
2372        }
2373    }
看到有这么一句r.app.thread.scheduleServiceArgs(r, slice);
于是回到ActivityThread中:
public final void scheduleServiceArgs(IBinder token, boolean taskRemoved, int startId,
            int flags ,Intent args) {
            ServiceArgsData s = new ServiceArgsData();
            s.token = token;
            s.taskRemoved = taskRemoved;
            s.startId = startId;
            s.flags = flags;
            s.args = args;

            sendMessage(H.SERVICE_ARGS, s);
        }
还是去H中找对应的处理case:
case SERVICE_ARGS:
                    Trace.traceBegin(Trace.TRACE_TAG_ACTIVITY_MANAGER, ("serviceStart: " + String.valueOf(msg.obj)));
                    handleServiceArgs((ServiceArgsData)msg.obj);
                    Trace.traceEnd(Trace.TRACE_TAG_ACTIVITY_MANAGER);
                    break;
接着去看handleServiceArgs:
private void handleServiceArgs(ServiceArgsData data) {
        Service s = mServices.get(data.token);
        if (s != null) {
            try {
                if (data.args != null) {
                    data.args.setExtrasClassLoader(s.getClassLoader());
                    data.args.prepareToEnterProcess();
                }
                int res;
                if (!data.taskRemoved) {
                    res = s.onStartCommand(data.args, data.flags, data.startId);
                } else {
                    s.onTaskRemoved(data.args);
                    res = Service.START_TASK_REMOVED_COMPLETE;
                }

                QueuedWork.waitToFinish();

                try {
                    ActivityManagerNative.getDefault().serviceDoneExecuting(
                            data.token, SERVICE_DONE_EXECUTING_START, data.startId, res);
                } catch (RemoteException e) {
                    throw e.rethrowFromSystemServer();
                }
                ensureJitEnabled();
            } catch (Exception e) {
                if (!mInstrumentation.onException(s, e)) {
                    throw new RuntimeException(
                            "Unable to start service " + s
                            + " with " + data.args + ": " + e.toString(), e);
                }
            }
        }
    }
s.onStartCommand中s就是上面创建的service对象。那么onStartCommand方法就是在这里调用的。至此service启动过程完毕。