概述
HashMap 是一个以键值对存储数据的容器,但是在它是线程不安全的,在多线程的环境下它有很多潜在的问题。ConcurrentHashMap 作为 HashMap 的并发版本,是一个线程安全的容器,在高并发的环境下相比 HashTable 依然能维持良好的性能。ConcurrentHashMap 在 jdk1.8之前是采用的 segment 分段锁的思想,但是在 jdk1.8 之后作了非常大的改动,取消了分段锁,并且加入了红黑树来提高查找速度。下面通过阅读jdk1.8源代码,分析并发容器 ConcurrentHashMap 内部结构以及实现原理。
总览
继承关系
public class ConcurrentHashMap<K,V> extends AbstractMap<K,V> implements ConcurrentMap<K,V>, Serializable继承自 AbstractMap 实现了 ConcurrentMap 接口
public interface ConcurrentMap<K, V> extends Map<K, V> {

    @Override
    default V getOrDefault(Object key, V defaultValue) {
        ...
    }

    @Override
    default void forEach(BiConsumer<? super K, ? super V> action) {
        ...
    }

    V putIfAbsent(K key, V value);

    boolean remove(Object key, Object value);

    boolean replace(K key, V oldValue, V newValue);

    V replace(K key, V value);

    @Override
    default void replaceAll(BiFunction<? super K, ? super V, ? extends V> function) {
        ...
    }

    @Override
    default V computeIfAbsent(K key, Function<? super K, ? extends V> mappingFunction) {
        ...
    }

    @Override
    default V computeIfPresent(K key, BiFunction<? super K, ? super V, ? extends V> remappingFunction) {
        ...
    }

    @Override
    default V compute(K key, BiFunction<? super K, ? super V, ? extends V> remappingFunction) {
        ...
    }

    @Override
    default V merge(K key, V value, BiFunction<? super V, ? super V, ? extends V> remappingFunction) {
        ...
    }
}基本上是增加了一些默认的方法。关于java1.8默认方法有一段解释可以看这里。
继承体系基本和 HashMap 是差不多的。
内部结构
static class Node<K,V> implements Map.Entry<K,V> {
    final int hash;
    final K key;
    volatile V val;
    volatile Node<K,V> next;

    Node(int hash, K key, V val, Node<K,V> next) {
        this.hash = hash;
        this.key = key;
        this.val = val;
        this.next = next;
    }

    public final K getKey()       { return key; }
    public final V getValue()     { return val; }
    public final int hashCode()   { return key.hashCode() ^ val.hashCode(); }
    public final String toString(){ return key + "=" + val; }
    public final V setValue(V value) {
        throw new UnsupportedOperationException();
    }

    public final boolean equals(Object o) {
        Object k, v, u; Map.Entry<?,?> e;
        return ((o instanceof Map.Entry) &&
                (k = (e = (Map.Entry<?,?>)o).getKey()) != null &&
                (v = e.getValue()) != null &&
                (k == key || k.equals(key)) &&
                (v == (u = val) || v.equals(u)));
    }

    /**
     * Virtualized support for map.get(); overridden in subclasses.
     */
    Node<K,V> find(int h, Object k) {
        Node<K,V> e = this;
        if (k != null) {
            do {
                K ek;
                if (e.hash == h &&
                    ((ek = e.key) == k || (ek != null && k.equals(ek))))
                    return e;
            } while ((e = e.next) != null);
        }
        return null;
    }
}

transient volatile Node<K,V>[] table;

private transient volatile Node<K,V>[] nextTable;
一个 table 数组存放 Node, Node类继承自 Map.Entry,还有一个 nextTable 数组(这个是扩容时候使用的临时数组,后面会讲到)。和 HashMap 的内部结构非常的相似,但是不同的地方是 Node 类里面的 val 和 next 都被设置了 volatile 关键字(可见性,修改内容之后立即写入内存) ,table/nextTable 也被设置为了 volatile。
大致结构示意图是这样的

是一个数组+链表+红黑树的结构
基本操作
ConcurrentHashMap 1.8 之前采用的是 Reentrantlock,通过锁住一个 segment 来减少锁的竞争,不同 segment 的锁之间没有竞争关系,从而提高并发性能。 但是在 1.8 之后,做了非常大的修改,取消了 segment,采用了和 HashMap 相似的数据结构,使用了 synchronized 和大量的 CAS 操作来保证原子性,并且引入红黑树来提高查询的效率。
CAS
什么是 CAS (Compare And Swap) 操作?和 数据库乐观锁 的概念比较相似,不知道的可以搜索一下,大概意思是 基于计算机硬件实现一个原子操作,有三个参数:内存地址,期望值,要修改的新值,当期望值和内存当中的值进行比较不相等的时候,表示内存中的值已经被别线程改动过,这时候失败返回,当相等的时候,将内存中的值改为新的值,并返回成功。
下面将会看到很多类似这样的代码
U.compareAndSwapInt(this, SIZECTL, sc, -1)意思为获取到当前对象的 SIZECTL 偏移量(其实就是获取到了 sizeCtl 变量的值),与 sc 变量作比较,如果相等则将 sizeCtl 的值更新为 -1,并且返回true,如果 sizeCtl 和 sc 的值不相等的话,直接返回 false。 Java 是通过 Unsafe 类的 native 方法,调用的底层 cpu 指令来完成 CAS 操作的。
// Unsafe mechanics
private static final sun.misc.Unsafe U;
private static final long SIZECTL;
private static final long TRANSFERINDEX;
private static final long BASECOUNT;
private static final long CELLSBUSY;
private static final long CELLVALUE;
private static final long ABASE;
private static final int ASHIFT;

static {
    try {
        U = sun.misc.Unsafe.getUnsafe();
        Class<?> k = ConcurrentHashMap.class;
        SIZECTL = U.objectFieldOffset(k.getDeclaredField("sizeCtl"));
        TRANSFERINDEX = U.objectFieldOffset(k.getDeclaredField("transferIndex"));
        BASECOUNT = U.objectFieldOffset(k.getDeclaredField("baseCount"));
        CELLSBUSY = U.objectFieldOffset(k.getDeclaredField("cellsBusy"));
        Class<?> ck = CounterCell.class;
        CELLVALUE = U.objectFieldOffset(ck.getDeclaredField("value"));
        Class<?> ak = Node[].class;
        ABASE = U.arrayBaseOffset(ak);
        int scale = U.arrayIndexScale(ak);
        if ((scale & (scale - 1)) != 0)
            throw new Error("data type scale not a power of two");
        ASHIFT = 31 - Integer.numberOfLeadingZeros(scale);
    } catch (Exception e) {
        throw new Error(e);
    }
}
先通读一遍源代码,带着疑问,一行一行分析作者思路。
put
public V put(K key, V value) {
    return putVal(key, value, false);
}

final V putVal(K key, V value, boolean onlyIfAbsent) {
    if (key == null || value == null) throw new NullPointerException();
    int hash = spread(key.hashCode());
    int binCount = 0;
    for (Node<K,V>[] tab = table;;) {
        Node<K,V> f; int n, i, fh;
        if (tab == null || (n = tab.length) == 0)
            tab = initTable();
        else if ((f = tabAt(tab, i = (n - 1) & hash)) == null) {
            if (casTabAt(tab, i, null, new Node<K,V>(hash, key, value, null)))
                break;                   // no lock when adding to empty bin
        }
        else if ((fh = f.hash) == MOVED)
            tab = helpTransfer(tab, f);
        else {
            V oldVal = null;
            synchronized (f) {
                if (tabAt(tab, i) == f) {
                    if (fh >= 0) {
                        binCount = 1;
                        for (Node<K,V> e = f;; ++binCount) {
                            K ek;
                            if (e.hash == hash &&
                                ((ek = e.key) == key ||
                                 (ek != null && key.equals(ek)))) {
                                oldVal = e.val;
                                if (!onlyIfAbsent)
                                    e.val = value;
                                break;
                            }
                            Node<K,V> pred = e;
                            if ((e = e.next) == null) {
                                pred.next = new Node<K,V>(hash, key, value, null);
                                break;
                            }
                        }
                    }
                    else if (f instanceof TreeBin) {
                        Node<K,V> p;
                        binCount = 2;
                        if ((p = ((TreeBin<K,V>)f).putTreeVal(hash, key, value)) != null) {
                            oldVal = p.val;
                            if (!onlyIfAbsent)
                                p.val = value;
                        }
                    }
                }
            }
            if (binCount != 0) {
                if (binCount >= TREEIFY_THRESHOLD)
                    treeifyBin(tab, i);
                if (oldVal != null)
                    return oldVal;
                break;
            }
        }
    }
    addCount(1L, binCount);
    return null;
}
主要分为以下几个步骤:
1.先通过 spread 方法计算出 key 的hash值
static final int HASH_BITS = 0x7fffffff;

static final int spread(int h) {
    return (h ^ (h >>> 16)) & HASH_BITS;
}
spread 方法主要是 异或 传入key的高16位和低16位,并且将结果和 HASH_BITS 按位与(0x7fffffff 二进制表示为 011..31个1..1),目的为消除异或出来的结果的符号位,以免接下来计算数组位置是一个负数。
2.判断 table 是否为空,如果是空的就进行初始化。
private static final int DEFAULT_CAPACITY = 16;

private transient volatile int sizeCtl;

private final Node<K,V>[] initTable() {
    Node<K,V>[] tab; int sc;
    while ((tab = table) == null || tab.length == 0) {
        if ((sc = sizeCtl) < 0)
            Thread.yield(); // lost initialization race; just spin
        else if (U.compareAndSwapInt(this, SIZECTL, sc, -1)) {
            try {
                if ((tab = table) == null || tab.length == 0) {
                    int n = (sc > 0) ? sc : DEFAULT_CAPACITY;
                    @SuppressWarnings("unchecked")
                    Node<K,V>[] nt = (Node<K,V>[])new Node<?,?>[n];
                    table = tab = nt;
                    sc = n - (n >>> 2);
                }
            } finally {
                sizeCtl = sc;
            }
            break;
        }
    }
    return tab;
}
先判断一下 table 是否已被初始化,如果没有,使用 CAS 操作将 sizeCtl 更新为 -1,然后新建一个长度为 16 的 Node数组,结束之前将 sizeCtl 设置为 12 (sc = n - ( n >>> 2),n 初始化的时候为 16, n >>> 2 无符号右移2位就是 4,16 - 4 = 12。其实就是 16 * 负载因子0.75 = 12 )。数组内部超过12个位置被赋值的时候会进行扩容。
3.通过 (n-1) & hash 扰动函数 计算出数组位置,使用 CAS 操作 tabAt 获取该位置上的值,如果为空,新建一个 Node 放入这个位置。
4.判断该位置的hash值是否为 MOVED
static final int MOVED = -1;如果为 MOVED 表示此时数组正在发生扩容,那么当前线程帮助数组一起进行扩容操作。(后面会详细说到)
5.如果以上2种情况都不是,那么表示当前位置上存在 Node,判断当前节点下如果是链表,就遍历整个链表,如果找到相同的hash值和key直接返回旧值,如果没有找到则新建一个 Node 放到链表的最后。如果当前节点是一个红黑树(链表长度超过8会自动转为红黑树),那么按照红黑树的方法查找。注意这个地方使用了 synchronized 关键字,锁住了一个数组的位置,防止其他线程执行put操作的时候把链表上的值修改掉了。
6.出方法前有一个 addCount 方法
/**
 * Adds to count, and if table is too small and not already
 * resizing, initiates transfer. If already resizing, helps
 * perform transfer if work is available.  Rechecks occupancy
 * after a transfer to see if another resize is already needed
 * because resizings are lagging additions.
 *
 * @param x the count to add
 * @param check if <0, don't check resize, if <= 1 only check if uncontended
 */
private final void addCount(long x, int check) {
    CounterCell[] as; long b, s;
    if ((as = counterCells) != null ||
        !U.compareAndSwapLong(this, BASECOUNT, b = baseCount, s = b + x)) {
        CounterCell a; long v; int m;
        boolean uncontended = true;
        if (as == null || (m = as.length - 1) < 0 ||
            (a = as[ThreadLocalRandom.getProbe() & m]) == null ||
            !(uncontended =
              U.compareAndSwapLong(a, CELLVALUE, v = a.value, v + x))) {
            fullAddCount(x, uncontended);
            return;
        }
        if (check <= 1)
            return;
        s = sumCount();
    }
    if (check >= 0) {
        Node<K,V>[] tab, nt; int n, sc;
        while (s >= (long)(sc = sizeCtl) && (tab = table) != null &&
               (n = tab.length) < MAXIMUM_CAPACITY) {
            int rs = resizeStamp(n);
            if (sc < 0) {
                if ((sc >>> RESIZE_STAMP_SHIFT) != rs || sc == rs + 1 ||
                    sc == rs + MAX_RESIZERS || (nt = nextTable) == null ||
                    transferIndex <= 0)
                    break;
                if (U.compareAndSwapInt(this, SIZECTL, sc, sc + 1))
                    transfer(tab, nt);
            }
            else if (U.compareAndSwapInt(this, SIZECTL, sc,
                                         (rs << RESIZE_STAMP_SHIFT) + 2))
                transfer(tab, null);
            s = sumCount();
        }
    }
}
这个方法不是特别看得懂,但是看注释的意思是如果数组太小了,就扩容一下。如果已经在扩容了,就顺便帮着一起扩容。
相比 1.8 之前的代码还是很容易看懂的。
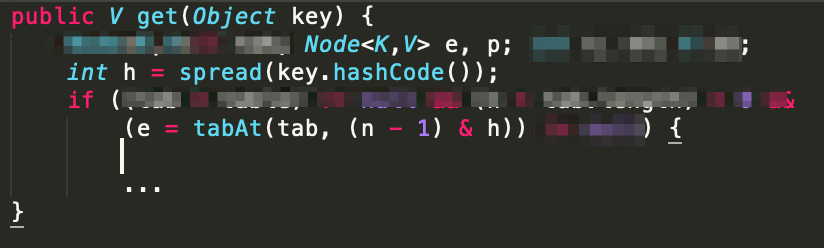
get
public V get(Object key) {
    Node<K,V>[] tab; Node<K,V> e, p; int n, eh; K ek;
    int h = spread(key.hashCode());
    if ((tab = table) != null && (n = tab.length) > 0 &&
        (e = tabAt(tab, (n - 1) & h)) != null) {
        if ((eh = e.hash) == h) {
            if ((ek = e.key) == key || (ek != null && key.equals(ek)))
                return e.val;
        }
        else if (eh < 0)
            return (p = e.find(h, key)) != null ? p.val : null;
        while ((e = e.next) != null) {
            if (e.hash == h &&
                ((ek = e.key) == key || (ek != null && key.equals(ek))))
                return e.val;
        }
    }
    return null;
}
get 方法还是一如既让的简单,根据key和hash值来进行查找,get方法是不加锁的。
remove
public V remove(Object key) {
    return replaceNode(key, null, null);
}

final V replaceNode(Object key, V value, Object cv) {
    int hash = spread(key.hashCode());
    for (Node<K,V>[] tab = table;;) {
        Node<K,V> f; int n, i, fh;
        if (tab == null || (n = tab.length) == 0 ||
            (f = tabAt(tab, i = (n - 1) & hash)) == null)
            break;
        else if ((fh = f.hash) == MOVED)
            tab = helpTransfer(tab, f);
        else {
            V oldVal = null;
            boolean validated = false;
            synchronized (f) {
                if (tabAt(tab, i) == f) {
                    if (fh >= 0) {
                        validated = true;
                        for (Node<K,V> e = f, pred = null;;) {
                            K ek;
                            if (e.hash == hash &&
                                ((ek = e.key) == key ||
                                 (ek != null && key.equals(ek)))) {
                                V ev = e.val;
                                if (cv == null || cv == ev ||
                                    (ev != null && cv.equals(ev))) {
                                    oldVal = ev;
                                    if (value != null)
                                        e.val = value;
                                    else if (pred != null)
                                        pred.next = e.next;
                                    else
                                        setTabAt(tab, i, e.next);
                                }
                                break;
                            }
                            pred = e;
                            if ((e = e.next) == null)
                                break;
                        }
                    }
                    else if (f instanceof TreeBin) {
                        validated = true;
                        TreeBin<K,V> t = (TreeBin<K,V>)f;
                        TreeNode<K,V> r, p;
                        if ((r = t.root) != null &&
                            (p = r.findTreeNode(hash, key, null)) != null) {
                            V pv = p.val;
                            if (cv == null || cv == pv ||
                                (pv != null && cv.equals(pv))) {
                                oldVal = pv;
                                if (value != null)
                                    p.val = value;
                                else if (t.removeTreeNode(p))
                                    setTabAt(tab, i, untreeify(t.first));
                            }
                        }
                    }
                }
            }
            if (validated) {
                if (oldVal != null) {
                    if (value == null)
                        addCount(-1L, -1);
                    return oldVal;
                }
                break;
            }
        }
    }
    return null;
}
remove 方法通过一遍代码也是比较简单的,同样也是锁住数组的一个位置,然后遍历这个位置上的链表,如果找到hash值和key相同的节点,将前一个节点的next指向下一个节点。注意到remove中也会判断数组是否处在扩容的阶段,如果是,会帮助一起扩容。
扩容
以上的部分都和 HashMap 差不多,但是读到这里才是 ConcurrentHashMap 精髓的地方,在 put 和 remove 方法里面都有一个 helpTransfer 方法。
/**
 * Helps transfer if a resize is in progress.
 */
final Node<K,V>[] helpTransfer(Node<K,V>[] tab, Node<K,V> f) {
    Node<K,V>[] nextTab; int sc;
    if (tab != null && (f instanceof ForwardingNode) &&
        (nextTab = ((ForwardingNode<K,V>)f).nextTable) != null) {
        int rs = resizeStamp(tab.length);
        while (nextTab == nextTable && table == tab &&
               (sc = sizeCtl) < 0) {
            if ((sc >>> RESIZE_STAMP_SHIFT) != rs || sc == rs + 1 ||
                sc == rs + MAX_RESIZERS || transferIndex <= 0)
                break;
            if (U.compareAndSwapInt(this, SIZECTL, sc, sc + 1)) {
                transfer(tab, nextTab);
                break;
            }
        }
        return nextTab;
    }
    return table;
}
看注释 Helps transfer if a resize is in progress. 如果数组正在发生扩容,那么帮着一起扩容。牛逼啊,并发扩容,多线程一起扩容。 看下 transfer 方法,具体是怎么实现的。代码比较长,稍微加了一些注释方便阅读。
static final class ForwardingNode<K,V> extends Node<K,V> {
    final Node<K,V>[] nextTable;
    ForwardingNode(Node<K,V>[] tab) {
        super(MOVED, null, null, null);
        this.nextTable = tab;
    }

    。。。
}

/**
 * Moves and/or copies the nodes in each bin to new table. See
 * above for explanation.
 */
private final void transfer(Node<K,V>[] tab, Node<K,V>[] nextTab) {

    /**
     * 将 n 右移3位 相当于除8,然后除以 CPU核心数。如果得到的结果小于 MIN_TRANSFER_STRIDE(16),那么就使用 16。
     * 如果临时表(nextTab)没有初始化,那么以2倍的大小初始化(n << 1),sizeCtl 设置为 Integer 的最大值
     * transferIndex 设置为 tab 的长度
     */
    int n = tab.length, stride;
    if ((stride = (NCPU > 1) ? (n >>> 3) / NCPU : n) < MIN_TRANSFER_STRIDE)
        stride = MIN_TRANSFER_STRIDE; // subdivide range

    if (nextTab == null) {            // initiating
        try {
            @SuppressWarnings("unchecked")
            Node<K,V>[] nt = (Node<K,V>[])new Node<?,?>[n << 1];
            nextTab = nt;
        } catch (Throwable ex) {      // try to cope with OOME
            sizeCtl = Integer.MAX_VALUE;
            return;
        }
        nextTable = nextTab;
        transferIndex = n;
    }

    /**
     * ForwardingNode 是一个标示类,它的hash字段值为 MOVED(-1),如果看到节点为 ForwardingNode 类表示这个位置
     * 已经被处理过了,这个位置上面的数据已经被搬走了,不需要处理了。
     * advance 为 true 表示当前节点已经处理完了,可以继续处理下一个节点
     */
    int nextn = nextTab.length;
    ForwardingNode<K,V> fwd = new ForwardingNode<K,V>(nextTab);
    boolean advance = true;
    boolean finishing = false; // to ensure sweep before committing nextTab

    /**
     * 从这里开始 遍历数组开始处理扩容
     */
    for (int i = 0, bound = 0;;) {
        Node<K,V> f; int fh;

        // 4
        while (advance) {
            int nextIndex, nextBound;
            if (--i >= bound || finishing)
                advance = false;
            else if ((nextIndex = transferIndex) <= 0) {
                i = -1;
                advance = false;
            }
            else if (U.compareAndSwapInt(this, TRANSFERINDEX, nextIndex,
                      nextBound = (nextIndex > stride ? nextIndex - stride : 0))) {
                bound = nextBound;
                i = nextIndex - 1;
                advance = false;
            }
        }

        /**
         * 这里是一些扩容完之后的赋值操作, sizeCtl 最终被设置为 新长度 * 负载因子 的结果
         */
        if (i < 0 || i >= n || i + n >= nextn) {
            int sc;
            if (finishing) {
                nextTable = null;
                table = nextTab;
                sizeCtl = (n << 1) - (n >>> 1);
                return;
            }
            if (U.compareAndSwapInt(this, SIZECTL, sc = sizeCtl, sc - 1)) {
                if ((sc - 2) != resizeStamp(n) << RESIZE_STAMP_SHIFT)
                    return;
                finishing = advance = true;
                i = n; // recheck before commit
            }
        }
        /**
         * 如果老的数组位置上为null,那么直接将该位置放一个 ForwardingNode,表示处理完
         */
        else if ((f = tabAt(tab, i)) == null)
            advance = casTabAt(tab, i, null, fwd);
        /**
         * 如果已经是 ForwardingNode,那么直接跳过,处理下一个
         */
        else if ((fh = f.hash) == MOVED)
            advance = true; // already processed
        else {
            /**
             * 这里是真正迁移数组的地方,分别是链表和红黑树的情况。fh >= 0 节点的hash值大于0,表示是链表,因为红黑树的hash值似乎为负数
             * 这里的迁移数据逻辑比较特别,概括一下是这样的
             * 将当前链表的每个节点的 hash 值与数组的长度按位与。结果只有2种,一种是0,另外一种是n(也就是数组的长度)
             * 将一个链表分成2组数据,然后一个循环,2组数据分别形成2个和原来顺序相反的链表
             * 刚才按位与结果为0的链表放在临时数组的原来序号位置,按位与结果不等于0的链表放在 i + n 的位置(原来位置加上数组长度的位置),
             * 迁移完将原来数组的位置的节点设置为 ForwardingNode, 然后进行下一轮。
             * 这个地方 synchronized(f) 使得不同的线程可以处理不同的节点而且互不影响。
             */
            synchronized (f) {
                if (tabAt(tab, i) == f) {
                    Node<K,V> ln, hn;

                    if (fh >= 0) {
                        int runBit = fh & n;
                        Node<K,V> lastRun = f;
                        for (Node<K,V> p = f.next; p != null; p = p.next) {
                            int b = p.hash & n;
                            if (b != runBit) {
                                runBit = b;
                                lastRun = p;
                            }
                        }
                        if (runBit == 0) {
                            ln = lastRun;
                            hn = null;
                        }
                        else {
                            hn = lastRun;
                            ln = null;
                        }
                        for (Node<K,V> p = f; p != lastRun; p = p.next) {
                            int ph = p.hash; K pk = p.key; V pv = p.val;
                            if ((ph & n) == 0)
                                ln = new Node<K,V>(ph, pk, pv, ln);
                            else
                                hn = new Node<K,V>(ph, pk, pv, hn);
                        }
                        setTabAt(nextTab, i, ln);
                        setTabAt(nextTab, i + n, hn);
                        setTabAt(tab, i, fwd);
                        advance = true;
                    }
                    else if (f instanceof TreeBin) {
                        TreeBin<K,V> t = (TreeBin<K,V>)f;
                        TreeNode<K,V> lo = null, loTail = null;
                        TreeNode<K,V> hi = null, hiTail = null;
                        int lc = 0, hc = 0;
                        for (Node<K,V> e = t.first; e != null; e = e.next) {
                            int h = e.hash;
                            TreeNode<K,V> p = new TreeNode<K,V>
                                (h, e.key, e.val, null, null);
                            if ((h & n) == 0) {
                                if ((p.prev = loTail) == null)
                                    lo = p;
                                else
                                    loTail.next = p;
                                loTail = p;
                                ++lc;
                            }
                            else {
                                if ((p.prev = hiTail) == null)
                                    hi = p;
                                else
                                    hiTail.next = p;
                                hiTail = p;
                                ++hc;
                            }
                        }
                        ln = (lc <= UNTREEIFY_THRESHOLD) ? untreeify(lo) :
                            (hc != 0) ? new TreeBin<K,V>(lo) : t;
                        hn = (hc <= UNTREEIFY_THRESHOLD) ? untreeify(hi) :
                            (lc != 0) ? new TreeBin<K,V>(hi) : t;
                        setTabAt(nextTab, i, ln);
                        setTabAt(nextTab, i + n, hn);
                        setTabAt(tab, i, fwd);
                        advance = true;
                    }
                }
            }
        }
    }
}
总结来说,扩容方法就是
- 计算每个线程可以处理区间。默认 16.
- 初始化临时数组 nextTable,扩容 2 倍,维持数组长度为2的指数幂的性质。
- 如果在数组的某个位置有数据,同步转移数据。将链表拆成 2 份,一份放在低位,一份放在高位。
- 将迁移过的数组赋值为 ForwardingNode 节点,记录为已迁移的状态。
上面的注释再结合下面的图一起来理解,模拟了一些数据
ConcurrentHashMap<String, Integer> concurrentHashMap = new ConcurrentHashMap();
concurrentHashMap.put("a", 1);
concurrentHashMap.put("q", 2);
concurrentHashMap.put("A", 1);
concurrentHashMap.put("AAA", 1);
concurrentHashMap.put("1", 1);
concurrentHashMap.put("122", 1);
concurrentHashMap.put("uha", 1);
concurrentHashMap.put("8y0", 1);
concurrentHashMap.put("01nf", 1);
concurrentHashMap.put("maog", 1);
concurrentHashMap.put("b", 1);
concurrentHashMap.put("c", 1);
concurrentHashMap.put("d", 1);
concurrentHashMap.put("e", 1);
concurrentHashMap.put("f", 1);
concurrentHashMap.put("g", 1);
concurrentHashMap.put("h", 1);
concurrentHashMap.put("i", 1);
concurrentHashMap.put("j", 1);
concurrentHashMap.put("k", 1);
concurrentHashMap.put("l", 1);
concurrentHashMap.put("m", 1);
concurrentHashMap.put("n", 1);
在map中依次放入这么多值

当put到k的时候超过了原数组的容量超过负载因子发生扩容,扩容前index=1位置和index=15位置的地方分别为2个链表,扩容后index=1的部分数据被转移到了index=17的位置,index=15位置上的部分数据被转移到了index=31的位置上。这么做的好处显而易见,缩短了链表的长度,维持良好的性能。
但是为什么要这么做,为什么链表要拆成拆成2份,为什么要和数组长度按位与,为什么一份放高位一份放地位,为什么这样拆分之后下一次get的能正确的找到数组的位置?网上分析源码的文章很多,但是我基本没有看到解释这些问题的。
为什么要和数组长度按位与
首先看一下 a 和 q 进过高低位异或之后的hash值二进制按位与的结果

按位与的结果主要取决于第5个位上面的值,如果第5位是0的放在原来的序号位不动,如果是1的放在 index + 原数组长度的位置。
那为什么要这么做,是因为要让map在扩容之后通过扰动函数能够取到正确的值。
当n=16的时候取得是最后4位,当n=32的时候取得是最后5位,作为数组下标
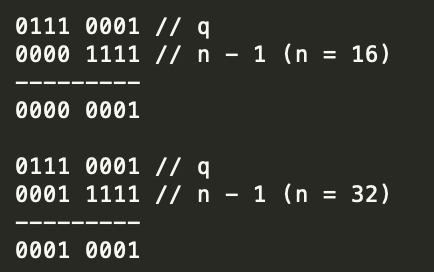
当n=16的时候取得的数组位置是 0001 对应 table[1] 的位置,当n=32的时候取得的数组位置是 10001 = 10000 + 0001 = 16 + 1 = 17 也就是 table[17] 的位置。
当第5位按位与为1的话,结果必定是 10000 加上某个数,而 10000 是 2的4次方 正好是16,正好是原来数组的长度。牛逼。
所以在迁移数据的时候才会有那种奇怪的操作,看似不经意的几行代码,其实是经过精心设计的,实在是佩服。