自动装机
- 需求
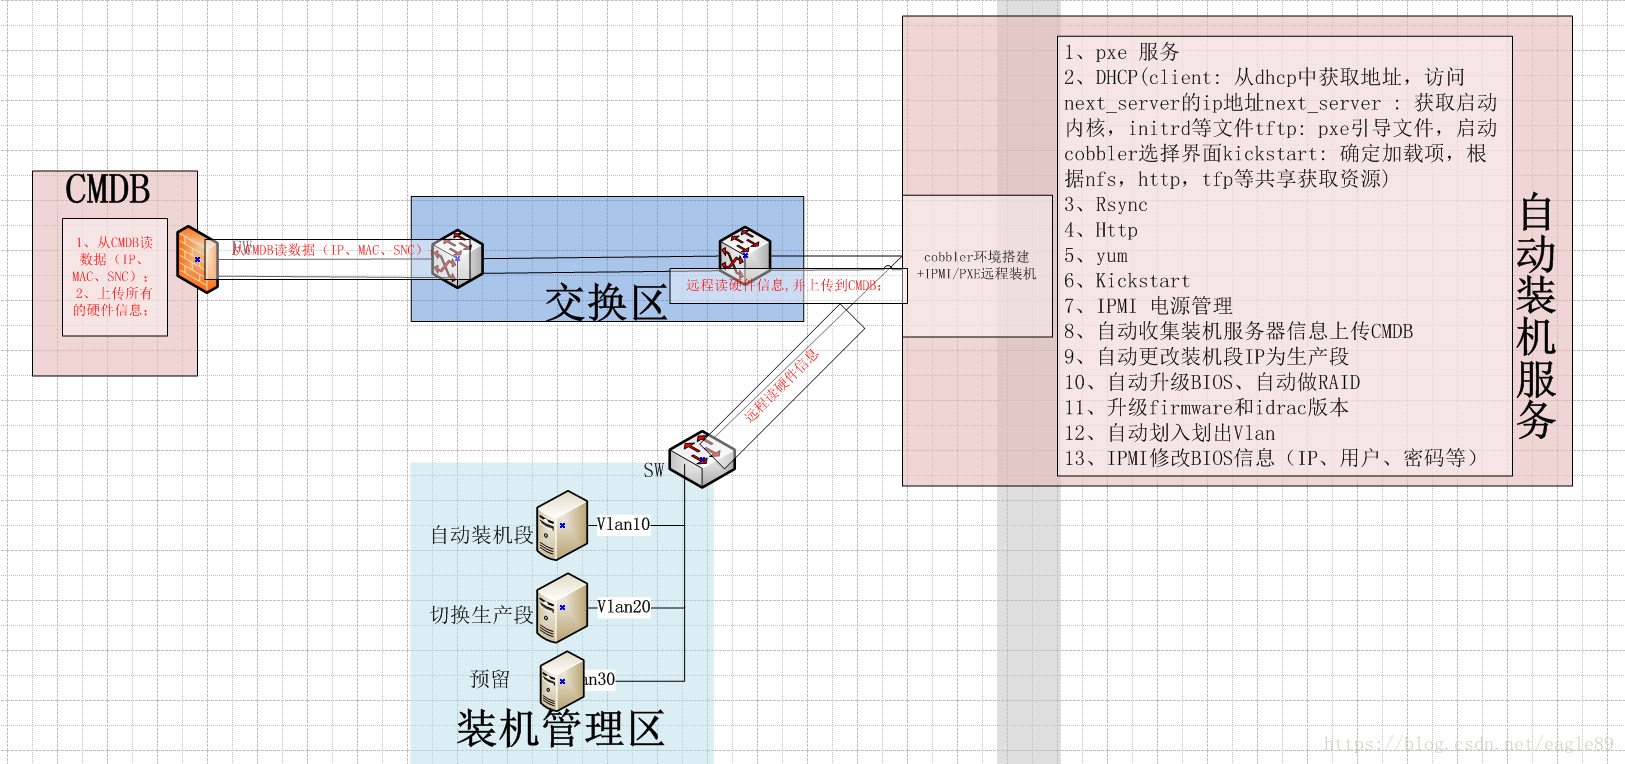
运维自动化在生产环境中占据着举足轻重的地位,尤其是面对几百台、几千台甚至几万台的服务器时,基于Cobbler实现多版本操作系统批量部署,面对生产环境中不同服务器的需求。
- Cobbler工作流程
server端:
第一步,启动Cobbler服务
第二步,进行Cobbler错误检查,执行cobbler check命令
第三步,进行配置同步,执行cobbler sync命令
第四步,复制相关启动文件文件到TFTP目录中
第五步,启动DHCP服务,提供地址分配
第六步,DHCP服务分配IP地址
第七步,TFTP传输启动文件
第八步,Server端接收安装信息
第九步,Server端发送ISO镜像与Kickstart文件
Client端:
第一步,客户端以PXE模式启动
第二步,客户端获取IP地址
第三步,通过TFTP服务器获取启动文件
第四步,进入Cobbler安装选择界面
第五步,客户端确定加载信息
第六步,根据配置信息准备安装系统
第七步,加载Kickstart文件
第八步,传输系统安装的其它文件
第九步,进行安装系统
- Cobbler安装前准备
安装Cobbler之前先查看一下基础环境:
#cat/etc/redhat-release (查看系统版本)
#uname-r (内核版本)
#getenforce (检测selinux是否关闭,必须要关闭)
关闭selinux方法:
#vim/etc/selinux/config
setenforce 0
如上,“SELINUX”参数有“enforcing、permissive、disabled”,将selinux关闭,需要将参数至为“disabled”即可,然后“# reboot”系统。
还需要关闭防火墙:
# systemctl stop firewalld (关闭防火墙)
# iptables-L (查看是否关闭)
systemctl stop firewalld
systemctl disable firewalld.service
查看本机的IP:
注:若是在线安装,则需要使用到epel源,yum源替换成阿里源或是网易源也比较快点。
# curl-o /etc/yum.repos.d/CentOS-Base.repo http://mirrors.aliyun.com/repo/Centos-7.repo (替换yum源为阿里源)
# curl-o /etc/yum.repos.d/epel.repo http://mirrors.aliyun.com/repo/epel-7.repo (添加epel源)
yum -y install http://mirrors.163.com/centos/7/extras/x86_64/Packages/epel-release-7-9.noarch.rpm
AND
curl -o /etc/yum.repos.d/CentOS-Base.repo http://mirrors.aliyun.com/repo/Centos-7.repo
curl -o /etc/yum.repos.d/epel.repo http://mirrors.aliyun.com/repo/epel-7.repo
以上就是准备工作,主要就是关闭防火墙,查看主机IP。
- 在cobbler server上安装cobbler
- 安装Cobbler
yum install cobbler cobbler-web tftp* rsync xinetd http* syslinux dhcp* pykickstart
rpm -ql cobbler # 查看安装的文件,下面列出部分。
/etc/cobbler # 配置文件目录
/etc/cobbler/settings # cobbler主配置文件,这个文件是YAML格式,Cobbler是python写的程序。
/etc/cobbler/dhcp.template # DHCP服务的配置模板
/etc/cobbler/tftpd.template # tftp服务的配置模板
/etc/cobbler/rsync.template # rsync服务的配置模板
/etc/cobbler/iso # iso模板配置文件目录
/etc/cobbler/pxe # pxe模板文件目录
/etc/cobbler/power # 电源的配置文件目录
/etc/cobbler/users.conf # Web服务授权配置文件
/etc/cobbler/users.digest # 用于web访问的用户名密码配置文件
/etc/cobbler/dnsmasq.template # DNS服务的配置模板
/etc/cobbler/modules.conf # Cobbler模块配置文件
/var/lib/cobbler # Cobbler数据目录
/var/lib/cobbler/config # 配置文件
/var/lib/cobbler/kickstarts # 默认存放kickstart文件
/var/lib/cobbler/loaders # 存放的各种引导程序
/var/www/cobbler # 系统安装镜像目录
/var/www/cobbler/ks_mirror # 导入的系统镜像列表
/var/www/cobbler/images # 导入的系统镜像启动文件
/var/www/cobbler/repo_mirror # yum源存储目录
/var/log/cobbler # 日志目录
/var/log/cobbler/install.log # 客户端系统安装日志
/var/log/cobbler/cobbler.log # cobbler日志
-
- 检测Cobbler
先启动apache和cobbler服务,且设为开机启动:
#systemctl enable xinetd && systemctl start xinetd
#systemctl enable httpd.service && systemctl start httpd.service
#systemctl enable cobblerd.service && systemctl start cobblerd.service
查看apache和cobbler服务是否正确启动:
#systemctl status httpd.service cobblerd.service
#cobbler check
针对以上检测出来的问题,解决如下:
1) The 'server' field in/etc/cobbler/settings must be set to something other than localhost, orkickstarting features will not work. This should be a resolvable hostname or IP for the boot server asreachable by all machines that will use it.
解决方法:修改/etc/cobbler/settings,将server对应的IP改为cobbler安装主机的IP,即将server: 127.0.0.1改成server: 192.168.139.153,切记切记,server: 后面有空格!!
2) For PXE to be functional,the 'next_server' field in /etc/cobbler/settings must be set to something otherthan 127.0.0.1, and should match the IP of the boot server on the PXE network.
解决方法:修改/etc/cobbler/settings,将next_server对应的IP改为cobbler安装主机的IP,即将server: 127.0.0.1改成server: 192.168.139.153
3) change 'disable' to 'no'in /etc/xinetd.d/tftp
解决方法:将/etc/xinetd.d/tftp中disable对应值改成no。
4) some network boot-loadersare missing from /var/lib/cobbler/loaders, you may run 'cobbler get-loaders' todownload them, or, if you only want to handle x86/x86_64 netbooting, you mayensure that you have installed a *recent* version of the syslinux packageinstalled and can ignore this message entirely. Files in this directory, should you want to support all architectures,should include pxelinux.0, menu.c32, elilo.efi, and yaboot. The 'cobblerget-loaders' command is the easiest way to resolve these requirements.
解决方法:执行cobbler get-loaders,此时是在线安装,本文使用离线安装
get-loaders的文件见“附件二”。具体步骤见下一节。
5) enable and startrsyncd.service with systemctl
解决方法:执行systemctl enable rsyncd;systemctl start rsyncd
6) debmirror package is notinstalled, it will be required to manage debian deployments and repositories
解决方法:debian的包,可以不下载,不影响使用cobbler。
7) The default password usedby the sample templates for newly installed machines (default_password_cryptedin /etc/cobbler/settings) is still set to 'cobbler' and should be changed, try:"openssl passwd -1 -salt 'random-phrase-here' 'your-password-here'"to generate new one
解决方法:给密码加盐,把生成的密码串添加到/etc/cobbler/settings里。具体步骤见下一节。
8) fencing tools were notfound, and are required to use the (optional) power management features.install cman or fence-agents to use them
解决办法:电源管理工具,下载fence-agents
yum-y install fence-agents
暂时不安装,也不影响cobbler的使用。
以上检测出来的问题,除了6和8不做处理,其他的问题在下面给出具体解决步骤。
-
- Cobbler修改配置文件
首先修改"/etc/cobbler/settings"和" /etc/xinetd.d/tftp"俩文件:
# sed-i 's/server: 127.0.0.1/server: 172.16.1.202/' /etc/cobbler/settings (解决问题1)
# sed-i 's/next_server: 127.0.0.1/next_server: 172.16.1.202/' /etc/cobbler/settings (解决问题2)
# sed -i 's/manage_dhcp: 0/manage_dhcp: 1/' /etc/cobbler/settings
# sed -i 's/pxe_just_once: 0/pxe_just_once: 1/' /etc/cobbler/settings
#sed -ri "/default_password_crypted/s#(.*: ).*#\1\"`openssl passwd -1-salt 'cobbler' 'cobbler'`\"#" /etc/cobbler/settings (解决问题7,这里设置了密码为"cobbler",此处就是按装系统完的密码)
# sed -i 's#yes#no#' /etc/xinetd.d/tftp (解决问题3)
或是直接修改settings和tftp文件:
“# vim/etc/cobbler/settings”
server: 主机IP (在384行)
next_server:主机IP(在272行)
default_password_crypted:(加盐的密码)(在101行)
生成加盐的密码(这个设置密码为'cobbler'):
#openssl passwd -1 -salt 'cobbler' 'cobbler'
将该加盐的密码全复制拷贝到settings文件default_password_crypted处:
修改" /etc/xinetd.d/tftp"文件:
# vim/etc/xinetd.d/tftp
将disable的参数至为“no”,如下:
下面修改cobbler配置的dhcp模板:
#vim /etc/cobbler/dhcp.template
需要修改的是其路由、域名、子网、IP分配以及网段。
查看路由、域名:
然后修改dhcp.template文件,如图红框标出:
注:
subnet 192.168.139.0 netmask 255.255.255.0 { #设置网段
option routers 192.168.139.2; #设置网关
option domain-name-servers 192.168.139.2; #设置dns服务器地址
option subnet-mask 255.255.255.0; #设置子网掩码
range dynamic-bootp 192.168.139.100 192.168.139.254; #设置dhcp服务器IP地址租用的范围
下面解决问题5,同步服务开启,并设置开机启动:
#systemctl enable rsyncd && systemctl start rsyncd
下面解决问题4,由于需要执行cobbler get-loaders,在线载入资源,本文离线状态下已经准备好了资源lib包,
这些文件都应该存放在“/var/lib/cobbler/loaders”
只需要将这些文件拷贝过去,同名覆盖即可。
上述问题基本解决,下面重启服务,再检测一次:
systemctl restart tftp.socket
systemctl restart xinetd.service
systemctl restart httpd.service
systemctl restart cobblerd.service
systemctl restart rsyncd
然后再运行cobbler监测:
#cobbler check
注:上面两个包可以省略,不影响生产使用;
下面就是cobbler同步:
#cobbler sync
同步之后,无任何问题,最后显示"***TASK COMPLETE****"。
-
- 开机启动
# 启动相关服务并设置开机启动(可选) 与第二种方法二选一
chkconfig httpd on
chkconfig xinetd on
chkconfig cobblerd on
chkconfig dhcpd on
/etc/init.d/httpd restart
/etc/init.d/xinetd restart
/etc/init.d/cobblerd restart
/etc/init.d/dhcpd restart
# 编写Cobbler相关服务启动脚本(可选)
cat >>/etc/init.d/cobbler<<EOF
#!/bin/bash
# chkconfig: 345 80 90
# description:cobbler
case \$1 in
start)
/etc/init.d/httpd start
/etc/init.d/xinetd start
/etc/init.d/dhcpd start
/etc/init.d/cobblerd start
;;
stop)
/etc/init.d/httpd stop
/etc/init.d/xinetd stop
/etc/init.d/dhcpd stop
/etc/init.d/cobblerd stop
;;
restart)
/etc/init.d/httpd restart
/etc/init.d/xinetd restart
/etc/init.d/dhcpd restart
/etc/init.d/cobblerd restart
;;
status)
/etc/init.d/httpd status
/etc/init.d/xinetd status
/etc/init.d/dhcpd status
/etc/init.d/cobblerd status
;;
sync)
cobbler sync
;;
*)
echo "Input error,please in put 'start|stop|restart|status|sync'!"
exit 2
;;
esac
EOF
# chmod +x /etc/init.d/cobbler
# chkconfig cobbler on
-
- IPMI的配置
关于IPMI的配置,因为要远程安装,在DELL服务器中,IPMI这个工具还是很给力的,三台机器都需要设置IPMI,因为cobbler server有操作系统,所以可以在系统中通过ipmitool命令进行设置,而两台客户机因为还没有操作系统,所以要提前设置好ipmi,两台客户机如下设置:
设置IPMI地址及用户密码,开机按照提示按crtl+E进入IPMI配置界面
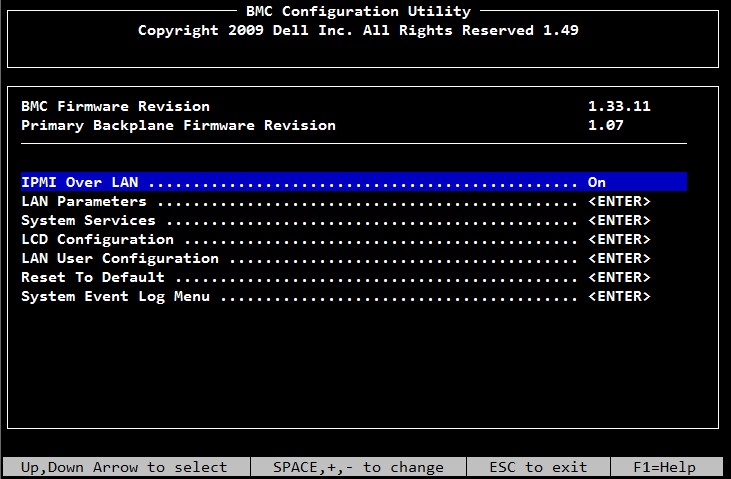
选择LAN Parameters,设置该客户机的IPMI地址是172.16.6.200

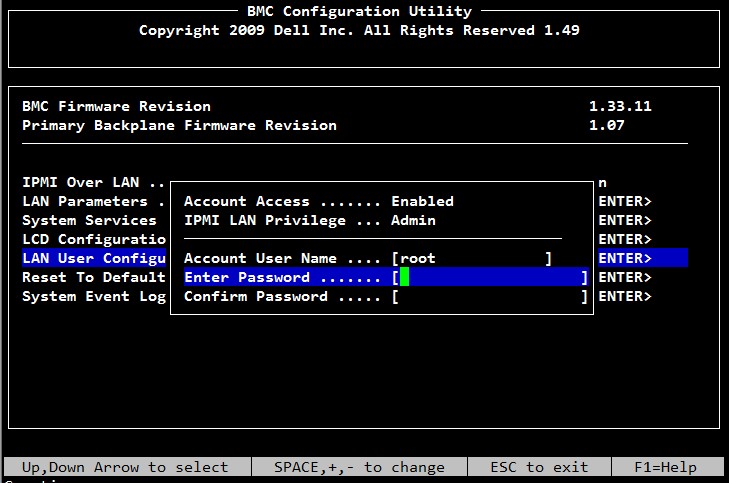
然后选择LAN User Configuration,设置root密码,然后保存退出。
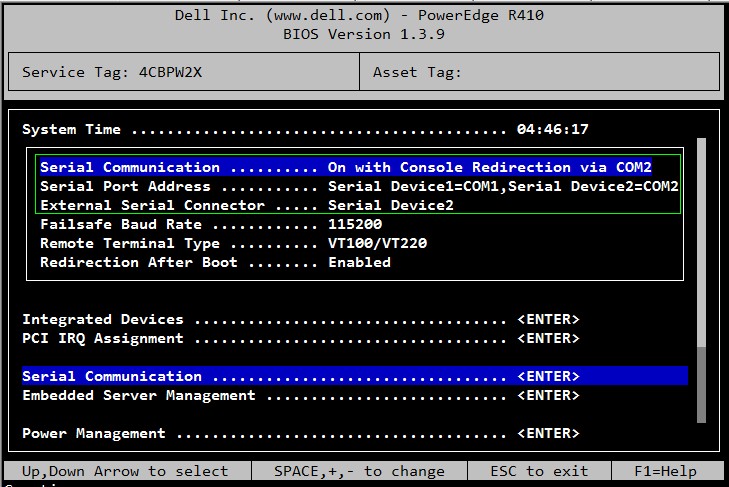
为了在远程能抓到客户端的启动过程,还需要设置BIOS,开机按F2进入BIOS进行设置
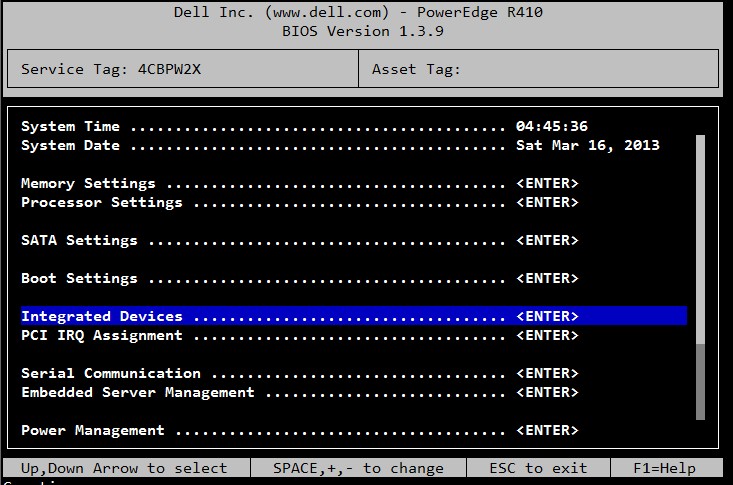
选择Integrated Devices,因为只有一块网卡,所以设置从NIC1 启动PXE

选择Serial Communication,设置串口,然后保存退出。
- Cobbler的命令行管理
cobbler
usage
=====
cobbler <distro|profile|system|repo|image|mgmtclass|package|file> ...
[add|edit|copy|getks*|list|remove|rename|report] [options|--help]
cobbler <aclsetup|buildiso|import|list|replicate|report|reposync|sync|validateks|version|signature|get-loaders|hardlink> [options|--help]
[root@linux-node1 ~]# cobbler import --help # 导入镜像
Usage: cobbler [options]
Options:
-h, --help show this help message and exit
--arch=ARCH OS architecture being imported
--breed=BREED the breed being imported
--os-version=OS_VERSION
the version being imported
--path=PATH local path or rsync location
--name=NAME name, ex 'RHEL-5'
--available-as=AVAILABLE_AS
tree is here, don't mirror
--kickstart=KICKSTART_FILE
assign this kickstart file
--rsync-flags=RSYNC_FLAGS
pass additional flags to rsync
cobbler check 核对当前设置是否有问题
cobbler list 列出所有的cobbler元素
cobbler report 列出元素的详细信息
cobbler sync 同步配置到数据目录,更改配置最好都要执行下
cobbler reposync 同步yum仓库
cobbler distro 查看导入的发行版系统信息
cobbler system 查看添加的系统信息
cobbler profile 查看配置信息
-
- 挂载和系统的导入
先将系统的镜像文件拷贝到“/opt/”目录下(目录自己随意),本次选用的是centos7.2的Minimal版本,如下:
然后将该iso挂载,然后查看挂载:
#mount -t iso9660 -o loop /opt/CentOS-7-x86_64-Minimal-1511.iso /mnt/
#df -h
挂载成功。
系统数据导入:
#cobbler import --path=/mnt/ --name=centos7.2-Minimal --arch=x86_64
无报错,则系统数据导入成功。
可以查看“/var/www/cobbler/ks_mirror/centos7.2-Minimal-x86_64/”下导入的数据是否存在:
列出导入后的信息配置:
#cobblerlist
#cobbler profile report(可以查看更详细的配置信息)
从该信息看出,kickstart的启动是使用了sample_end.ks,进入目录下查看:
#ll /var/lib/cobbler/kickstarts/
若要定制化安装系统,可以上传自己写的ks文件。
默认的“sample_end.ks”已经满足安装的需求。本次不上传,不修改。
或者
编辑profile,修改关联的ks文件
cobbler profile edit --name=centos7.2-Minimal --arch=x86_64 --kickstart=/var/lib/cobbler/kickstarts/centos7.2-Minimal.cfg
注:修改安装系统的内核参数,在CentOS7系统有一个地方变了,就是网卡名变成eno16777736这种形式,但是为了运维标准化,需要将它变成我们常用的eth0,因此使用下面的参数。但要注意是CentOS7才需要下面的步骤,CentOS6不需要。
cobbler profile edit --name=CentOS-7.1-x86_64 --kopts='net.ifnames=0 biosdevname=0'
下面是验证cobbler:
#cobbler validateks
至此,安装配置导入系统数据以及验证完成。
-
- 定制化系统(安装kickstart)
yum -y install *kickstart*
system-config-kickstart #自定义配置kickstart
注:下图借用网上的图片使用
与ks文件的对比
#platform=x86, AMD64, or Intel EM64T
#version=DEVEL
# Install OS instead of upgrade
install
# Keyboard layouts
keyboard 'us'
# Reboot after installation
Reboot
#安装完自动重启
# Root password
rootpw --iscrypted $1$vVvwaH.E$laQ2SHKj2ej6/1C.YzU7Q.
#root密码
# System timezone
timezone Africa/Abidjan
#时间
# Use network installation
url --url=ftp://192.168.65.2/
FTP网络路径
# System language
lang en_US
#使用的语言
# Firewall configuration
firewall –disabled
#关闭防火墙
# Network information
network --bootproto=dhcp --device=eth0
#新建网卡
# System authorization information
auth --useshadow --passalgo=md5
#用户加密方式
# Use graphical install
Graphical
#图形界面
# Run the Setup Agent on first boot
firstboot –enable
#图形界面开机启动
# SELinux configuration
selinux --disabled
#关闭selinux
# System bootloader configuration
bootloader --location=mbr
#安装引导项
# Clear the Master Boot Record
Zerombr
#这个还不知道
# Partition clearing information
clearpart --all
#这个还不知道,但一定要有
# Disk partitioning information
part swap --fstype="swap" --size=2048
#配置swp分区
part /boot --fstype="xfs" --size=300
#配置boot分区
part / --fstype="xfs" --size=18131
#配置根/分区
%pre
--password=$6$d5.YwnmIoKU5KqgX$h1jmKofHk28yYz0LyD.HiOgOnK7F0.arKFn6mcwMofrNtCAeGWSq5pzcgyUbFBETA3EC.QVGZKMAbjpuMrjbE1 --iscrypted --gecos="ream"
#新建用户ream并设置密码
%end
%post
/usr/sbin/adduser ream
/usr/sbin/usermod -p '$1$dq/RUYXu$KTztpGgYyUmDur05zgWZt1' ream
/usr/bin/chfn -f "ream" ream
mv /etc/rc.d/rc.local /etc/rc.d/rc.local.00
echo '#!/bin/bash' > /etc/rc.d/rc.local
ln -s ../rc.local /etc/rc.d/rc5.d/S99rclocal
chmod 755 /etc/rc.d/rc.local
echo 'mkdir -p /var/log/vmware' >> /etc/rc.d/rc.local
echo 'exec 1> /var/log/vmware/rc.local.log' >> /etc/rc.d/rc.local
echo 'exec 2>&1' >> /etc/rc.d/rc.local
echo 'set -x' >> /etc/rc.d/rc.local
echo 'echo Installing VMware Tools' >> /etc/rc.d/rc.local
echo 'set -x' >> /etc/rc.d/rc.local
echo '/bin/eject sr0 || /bin/true' >> /etc/rc.d/rc.local
echo '/bin/eject sr1 || /bin/true' >> /etc/rc.d/rc.local
echo '/bin/vmware-rpctool' \'guest.upgrader_send_cmd_line_args --default\' >> /etc/rc.d/rc.local
echo '/bin/vmware-rpctool' \'upgrader.setGuestFileRoot /tmp\' >> /etc/rc.d/rc.local
echo '/bin/vmware-rpctool' \'toolinstall.installerActive 1\' >> /etc/rc.d/rc.local
echo '/bin/vmware-rpctool' \'toolinstall.installerActive 100\' >> /etc/rc.d/rc.local
echo 'rm -f /etc/rc.d/rc.local' >> /etc/rc.d/rc.local
echo 'rm -f /etc/rc.d/rc5.d/S99rclocal' >> /etc/rc.d/rc.local
echo 'mv /etc/rc.d/rc.local.00 /etc/rc.d/rc.local' >> /etc/rc.d/rc.local
/bin/echo done
%end
%packages
@base
@core
@guest-desktop-agents
binutils
chrony
ftp
gcc
kernel-devel
make
open-vm-tools
patch
python
%end
#上面这些配置%post 到 %end 可以到~/ anaconda-ks.cfg那里看
配置好后保存到/var/ftp/pub/ks.cfg
- 安装系统
首次安装操作系统
1、 将需要安装系统的服务器,以下简称客户端,放到和cobbler服务端同样的子网中。
2、 启动cobbler服务端上的cobblerd等相关服务。
3、 从PXE启动客户端主机。
(1) 客户端寻找设置DHCP。
(2) 客户端从PXE启动。
(3) 客户端进入cobbler profile选择界面,用户可以根据应用的不同,选择不同的cobbler配置文件。
-
- 设置PXE开机启动顺序
注:在需要装机的服务器设置BIOS开机启动顺序为PXE启动。
系统就安装完成了;
-
- PXE动项修改
默认的情况下PXE的启动项是Local(如下图)。
但是根据需求,无需人工干预,自动安装,这时候,只需要将local从启动项删除即可。方法如下:
首先找到PXE加载的菜单选项在哪,路径“/var/lib/tftpboot/pxelinux.cfg”下找到“default”文件,内容如下:
如上,可以看出MENU菜单有俩个选项。这里删除“LABEL local”的内容,并修改“ONTIMEOUT”值为我们想要的启动项即可,如下:
如上图,只留下了“LABELcentos7.2-Minimal-x86_64”这一个启动项,“ONTIMEOUT ”改为了“centos7.2-Minimal-x86_64”,“MENUTITLE”可以修改成自定义内容。
修改后保存即可,不要重启cobblerd服务,也不要执行“cobbler sync”同步。修改后的PXE启动页面如下:
默认的20秒超时一过就可以进入该选项进行自动安装。这样就可以做到了无人工干预的自动无人值守安装需求。
-
- IPMI远程修改BIOS信息
开始安装远程客户机,在cobbler server的eth0上绑定IPMI的网段地址。
ifconfigeth0:1172.16.6.252netmask255.255.255.0
然后开两个窗口分别执行如下IPMI命令
-
- 定制化安装
注:指定某台服务器使用指定ks文件=》安装某种操作系统,区分一台服务器的最简单的方法就是物理MAC地址。
cobbler system add --name=oldboy --mac=00:0C:29:7F:2F:A1 --profile=CentOS-7.1-x86_64 -ip-address=10.0.0.111 --subnet=255.255.255.0 --gateway=10.0.0.2 --interface=eth0 --static=1 --hostname=oldboy.example.com --name-servers="114.114.114.114 8.8.8.8"
# --name 自定义,但不能重复
# 查看定义的列表
[root@linux-node1 ~]# cobbler system list
oldboy
[root@linux-node1 ~]# cobbler sync
再次开机安装就不再询问选择了,直接安装。
-
- 指定装机网段
添加指定客户机系统配置到Cobbler
- 指定一个网段使用特定的装机配置
cobbler system add --name=test_000 --ip=192.168.1.0/24 --profile=CentOS-5.9-x86_64
- 添加一个指定服务器的装机配置
指定服务器的mac地址,并设置好主机名、IP地址等信息,需要提示知道服务器MAC地址,根据MAC应用到具体机器上。
还可以指定ks参数。–kickstart=/var/lib/cobbler/kickstarts/webserver.ks
cobbler system add --name=test_001 --hostname=test_001 --mac=00:0C:29:E3:81:32 --interface=eth0 --ip-address=192.168.1.123 --subnet=255.255.255.0 --gateway=192.168.1.1 --static=1 --profile=Centos-5.9-x86_64
- 修改system配置
机器IP地址变更为192.168.21.118
cobbler system add --name=test_001 --ip=192.168.21.118
变更system配置名称
cobbler system rename --name=test001 --newname=abc
- 删除system配置
需要删除的profile名称为test_001
cobbler system remove --name=test_001
- 查看定义的系统列表
cobbler system list
test_001
设置好后,需要执行排错和同步
cobbler check
cobbler sync
-
- 自动化重装系统
- 安装epel源(先配置好yum)
yum install epel-release -y
- 安装koan工具
yum install koan -y
- 查看可以重装的列表(还可以装别版本的系统,不过需要在cobbler server制作iso)
koan --server 10.0.0.134 --list=profiles
- 使用Centos-7.2-x86_64重装系统
koan --replace-self --server=10.0.0.134 --profile=Centos-7.2-x86_64
-
- 防止误重装系统
防止误重装系统,选项:pxe_just_once
cobbler setting edit --name=pxe_just_once --value=1
该选项作用:
--防止机器循环安装配置始终从网络引导
--激活此选项,机器回传Cobbler安装完成
--Cobbler将系统对象的netboot标志更改为false,强制要求机器从本地磁盘引导。
-
- 脚本信息