13.1 设置更改root密码

实验报错
ERROR 2002 (HY000): Can't connect to local MySQL server through socket '/var/lib/mysql/mysql.sock' (2)

解决方法 ln -s /tmp/mysql.sock /var/lib/mysql/mysql.sock

参考博客
https://www.cnblogs.com/Lam7/p/6090975.html
设置密码

如果忘记密码
skip-grant

重启mysql服务

空密码登录

update user set password=password('aminglinux1') where user='root';

把skip-grant注释掉,重启服务,用新密码登录

13.2 连接MySQL

-h 远程主机

-S 只适合在本机


13.3 MySQL常用命令

show databases;
查看全部数据库

use mysql;
切换到哪一个库下面

show tables;
查看库里面的表

desc user;
查看表里面的字段

show create table user\G;
查看表创建过程,G代表竖排显示

select user();
查看当前用户


mysql的命令历史
select database();
查看当前使用的数据库


create database db1;
创建数据库

create table t1(`id` int(4),`name` char(40));
创建表


select version();
查看数据库版本

show status;
查看数据库的状态

show variables like 'max_connect%';
查看数据库的参数

set global max_connet_errors=1000;
修改参数(临时修改,永久生效需要到my.cnf里面修改)

show processlist;
查看队列

show full processlist;
查看完整队列

13.4 MySQL用户管理

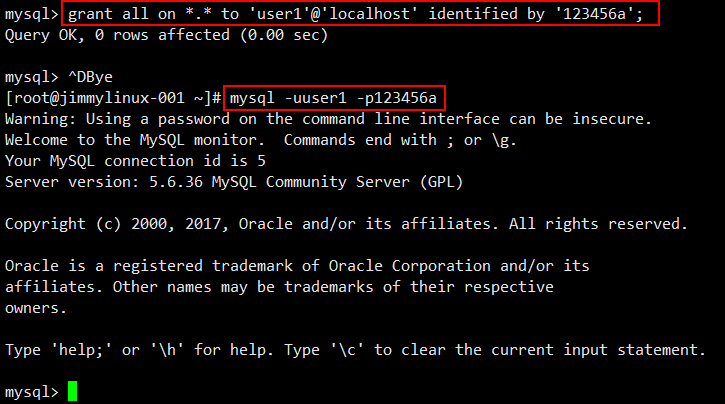
grant all on *.* to 'user1'@'localhost' identified by '123456';

show grants for user1@localhost;

13.5 常用sql语句

select count(*) from mysql.user;
统计行数

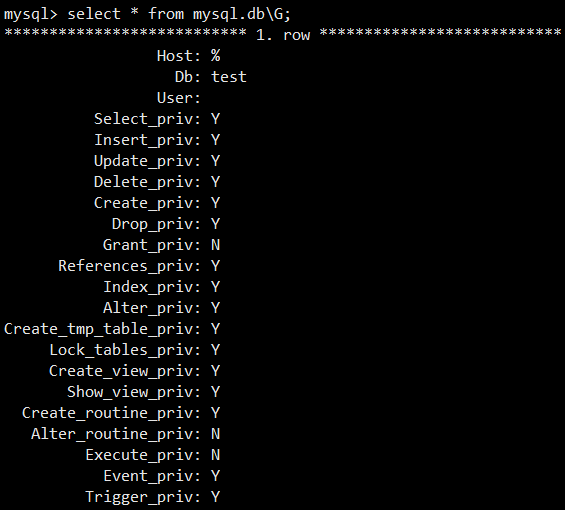
select * from mysql.db\G;

select db from mysql.db;
查询字段

select db,user from mysql.db;
查询两个字段

select * from mysql.db where host like '192.168.%'\G;
条件查询

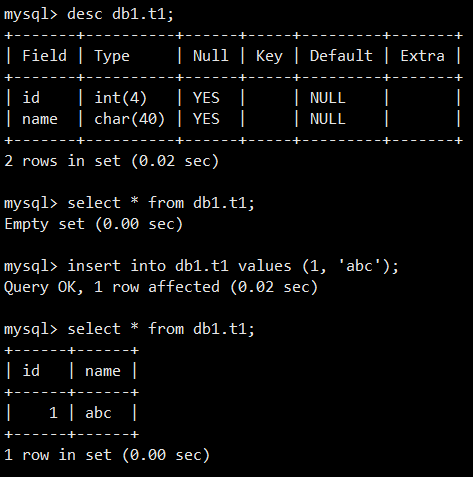
insert into db1.t1 values(1,'abc');
插入数据

update db1.t1 set name='aaa' where id=1;
更新表

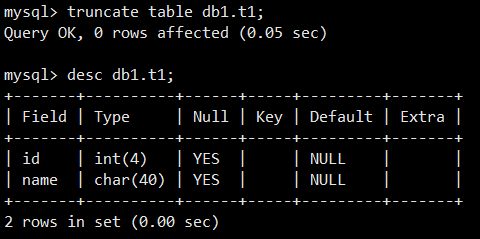
truncate table db1.t1;
清空一个表

drop table db1.t1;
删除一个表

drop database db1;
删除一个数据库

13.6 MySQL数据库备份恢复

mysqldump -uroot -paminglinux1 mysql > /tmp/mysqlbak.sql
备份数据库
mysql -uroot -paminglinux1 mysql2 < /tmp/mysqlbak.sql
恢复数据库
mysqldump -uroot -paminglinux1 mysql user >/tmp/user.sql
备份表
mysqldump -uroot -paminglinux1 mysql user >/tmp/user.sql
恢复表
mysql -uroot -paminglinux1 mysql2 < /tmp/user.sql

mysqldump -uroot -paminglinux1 -A >/tmp/mysql_all.sql
-A 备份所有数据库
mysqldump -uroot -paminglinux1 -d mysql2 >/tmp/mysql2.sql
-d 只备份表结构
课堂串讲
1、设置更改root密码
查看mysql 启动与否,若没启动就运行:/usr/local/mysql56/bin/mysql
ps aux |grep mysql 或 netstat -tulnp |grep 3306
运行mysql 命令,会出现:
-bash: mysql: command not found
就把mysql 添加到环境变量:
临时添加:PAHT=$PATH:/usr/local/mysql56/bin
永久添加:echo "export PATH=$PATH:/usr/local/mysql56/bin" >>/etc/profile
再运行soucre /etc/profile 或 . /etc/profile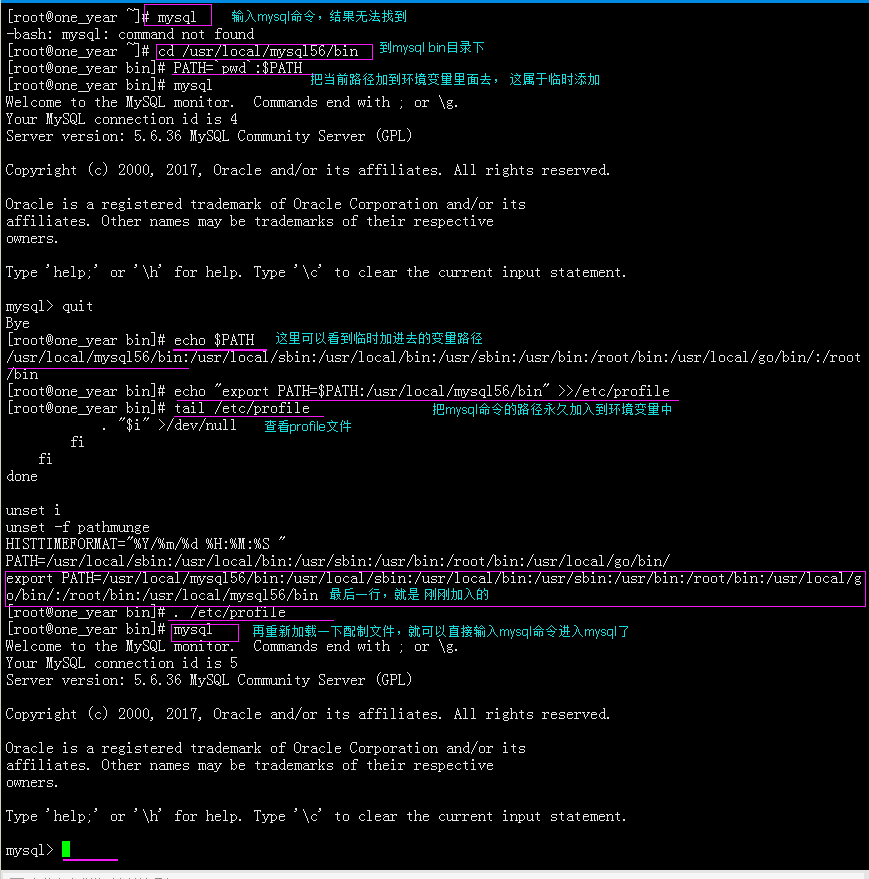
mysql密码的设置,给root用户设置密码
mysql -uroot password 'new_password' 或用下面的方式
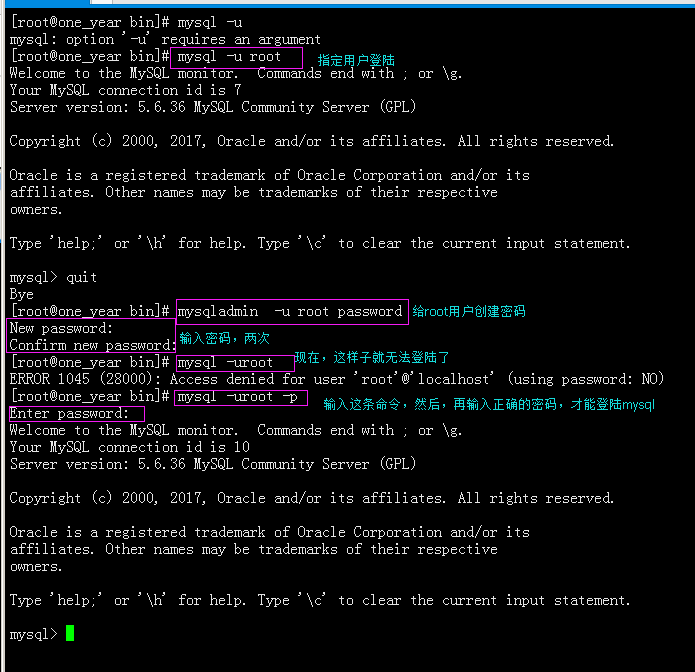
如何修改密码:
mysqladmin -uroot -p 'old_password' password 'new_password' 或用下面的方式
忘记密码了如何修改:
首先,得修改配制文件:vim /etc/my.cnf
在[mysqld]模块下加入skip-grant ,然后重启mysql服务:sed -i '/3306/a\skip-grant' /etc/my.cnf
重启:/etc/init.d/mysqld restart
然后,切换数据库:use mysql;
然后,再在数据库里面修改root密码:update user set password=password('new_password') where user='root';
这样就把密码给改回来了
重新测试,就把my.cnf给改回来: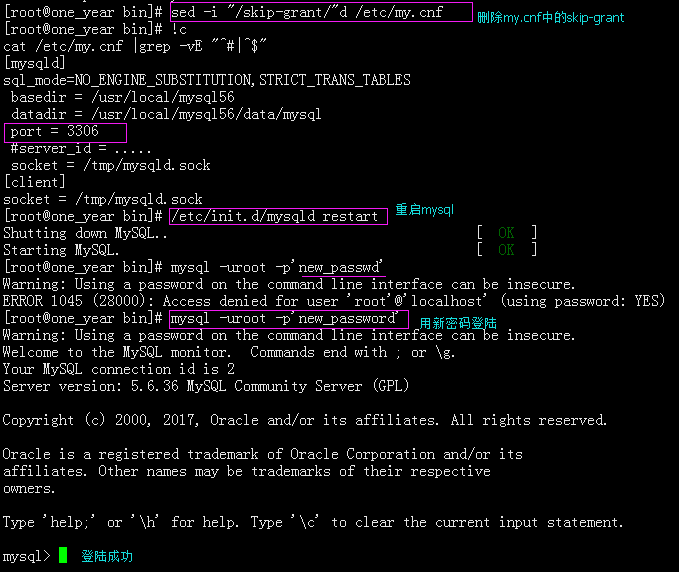
2、mysql的连接
mysql -uroot -p'password'
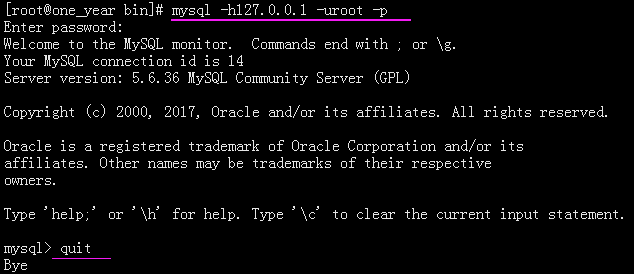
mysql -h127.0.0.1 -uroot -p'password'
mysql -S/tmp/mysql.sock -uroot -p'password'
mysql -uroot -p -e "show databases"


3、mysql常用命令
查询有多少库:show databases;
使用某个库:use database_name;
查看有多少个表:show tables;
查看某张表里的字段:desc table_name:
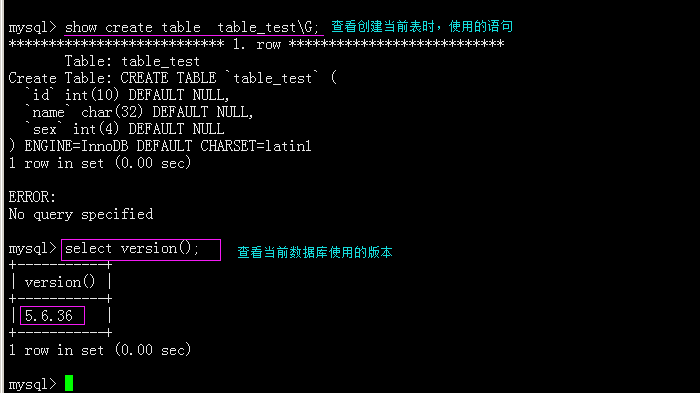
查看某张表创建时输入的命令:show create table table_name\G;
查看当前登陆有哪些用户:select user();
查看当前使用的哪个库:select database();
查看当前数据库的版本:select version();
查看配制文件可定义的各种参数:show variables;
查看目前的进程数:show processlist; 或 show full processlist; #这是用得最多的(即查看数据库正在进行的操作)
创建一个数据库:create database db_name;
创建一张表:create table table_name('name' types(length),'name' type(length),........)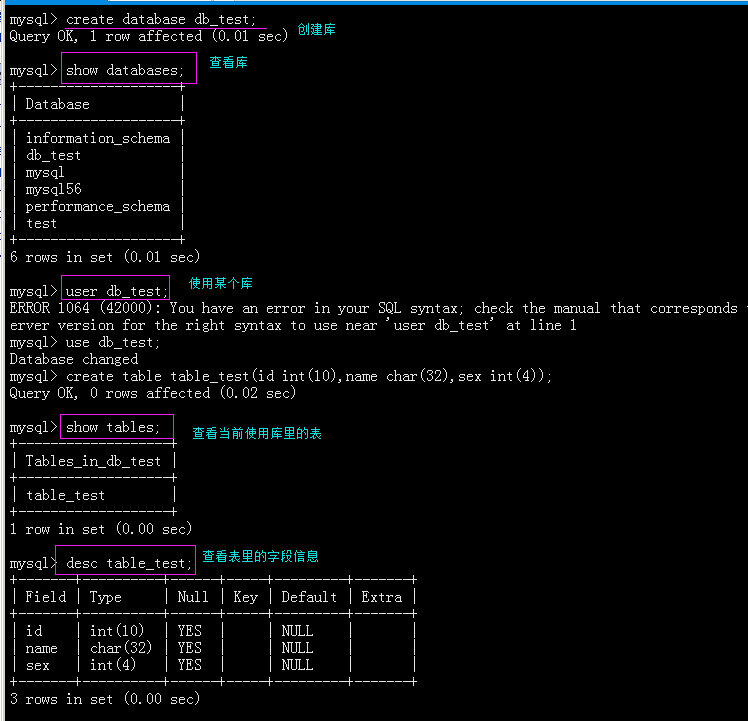
创建一张表:create table table_test(id int(10),name char(32),sex int(4));

13.4 mysql用户管理
创建mysql用户和授权,对单独的用户进行授权,因为不可能每一个用户都去连接root,root的权限是很大的,如果让每个用户都能够使用root,这样是非常不安全的。
创建用户:
[root@jimmylinux-001 ~]# mysql -uroot -pabcd1234  登录到mysql

mysql> grant all on *.* to 'user1'@'127.0.0.1' identified by '123456a';
Query OK, 0 rows affected (0.03 sec)
grant是授权,all表示所有权限,前面的*表示库名,例如mysql.*就表示mysql库名下面所有的表,*.*就是所有库名的表。@后面指定来源IP,也可以使用%表示所有IP。
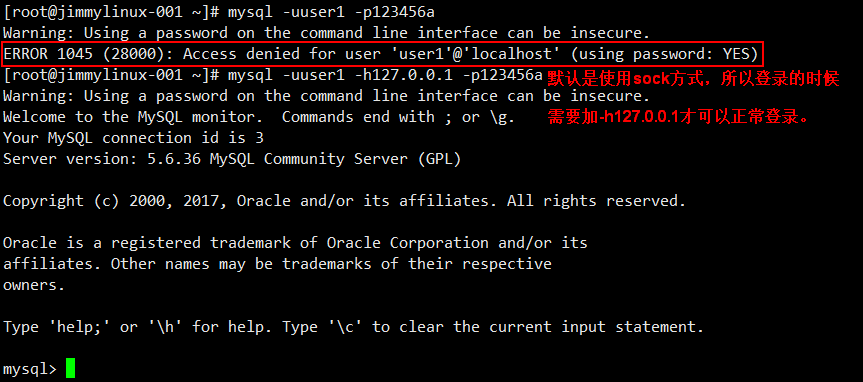
也可以指定localhost方式登录,首先用root登录,然后把127.0.0.1改为localhost,这样就可以不用加-h127.0.0.1也能够登录了。
可以针对具体的权限去授权
grant SELECT,UPDATE,INSERT on db1.* to 'user2'@'192.168.52.1' identified by 'passwd';
还可以针对所有的IP去授权
grant all on db1.* to 'user3'@'%' identified by 'passwd';

mysql> show grants for user1@'127.0.0.1';  查看指定用户的授权是什么
+-----------------------------------------------------------------------------------------------------------------------+
| Grants for [email protected]                                                                                            |
+-----------------------------------------------------------------------------------------------------------------------+
| GRANT ALL PRIVILEGES ON *.* TO 'user1'@'127.0.0.1' IDENTIFIED BY PASSWORD '*B012E8731FF1DF44F3D8B26837708985278C3CED' |
+-----------------------------------------------------------------------------------------------------------------------+
1 row in set (0.00 sec)
查看user2的授权
mysql> grant all on *.* to 'user2'@'192.168.52.1' identified by '123456a';    首先要创建一个user2用户
Query OK, 0 rows affected (0.00 sec)
mysql> show grants for user2@'192.168.52.1'; 查看user2用户的授权
+--------------------------------------------------------------------------------------------------------------------------+
| Grants for [email protected] |
+--------------------------------------------------------------------------------------------------------------------------+
| GRANT ALL PRIVILEGES ON *.* TO 'user2'@'192.168.52.1' IDENTIFIED BY PASSWORD '*B012E8731FF1DF44F3D8B26837708985278C3CED' |
| GRANT SELECT, INSERT, UPDATE ON `db1`.* TO 'user2'@'192.168.52.1' |
+--------------------------------------------------------------------------------------------------------------------------+
2 rows in set (0.00 sec)
如果遇到IP不够用,用户除了要在192.168.52.1上登录,还想在192.168.52.2的IP登录,这个时候只需要把授权的命令全部执行一遍,只需要把IP改为192.168.52.2

如果需要复制一个用户,假如知道用户名,但是密码不知道,就可以通过上面的方式进行设置,把2条命令复制执行,更改一下IP就可以了。
13.5 常用sql语句
select count(*) from mysql.user; 查看这个表的行数,库和表中间有一个.作为分隔符。
select * from mysql.db; 查看所有内容,如果一个表内容很多,不建议使用*查看所有。
select db from mysql.db; 查看字段
select db,user from mysql.db; 查看2个字段
select * from mysql.db where host like '192.168.%'; 模糊查询,使用这样方式可以树形显示
insert into db1.t1 values (1, 'abc'); 插入字段内容
update db1.t1 set name='aaa' where id=1; 更新字段内容
truncate table db1.t1; 清空一个表里面的内容,但是表的结构框架还会保留。
drop table db1.t1; 彻底清空一个表
drop database db1; 彻底清空一个数据库
查看表行数

查看所有内容
mysql> select * from mysql.db\G;
查看字段

插入字段内容
更新字段内容

删除一个表
清空一个表里面的内容,但是表的结构框架还会保留。
彻底清空一个表和一个数据库
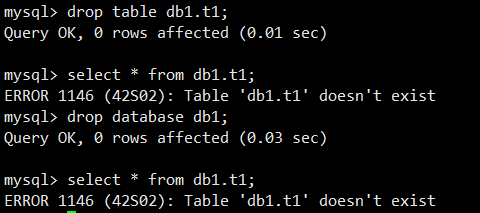
在做彻底清空表或者数据库时,一定要非常谨慎,如果没有做备份,最好不要轻易执行清空操作。
13.6 mysql数据库备份恢复
为了避免误操作删除一个表或数据库,平常一定要养成数据库备份的习惯。
备份数据库
[root@jimmylinux-001 ~]# mysqldump -uroot -pabcd1234 mysql > /tmp/mysqlbak.sql
Warning: Using a password on the command line interface can be insecure.
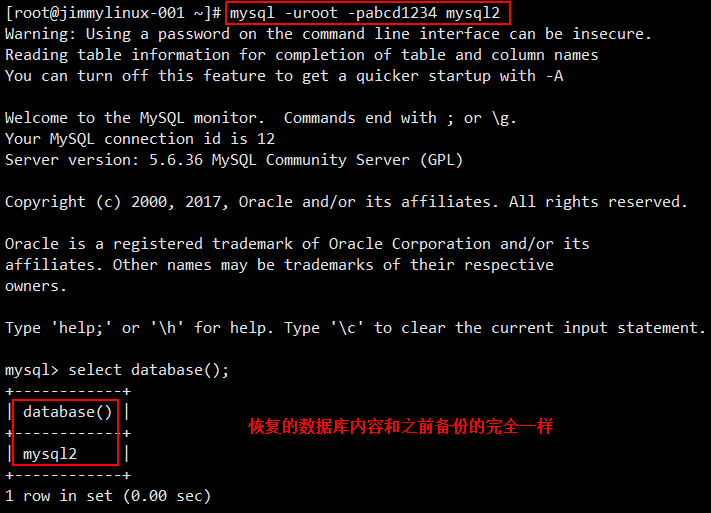
恢复数据库
[root@jimmylinux-001 ~]# mysql -uroot -pabcd1234 -e "create database mysql2"    创建一个新的数据库mysql2
Warning: Using a password on the command line interface can be insecure.

[root@jimmylinux-001 ~]# mysql -uroot -pabcd1234 mysql2 < /tmp/mysqlbak.sql     把之前备份的数据库恢复到新建的数据库mysql2里面去
Warning: Using a password on the command line interface can be insecure.
备份一个表
[root@jimmylinux-001 ~]# mysqldump -uroot -pabcd1234 mysql user > /tmp/user.sql
Warning: Using a password on the command line interface can be insecure.
恢复一个表
[root@jimmylinux-001 ~]# mysql -uroot -pabcd1234 mysql2 < /tmp/user.sql
Warning: Using a password on the command line interface can be insecure.
备份所有数据库
[root@jimmylinux-001 ~]# mysqldump -uroot -pabcd1234 -A >/tmp/mysql_all.sql
Warning: Using a password on the command line interface can be insecure.
只备份表结构
[root@jimmylinux-001 ~]# mysqldump -uroot -pabcd1234 -d mysql2 > /tmp/mysql2.sql
Warning: Using a password on the command line interface can be insecure.
总结:
-A 备份所有的数据库
-d 备份数据库里面的表结构,不备份数据。
备份一个表,先库再表,中间用空格做一个分隔,恢复的时候只需要写mysql就行了,不用写表。
MySQLdump 只适合数据量不大的,如果数据量很大有上百G或者上T的数据量就不适用了。
扩展
xtrabackup原理相关 http://wangxin123.com/2017/01/20/%E9%80%9A%E8%BF%87Percona%20Xtrabackup%E5%AE%9E%E7%8E%B0%E6%95%B0%E6%8D%AE%E7%9A%84%E5%A4%87%E4%BB%BD%E4%B8%8E%E6%81%A2%E5%A4%8D/
增量备份 http://zhangguangzhi.top/2017/08/23/innobackex%E5%B7%A5%E5%85%B7%E5%A4%87%E4%BB%BDmysql%E6%95%B0%E6%8D%AE/#%E4%B8%89%E3%80%81%E5%BC%80%E5%A7%8B%E6%81%A2%E5%A4%8Dmysql
mysql5.7 root密码更改
http://www.apelearn.com/bbs/thread-7289-1-1.html
myisam 和innodb引擎对比
http://www.pureweber.com/article/myisam-vs-innodb/
知乎上的答案
https://www.zhihu.com/question/20596402
mysql 配置详解:
https://www.jb51.net/article/48082.htm
mysql调优:
http://www.aminglinux.com/bbs/thread-5758-1-1.html
同学分享的亲身mysql调优经历:
http://www.apelearn.com/bbs/thread-11281-1-1.html
SQL语句教程
http://www.runoob.com/sql/sql-tutorial.html
什么是事务?事务的特性有哪些?
http://blog.csdn.net/yenange/article/details/7556094
根据binlog恢复指定时间段的数据
https://blog.csdn.net/lilongsy/article/details/74726002
相关扩展 https://blog.csdn.net/linuxheik/article/details/71480882
mysql字符集调整 http://xjsunjie.blog.51cto.com/999372/1355013