1.HTML插件的使用
安装插件
npm install html-webpack-plugin –save-dev
配置webpack.config.js
安装完成后需要在webpack.config.js中引用并且初始化插件,具体的可以查看
API: http://webpack.github.io/docs/using-plugins.html
Npm插件详解:https://www.npmjs.com/package/html-webpack-plugin
//引用webpack.config.js插件
var htmlWebpackPlugin = require('html-webpack-plugin');

//模块化输出
module.exports = {
      //入口文件,这里采用entry对象的方式,分别将main.js和hellow.js打包
    entry:{
        main:'./src/script/main.js',
        hello:'./src/script/hellow.js'
    },
    // 打包后的文件
    output:{
        //打包后文件在./dist/js的文件夹中
        path:__dirname+'/dist/js',
        //打包后文件的名称为entry的chunk名称-编译的哈希值
        filename:'[name]-[hash].js'
    },
    //插件数组
    plugins:[
        //初始化插件
        new htmlWebpackPlugin()
    ]
}
编译打包 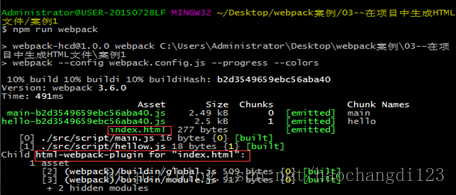
会自动在output.path的路径下生成index.html
结果: 
dist中的index.html是自动生成的,已经自动引入了打包后的js文件,内容为 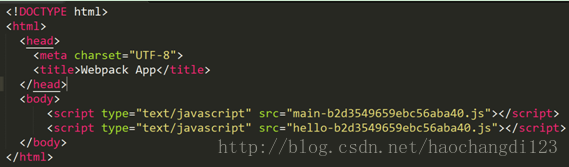
在项目中生成HTML文件—案例1
2.以模板生成HTML
在上面的例子中会自动生成index.html,但是在大的项目中我们的index.html需要引入许多的js文件,所以我们可以在引入插件初始化时插入模板参数,那么就会自动生成以模板为基本的HTML文件,并且自动引入打包后的js文件了。
例如:
wbepack.config.js的配置:
    var htmlWebpackPlugin = require('html-webpack-plugin');

    module.exports = {
        //执行上下文,默认为webpack.config.js所在的文件夹
        // context:
        entry:{
            main:'./src/script/main.js',
            hello:'./src/script/hellow.js'
        },
        output:{
            path:__dirname+'/dist/js',
            filename:'[name]-[hash].js'
        },
        //插件数组
        plugins:[
        //初始化插件,传递模板参数
        new htmlWebpackPlugin({
                //模板为同级目录下的index.html,为何不用写路径,是因为默认上下文问webpack.config.js所在的文件夹
                    template:'index.html'
            })
        ]
    }
我们的根目录下的index.html 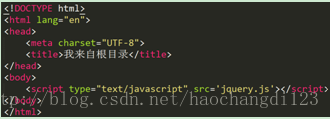
编辑运行: 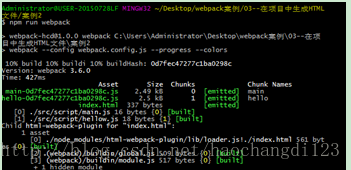
结果:
会根据output.path生成index.html文件, 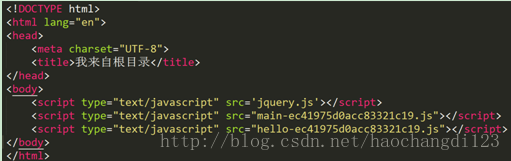
在项目中生成HTML文件—案例2
3.改变生成HTML的位置
在上面的例子中,生成的HTML和js是放在一起的,会非常的不方便,所以我们可以改变output.path
    output:{
        path:__dirname+'/dist',
         //注意写法
        filename:'js/[name]-[hash].js'
    }
运行后结果为:
这样一来自动生成的index.html就会在dist目录下,而打包的js文件将在dist/.js目录下 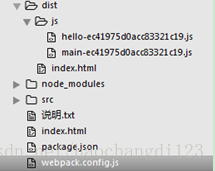
在项目中生成HTML文件—案例3
4.初始化HTML插件的详解
Npm插件详解:https://www.npmjs.com/package/html-webpack-plugin
1.简介html插件的options参数
具体可以看详解的configuration部分
Webpack.congif.js:
    //插件数组
        plugins:[
            //初始化插件,传递模板参数
            new htmlWebpackPlugin({
                //模板为同级目录下的index.html,为何不用写路径,是因为默认上下文问webpack.config.js所在的文件夹
                template:'index.html',
                //自动生成HTML文件的名字
                filename:'index-[hash].html',
                //引入打包后的js的script标签所在的位置,这里表示放在head标签中
                inject:'head',
                //可以向模板传递参数,然后应用于自动生成的html,(模板需要获取参数)
                title:'我来自参数',
                //任何的参数都是可以传递的
                date:new Date()
            })
    ]
Index.html(模板)
    <!DOCTYPE html>
    <html lang="en">
    <head>
        <meta charset="UTF-8">
        <!-- 这里利用ejs的语法,获取htmlWebpackPlugin(名字来自于webpack.config.js的require命名)插件中参数的title属性值 -->
        <title><%= htmlWebpackPlugin.options.title%></title>
    </head>
    <body>
        <script type="text/javascript" src='jquery.js'></script>
        <h2>
        现在的时间是:<%= htmlWebpackPlugin.options.date%>
        </h2>
    </body>
    </html>
结果为:
目录: 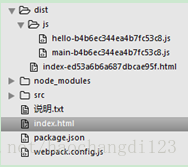
自动生成的html:
可以看到连注释都一起生成了
<!DOCTYPE html>
<html lang="en">
<head>
    <meta charset="UTF-8">
    <!-- 这里利用ejs的语法,获取htmlWebpackPlugin(名字来自于webpack.config.js的require命名)插件中参数的title属性值 -->
    <title>我来自参数</title>
<script type="text/javascript" src="js/main-b4b6ec344ea4b7fc53c8.js"></script><script type="text/javascript" src="js/hello-b4b6ec344ea4b7fc53c8.js"></script></head>
<body>
    <script type="text/javascript" src='jquery.js'></script>
    <h2>
        现在的时间是:Fri Oct 13 2017 10:03:45 GMT+0800 (中国标准时间)
    </h2>
</body>
</html>2.简介html插件的files属性
files属性是描述自动生成的HTML的一些特征的,是内部自动生成的,我们不用写的,但是我们可以利用
"htmlWebpackPlugin": {
//files其实就是指自动编译的HTML文件
  "files": {
    //引用的css文件
    "css": [ "main.css" ],
    //当前引用的打包后的js数组
    "js": [ "assets/head_bundle.js", "assets/main_bundle.js"],
    //webpack.config.js中用于打包的两个chaunk
    "chunks": {
      "head": {
        //打包后js文件名
        "entry": "assets/head_bundle.js",
        //打包后css文件名
        "css": [ "main.css" ]
      },
      "main": {
        "entry": "assets/main_bundle.js",
        "css": []
      },
    }
  }
}
例子:
在上面的例子中我们知道我们可以利用html插件参数的enject属性来设置引入打包后js文件的位置,但是如果引入的是多个打包js文件,我们想一个放在head中一个放在body中,只利用options的属性是办不到的,我们可以利用插件的files下的属性来做
Webpack.config.js:
var htmlWebpackPlugin = require('html-webpack-plugin');

module.exports = {
    //执行上下文,默认为webpack.config.js所在的文件夹
    // context:
    entry:{
        main:'./src/script/main.js',
        hello:'./src/script/hellow.js'
    },
    output:{
        path:__dirname+'/dist',
        filename:'js/[name]-[hash].js'
    },
    //插件数组
    plugins:[
        //初始化插件,传递模板参数
        new htmlWebpackPlugin({
            //模板为同级目录下的index.html,为何不用写路径,是因为默认上下文问webpack.config.js所在的文件夹
            template:'index.html',
            //自动生成HTML文件的名字
            filename:'index-hcd.html',
            //引入打包后的js的script标签所在的位置,false表示不自动引入打包后的js
            inject:false,
            //可以向模板传递参数,然后应用于自动生成的html,(模板需要获取参数)
            title:'我来自参数'
        })
    ]
}
Index.html模板为:
<!DOCTYPE html>
<html lang="en">
<head>
    <meta charset="UTF-8">
    <!-- 这里利用ejs的语法,获取htmlWebpackPlugin(名字来自于webpack.config.js的require命名)插件中参数的title属性值 -->
    <title><%= htmlWebpackPlugin.options.title%></title>
    <!-- 将main这个chunk打包成的js文件放在head中 -->
    <script type="text/javascript" src='<%=htmlWebpackPlugin.files.chunks.main.entry%>'></script>
</head>
<body>
    <script type="text/javascript" src='jquery.js'></script>
    <!-- 将main这个chunk打包成的js文件放在body中 -->
    <script type="text/javascript" src='<%=htmlWebpackPlugin.files.chunks.hello.entry%>'></script>
</body>
</html>
结果为: 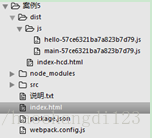
自动生成的HTML: 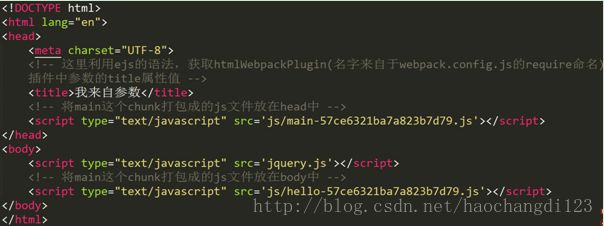
在项目中生成HTML文件—案例5
3.实战上线时配置的属性
1.利用oupt的新属性publicPath,设置绝对地址
API:http://webpack.github.io/docs/configuration.html#output-publicpath
2.利用html插件的minify属性压缩代码
API:https://www.npmjs.com/package/html-webpack-plugin
例如:
Wenpack.config.js
var htmlWebpackPlugin = require('html-webpack-plugin');

module.exports = {
    entry:{
        main:'./src/script/main.js',
        hello:'./src/script/hellow.js'
    },
    output:{
        path:__dirname+'/dist',
        filename:'js/[name]-[hash].js',
    //线上的地址,所有生成的文件将换为以此为开头的绝对路径
        publicPath:'http://hcd.com/'

    },
    //插件数组
    plugins:[
        //初始化插件,传递模板参数
        new htmlWebpackPlugin({
            //模板为同级目录下的index.html,为何不用写路径,是因为默认上下文问webpack.config.js所在的文件夹
            template:'index.html',
            //自动生成HTML文件的名字
            filename:'index-hcd.html',
            //引入打包后的js的script标签所在的位置,这里表示放在head标签中
            inject:'head',
            //可以向模板传递参数,然后应用于自动生成的html,(模板需要获取参数)
            title:'我来自参数',
            //任何的参数都是可以传递的
            date:new Date(),
            //上线时减小html代码的规格,压缩代码
            minify:{
                //删除html的注释
                removeComments:true,
                //删除空格
                collapseWhitespace:true
            }
        })
    ]
}
结果: 
生成的html代码: 
在项目中生成HTML文件—案例6
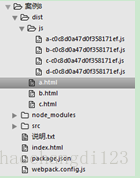
5.多页面应用
上面的例子多数为单页面的应用,这里讲解的是生成多个HTML,而不同的html引入不同的打包后的js
目录: 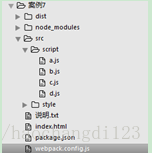
Webpack.config.js:
var htmlWebpackPlugin = require('html-webpack-plugin');

module.exports = {
    entry:{
        a:'./src/script/a.js',
        b:'./src/script/b.js',
        c:'./src/script/c.js',
        d:'./src/script/d.js'
    },
    output:{
        path:__dirname+'/dist',
        filename:'js/[name]-[hash].js',
        publicPath:'http://hcd.com/'
    },
    plugins:[
        //自动生成多少个HTML页面就new几次插件
        new htmlWebpackPlugin({
            template:'index.html',
            filename:'a.html',
            title:'this is A',
            //在该页面加载chunk为‘a’打包生成的js
            chunks:['a']
        }),
        new htmlWebpackPlugin({
            template:'index.html',
            filename:'b.html',
            title:'this is  B',
            //加载除了‘a’chunk以外所有的打包生成的js
            excludeChunks:['a']
        }),
        new htmlWebpackPlugin({
            template:'index.html',
            filename:'c.html',
            title:'this is C',
            chunks:['c','d']
        })
    ]
}
Index.html模板: 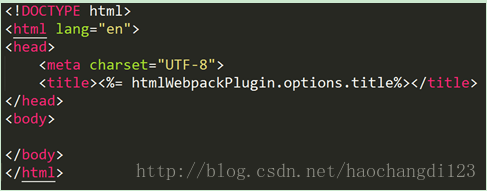
结果:
目录 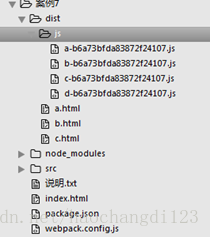
a.html: 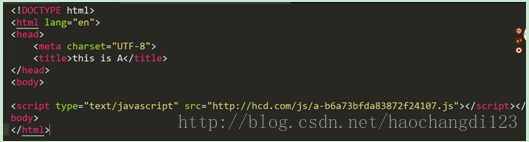
b.html: 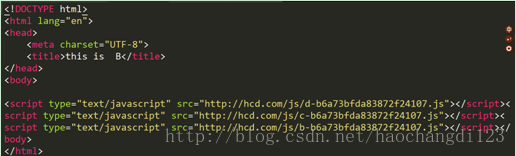
c.html: 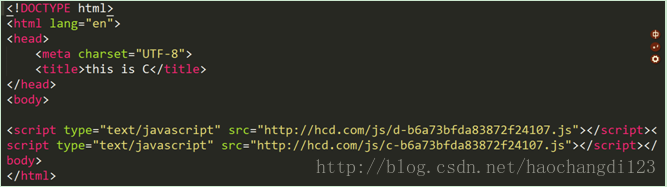
在项目中生成HTML文件—案例7
6.将js内嵌入HTML
上面的我们都是用的http去请求js,有的时候我们需要在HTML插入js文件
模板index.html
1   <!DOCTYPE html>
2   <html lang="en">
3   <head>
4       <meta charset="UTF-8">
5       <title><%= htmlWebpackPlugin.options.title%></title>
6       <script type="text/javascript">
7           //获取打包后chunk d的文件地址,因为我们采用的是publicPath,所以绝对地址是publicPath
8           绝对地址:<%=
9           htmlWebpackPlugin.files.chunks.d.entry
10          %>
11          //获取去除publicPath绝对地址的d的打包js地址
12          去除绝对地址:<%=
13          htmlWebpackPlugin.files.chunks.d.entry.substr(htmlWebpackPlugin.files.publicPath.length)
14          %>
15          //获取d打包后的代码
16          js代码:<%=
17          compilation.assets[htmlWebpackPlugin.files.chunks.d.entry.substr(htmlWebpackPlugin.files.publicPath.length)].source()
18          %>
19      </script>
20  </head>
21  <body>
22      <!-- 因为每一个自动生成的html都是要引入两个js的,除了内嵌的,还有http请求的一个,(注意先要在webpack.config.js中间inject设置为false,否则会直接建两个js文件引入) -->
23      <% for(var key in htmlWebpackPlugin.files.chunks){ %>
24          <% if( key !== 'd'){ %>
25                  <script type="text/javascript" src="<%=htmlWebpackPlugin.files.chunks[key].entry%>"></script>
26          <% } %>
27      <%}%>
28  </body>
29  </html>
Webpack.config.js
var htmlWebpackPlugin = require('html-webpack-plugin');

module.exports = {
    entry:{
        a:'./src/script/a.js',
        b:'./src/script/b.js',
        c:'./src/script/c.js',
        d:'./src/script/d.js'
    },
    output:{
        path:__dirname+'/dist',
        filename:'js/[name]-[hash].js',
        publicPath:'http://hcd.com/'
    },
    plugins:[
        //自动生成多少个HTML页面就new几次插件
        new htmlWebpackPlugin({
            template:'index.html',
            filename:'a.html',
            title:'this is A',
            //避免自动加载js
            inject:false,
            //在该页面加载chunk为‘a’’b’打包生成的js
            chunks:['a','d']
        }),
        new htmlWebpackPlugin({
            template:'index.html',
            filename:'b.html',
            title:'this is  B',
            inject:false,
            //加载除了‘a’chunk以外所有的打包生成的js
            excludeChunks:['a','c']
        }),
        new htmlWebpackPlugin({
            template:'index.html',
            filename:'c.html',
            title:'this is C',
            inject:false,
            chunks:['c','d']
        })
    ]
}
结果: