版权声明:本文为博主原创文章,未经博主允许不得转载。 https://blog.csdn.net/yueloveme/article/details/83068608
给大家推荐个靠谱的公众号程序员探索之路,大家一起加油
git项目地址:https://github.com/ZhZGod/spring-security-demo.git
1.实现
org.springframework.security.core.userdetails.UserDetailsService,这里可以定义从哪里得到用户信息,以及分装成security的user

import com.zzh.entity.UserEntity;
import com.zzh.service.UserService;
import org.springframework.beans.factory.annotation.Autowired;
import org.springframework.security.core.authority.SimpleGrantedAuthority;
import org.springframework.security.core.userdetails.User;
import org.springframework.security.core.userdetails.UserDetails;
import org.springframework.security.core.userdetails.UserDetailsService;
import org.springframework.security.core.userdetails.UsernameNotFoundException;
import org.springframework.stereotype.Service;

import java.util.ArrayList;
import java.util.List;

@Service
public class MyUserDetailsService implements UserDetailsService {

    @Autowired
    private UserService userService;

    @Override
    public UserDetails loadUserByUsername(String username) throws UsernameNotFoundException {
        UserEntity userEntity = userService.getByUsername(username);
        if (userEntity == null){
            throw new UsernameNotFoundException("用户不存在!");
        }
        List<SimpleGrantedAuthority> simpleGrantedAuthorities = createAuthorities(userEntity.getRoles());
        return new User(userEntity.getUsername(), userEntity.getPassword(), simpleGrantedAuthorities);
    }

    /**
     * 根据自己的实际情况可以进行 自定义 我的是user表里有一个字段存储的权限而且是,号分隔的
     * 权限字符串转化
     * @param roleStr 权限字符串
     */
    private List<SimpleGrantedAuthority> createAuthorities(String roleStr){
        String[] roles = roleStr.split(",");
        List<SimpleGrantedAuthority> simpleGrantedAuthorities = new ArrayList<>();
        for (String role : roles) {
            simpleGrantedAuthorities.add(new SimpleGrantedAuthority(role));
        }
        return simpleGrantedAuthorities;
    }

}
2.WebSecurityConfig,具体作用见代码注释
import org.springframework.beans.factory.BeanInitializationException;
import org.springframework.beans.factory.annotation.Autowired;
import org.springframework.context.annotation.Bean;
import org.springframework.http.HttpMethod;
import org.springframework.security.authentication.AuthenticationManager;
import org.springframework.security.config.annotation.authentication.builders.AuthenticationManagerBuilder;
import org.springframework.security.config.annotation.method.configuration.EnableGlobalMethodSecurity;
import org.springframework.security.config.annotation.web.builders.HttpSecurity;
import org.springframework.security.config.annotation.web.builders.WebSecurity;
import org.springframework.security.config.annotation.web.configuration.EnableWebSecurity;
import org.springframework.security.config.annotation.web.configuration.WebSecurityConfigurerAdapter;

import javax.annotation.PostConstruct;

@EnableWebSecurity
@EnableGlobalMethodSecurity(prePostEnabled = true, securedEnabled = true)//使用注解的权限形式时 这个注解和下面的authenticationManagerBean要加上
public class WebSecurityConfig extends WebSecurityConfigurerAdapter{
    @Autowired
    private MyUserDetailsService myUserDetailsService;
    @Autowired
    private AuthenticationManagerBuilder authenticationManagerBuilder;
    @Autowired
    private MyConfig myConfig;

    /**
     * 指定  校验用户信息的地方  和 密码编码方式
     */
    @PostConstruct
    public void init() {
        try {
            authenticationManagerBuilder
                    .userDetailsService(myUserDetailsService)
                    .passwordEncoder(myConfig.passwordEncoder());
        } catch (Exception e) {
            throw new BeanInitializationException("Security configuration failed", e);
        }
    }

    /**
     * 忽略的路径
     * @param web
     * @throws Exception
     */
    @Override
    public void configure(WebSecurity web) throws Exception {
        web.ignoring()
                .antMatchers(HttpMethod.OPTIONS, "/**")
                .antMatchers("/app/**/*.{js,html}")
                .antMatchers("/bower_components/**")
                .antMatchers("/i18n/**")
                .antMatchers("/content/**")
                .antMatchers("/swagger-ui/index.html")
                .antMatchers("/test/**")
                .antMatchers("/h2-console/**")
                .antMatchers("/mylogin");
    }
    /**
     * 匹配 "/", "/index", "/mylogin", "/register" 路径,不需要权限即可访问
     * 登录地址为 "/mylogin",登录成功默认跳转到页面 "/user"
     * 退出登录的地址为 "/logout",退出成功后跳转到页面 "/login"
     * 默认启用 CSRF 我这里给禁用了
     */
    @Override
    protected void configure(HttpSecurity http) throws Exception {
        http
                .csrf().disable()
                .authorizeRequests()
                .antMatchers("/", "/index", "/mylogin", "/register").permitAll()//在这地方也可以配置哪些路径不需要权限
                //.antMatchers("/user/**").hasRole("USER")//不使用注解也可以在这里配置 /user/以下的 路径 都需要USER权限
                //.antMatchers("/user").hasRole("USER")//   /user路径需要USER权限
                .anyRequest().authenticated()//其余的所有请求都需要验证
                .and()
                .formLogin().loginPage("/mylogin").defaultSuccessUrl("/user")//自定义 登录页面的地址  登录成功后的地址
                .and()
                .logout().logoutUrl("/logout").logoutSuccessUrl("/login");//自定义 登出的地址  登出成功后的地址
    }

    @Override
    @Bean
    public AuthenticationManager authenticationManagerBean() throws Exception {
        return super.authenticationManagerBean();
    }
}
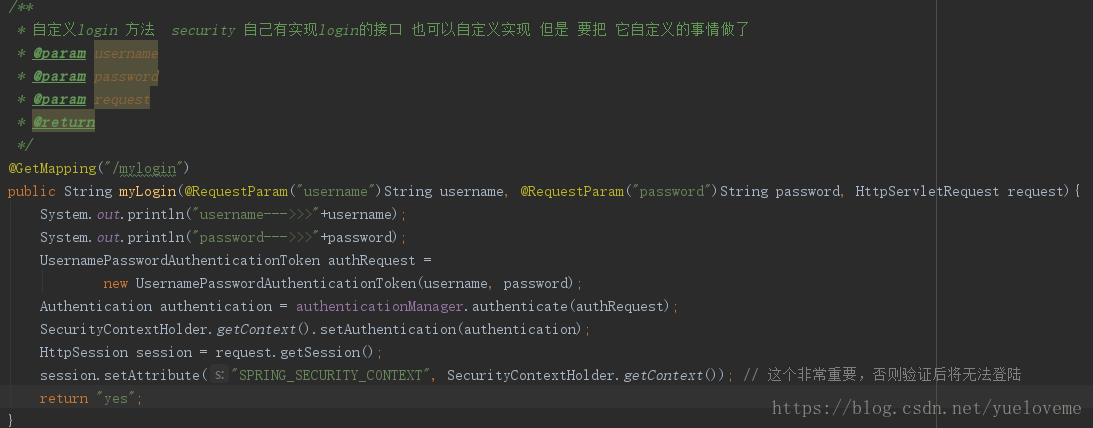
3.security 自带的有登录/login和登出/logout接口,当然 可以自定义
附录:
MyConfig
import org.springframework.context.annotation.Bean;
import org.springframework.context.annotation.Configuration;
import org.springframework.security.crypto.bcrypt.BCryptPasswordEncoder;
import org.springframework.security.crypto.password.PasswordEncoder;

@Configuration
public class MyConfig {
    @Bean
    public PasswordEncoder passwordEncoder() {
        return new BCryptPasswordEncoder();
    }

    //    @Bean  示例 自己写加密方式
//    public PasswordEncoder passwordEncoder() {
//        return new MyPasswordEncoder();
//    }
}
MyPasswordEncoder:
import org.springframework.security.crypto.password.PasswordEncoder;

public class MyPasswordEncoder implements PasswordEncoder {
    /**
     * 只是在原有的密码基础上增加了"1"字符
     * @param rawPassword
     * @return
     */
    public String encode(CharSequence rawPassword) {
        return rawPassword.toString()+"1";
    }

    public boolean matches(CharSequence rawPassword, String encodedPassword) {
        if (encodedPassword != null && encodedPassword.length() != 0) {
            if ((rawPassword.toString()+"1").equals(encodedPassword)){
                return true;
            }
        }
        return false;
    }
}