人工智能已经是当下一大热点,各个行业都在探讨人工智能将为自身带来怎样的改变,包括出行、居家、安全等不同方面,我们都可以看到人工智能的应用可能性。
在这样的趋势下,很多公司开始加入人工智能的开发研究当中。但是基于大数据、深度学习的人工智能技术,需要强大的计算能力来支持。一般的物理服务器或云端的ecs服务器勉强可以支持完成计算,但是效率上来讲局限很大。
GPU高速服务器,就是为了解决这种难题而推出的,在相同的任务下,GPU服务器的表现远远优于ECS服务器的计算能力。我们利用TensorFlow的验证码识别训练,比较了在训练CNN模型方面ECS服务器和GPU服务器各自的速度,过程以及结果如下。
数据学习
安装 captcha 库
pip install captcha获取训练数据
本教程使用的验证码由数字、大写字母、小写字母组成,每个验证码包含 4 个字符,总共有 62^4 种组合,所以一共有 62^4 种不同的验证码。
示例代码:
现在您可以在 /home/ubuntu 目录下创建源文件 generate_captcha.py,内容可参考:
示例代码:/home/ubuntu/generate_captcha.py
#-*- coding:utf-8 -*-

from captcha.image import ImageCaptcha

from PIL import Image

import numpy as np

import random

import string


class generateCaptcha():

    def __init__(self,

                 width = 160,#验证码图片的宽

                 height = 60,#验证码图片的高

                 char_num = 4,#验证码字符个数

                 characters = string.digits + string.ascii_uppercase + string.ascii_lowercase):#验证码组成,数字+大写字母+小写字母

        self.width = width

        self.height = height

        self.char_num = char_num

        self.characters = characters

        self.classes = len(characters)


    def gen_captcha(self,batch_size = 50):

        X = np.zeros([batch_size,self.height,self.width,1])

        img = np.zeros((self.height,self.width),dtype=np.uint8)

        Y = np.zeros([batch_size,self.char_num,self.classes])

        image = ImageCaptcha(width = self.width,height = self.height)


        while True:

            for i in range(batch_size):

                captcha_str = ''.join(random.sample(self.characters,self.char_num))

                img = image.generate_image(captcha_str).convert('L')

                img = np.array(img.getdata())

                X[i] = np.reshape(img,[self.height,self.width,1])/255.0

                for j,ch in enumerate(captcha_str):

                    Y[i,j,self.characters.find(ch)] = 1

            Y = np.reshape(Y,(batch_size,self.char_num*self.classes))

            yield X,Y


    def decode_captcha(self,y):

        y = np.reshape(y,(len(y),self.char_num,self.classes))

        return ''.join(self.characters[x] for x in np.argmax(y,axis = 2)[0,:])


    def get_parameter(self):

        return self.width,self.height,self.char_num,self.characters,self.classes


    def gen_test_captcha(self):

        image = ImageCaptcha(width = self.width,height = self.height)

        captcha_str = ''.join(random.sample(self.characters,self.char_num))

        img = image.generate_image(captcha_str)

        img.save(captcha_str + '.jpg')


        X = np.zeros([1,self.height,self.width,1])

        Y = np.zeros([1,self.char_num,self.classes])

        img = img.convert('L')

        img = np.array(img.getdata())

        X[0] = np.reshape(img,[self.height,self.width,1])/255.0

        for j,ch in enumerate(captcha_str):

            Y[0,j,self.characters.find(ch)] = 1

        Y = np.reshape(Y,(1,self.char_num*self.classes))

        return X,Y
理解训练数据
- X:一个 mini-batch 的训练数据,其 shape 为 [ batch_size, height, width, 1 ],batch_size 表示每批次多少个训练数据,height 表示验证码图片的高,width 表示验证码图片的宽,1 表示图片的通道。
- Y:X 中每个训练数据属于哪一类验证码,其形状为 [ batch_size, class ] ,对验证码中每个字符进行 One-Hot 编码,所以 class 大小为 4*62。
执行:
- 获取验证码和对应的分类
d /home/ubuntu;

python

from generate_captcha import generateCaptcha

g = generateCaptcha()

X,Y = g.gen_test_captcha()- 查看训练数据
X.shape

Y.shape
可以在 /home/ubuntu 目录下查看生成的验证码,jpg 格式的图片可以点击查看。
模型学习
任务时间:时间未知
CNN 模型
总共 5 层网络,前 3 层为卷积层,第 4、5 层为全连接层。对 4 层隐藏层都进行 dropout。网络结构如下所示: input——>conv——>pool——>dropout——>conv——>pool——>dropout——>conv——>pool——>dropout——>fully connected layer——>dropout——>fully connected layer——>output
示例代码:
现在您可以在 /home/ubuntu 目录下创建源文件 captcha_model.py,内容可参考:
示例代码:/home/ubuntu/captcha_model.py
# -*- coding: utf-8 -*

import tensorflow as tf

import math


class captchaModel():

    def __init__(self,

                 width = 160,

                 height = 60,

                 char_num = 4,

                 classes = 62):

        self.width = width

        self.height = height

        self.char_num = char_num

        self.classes = classes


    def conv2d(self,x, W):

        return tf.nn.conv2d(x, W, strides=[1, 1, 1, 1], padding='SAME')


    def max_pool_2x2(self,x):

        return tf.nn.max_pool(x, ksize=[1, 2, 2, 1],

                              strides=[1, 2, 2, 1], padding='SAME')


    def weight_variable(self,shape):

        initial = tf.truncated_normal(shape, stddev=0.1)

        return tf.Variable(initial)


    def bias_variable(self,shape):

        initial = tf.constant(0.1, shape=shape)

        return tf.Variable(initial)


    def create_model(self,x_images,keep_prob):

        #first layer

        w_conv1 = self.weight_variable([5, 5, 1, 32])

        b_conv1 = self.bias_variable([32])

        h_conv1 = tf.nn.relu(tf.nn.bias_add(self.conv2d(x_images, w_conv1), b_conv1))

        h_pool1 = self.max_pool_2x2(h_conv1)

        h_dropout1 = tf.nn.dropout(h_pool1,keep_prob)

        conv_width = math.ceil(self.width/2)

        conv_height = math.ceil(self.height/2)


        #second layer

        w_conv2 = self.weight_variable([5, 5, 32, 64])

        b_conv2 = self.bias_variable([64])

        h_conv2 = tf.nn.relu(tf.nn.bias_add(self.conv2d(h_dropout1, w_conv2), b_conv2))

        h_pool2 = self.max_pool_2x2(h_conv2)

        h_dropout2 = tf.nn.dropout(h_pool2,keep_prob)

        conv_width = math.ceil(conv_width/2)

        conv_height = math.ceil(conv_height/2)


        #third layer

        w_conv3 = self.weight_variable([5, 5, 64, 64])

        b_conv3 = self.bias_variable([64])

        h_conv3 = tf.nn.relu(tf.nn.bias_add(self.conv2d(h_dropout2, w_conv3), b_conv3))

        h_pool3 = self.max_pool_2x2(h_conv3)

        h_dropout3 = tf.nn.dropout(h_pool3,keep_prob)

        conv_width = math.ceil(conv_width/2)

        conv_height = math.ceil(conv_height/2)


        #first fully layer

        conv_width = int(conv_width)

        conv_height = int(conv_height)

        w_fc1 = self.weight_variable([64*conv_width*conv_height,1024])

        b_fc1 = self.bias_variable([1024])

        h_dropout3_flat = tf.reshape(h_dropout3,[-1,64*conv_width*conv_height])

        h_fc1 = tf.nn.relu(tf.nn.bias_add(tf.matmul(h_dropout3_flat, w_fc1), b_fc1))

        h_fc1_drop = tf.nn.dropout(h_fc1, keep_prob)


        #second fully layer

        w_fc2 = self.weight_variable([1024,self.char_num*self.classes])

        b_fc2 = self.bias_variable([self.char_num*self.classes])

        y_conv = tf.add(tf.matmul(h_fc1_drop, w_fc2), b_fc2)


        return y_conv
训练 CNN 模型
每批次采用 64 个训练样本,每 100 次循环采用 100 个测试样本检查识别准确度,当准确度大于 99% 时,训练结束,采用 GPU 需要 4-5 个小时左右,CPU 大概需要 20 个小时左右。
示例代码:
现在您可以在 /home/ubuntu 目录下创建源文件 train_captcha.py,内容可参考:
示例代码:/home/ubuntu/train_captcha.py
#-*- coding:utf-8 -*-

import tensorflow as tf

import numpy as np

import string

import generate_captcha

import captcha_model


if __name__ == '__main__':

    captcha = generate_captcha.generateCaptcha()

    width,height,char_num,characters,classes = captcha.get_parameter()


    x = tf.placeholder(tf.float32, [None, height,width,1])

    y_ = tf.placeholder(tf.float32, [None, char_num*classes])

    keep_prob = tf.placeholder(tf.float32)


    model = captcha_model.captchaModel(width,height,char_num,classes)

    y_conv = model.create_model(x,keep_prob)

    cross_entropy = tf.reduce_mean(tf.nn.sigmoid_cross_entropy_with_logits(labels=y_,logits=y_conv))

    train_step = tf.train.AdamOptimizer(1e-4).minimize(cross_entropy)


    predict = tf.reshape(y_conv, [-1,char_num, classes])

    real = tf.reshape(y_,[-1,char_num, classes])

    correct_prediction = tf.equal(tf.argmax(predict,2), tf.argmax(real,2))

    correct_prediction = tf.cast(correct_prediction, tf.float32)

    accuracy = tf.reduce_mean(correct_prediction)


    saver = tf.train.Saver()

    with tf.Session() as sess:

        sess.run(tf.global_variables_initializer())

        step = 1

        while True:

            batch_x,batch_y = next(captcha.gen_captcha(64))

            _,loss = sess.run([train_step,cross_entropy],feed_dict={x: batch_x, y_: batch_y, keep_prob: 0.75})

            print ('step:%d,loss:%f' % (step,loss))

            if step % 100 == 0:

                batch_x_test,batch_y_test = next(captcha.gen_captcha(100))

                acc = sess.run(accuracy, feed_dict={x: batch_x_test, y_: batch_y_test, keep_prob: 1.})

                print ('###############################################step:%d,accuracy:%f' % (step,acc))

                if acc > 0.99:

                    saver.save(sess,"./capcha_model.ckpt")

                    break

step += 1然后执行:
cd /home/ubuntu;

python train_captcha.py
执行结果:
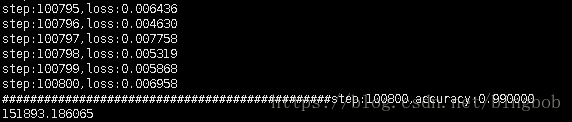
Ecs服务器结果
GPU服务器结果

可以看到,在训练结果中,ECS服务器的训练时间为151893s,而GPU服务器讲训练时间减少到了29570s,速度提升五倍以上!显然,使用GPU服务器进行深度学习训练、研发人工智能技术,将极大的提升效率。
<代码来源于腾讯云开发者实验室>
<两种试验用服务器来源于新睿云>