手写Mybatis-v1.0
源码链接(包括v1.0与v2.0): https://github.com/staticLin/customMyBatis.git
从上一个文章 ---Mybatis概述中了解到了Mybatis的主要架构与底层原理流程,结尾给出了一个宏观流程图,可以知道,大致我们可以从三个模块入手:
- SqlSession:含有属性Configuration、Excutor,含有方法getMapper,selectOne(先实现一个查询方法)
- Configuration:含有MapperRegistry(mapper接口、方法、SQL),含有方法getMapper
- Executor:含有方法doQuery查询数据库
这样来看,我们的MyBatis1.0的大致脉络已经出来了。接下来就coding吧~
先是自定义的SqlSession (这里忽略SqlSessionFactory解析xml资源过程,1.0版本简化)
/**
 * @description: 自定义的SqlSession
 * @author: linyh
 * @create: 2018-10-31 16:31
 **/
public class CustomSqlSession {

    //持有两个关键对象
    private CustomConfiguration configuration;
    private CustomExecutor executor;

    /**
     * 用构造器将两个对象形成关系
     */
    public CustomSqlSession(CustomConfiguration configuration, CustomExecutor executor) {
        this.configuration = configuration;
        this.executor = executor;
    }

    public CustomConfiguration getConfiguration() {
        return configuration;
    }

    /**
    * 委派configuration获取mapper
    */
    public <T> T getMapper(Class<T> clazz){
        return configuration.getMapper(clazz, this);
    }

    /**
     * 委派executor查询
     */
    public <T> T selectOne(String statement, String parameter){
        return executor.query(statement, parameter);
    }
}
然后是自定义Configuration实现getMapper方法,这里也初始化一个MapperProxyFactory为了存放所有的Mapper。再写一个验证Mapper是否存在的方法和根据Class获取对应mapper的MapperProxyFactory。
/**
 * @description:
 * @author: linyh
 * @create: 2018-10-31 16:32
 **/
public class CustomConfiguration {

    public final MapperRegistory mapperRegistory = new MapperRegistory();

    public static final Map<String, String> mappedStatements = new HashMap<>();

    //TODO 改用anontation扫描 (暂时HardCode)
    //初始化时Configuration加载所有Mapper方法与Sql语句
    public CustomConfiguration() {
        mapperRegistory.addMapper(TestMapper.class);
        mappedStatements.put("com.test.mybatis.v1.mapper.TestCustomMapper.selectByPrimaryKey"
        , "select * from test where id = %d");
    }

    //MapperProxy根据statementName查找是否有对应SQL
    public boolean hasStatement(String statementName) {
        return mappedStatements.containsKey(statementName);
    }

    //MapperProxy根据statementID获取SQL
    public String getMappedStatement(String id) {
        return mappedStatements.get(id);
    }

    public <T> T getMapper(Class<T> clazz, CustomSqlSession sqlSession) {
        return mapperRegistory.getMapper(clazz, sqlSession);
    }
}
这里完善MapperProxy与MapperRegistory(注册所有的Mapper的Map)
/**
 * @description: Mapper动态代理者
 * @author: linyh
 * @create: 2018-10-31 16:52
 **/
public class MapperProxy implements InvocationHandler{

    private CustomSqlSession sqlSession;

    public MapperProxy(CustomSqlSession sqlSession) {
        this.sqlSession = sqlSession;
    }

    /**
     * 每一个Mapper的每个方法都将执行invoke方法,此方法判断方法名是否维护在Configuration中,如有则取出SQL
    */
    @Override
    public Object invoke(Object proxy, Method method, Object[] args) throws Throwable {
        if (sqlSession.getConfiguration().hasStatement(method.getDeclaringClass().getName()+"."+method.getName())) {
            String sql = sqlSession.getConfiguration().getMappedStatement(method.getDeclaringClass().getName()+"."+method.getName());
            return sqlSession.selectOne(sql, args[0].toString());
        }
        return method.invoke(proxy, args);
    }
}
/**
* @description: mapper注册类
* @author: linyh
* @create: 2018-10-31 16:51
**/
public class MapperRegistory {
//用一个Map维护所有Mapper
private final Map<Class<?>, MapperProxyFactory> knownMappers = new HashMap<>();
//TODO Configuration解析anontation之后调用方法初始化所有mapper
public <T> void addMapper(Class<T> clazz){
knownMappers.put(clazz, new MapperProxyFactory(clazz));
}
/**
* getMapper最底层执行者,获取mapper的MapperProxyFactory对象
*/
public <T> T getMapper(Class<T> clazz, CustomSqlSession sqlSession) {
MapperProxyFactory proxyFactory = knownMappers.get(clazz);
if (proxyFactory == null) {
throw new RuntimeException("Type: " + clazz + " can not find");
}
return (T)proxyFactory.newInstance(sqlSession);
}
/**
* 内部类实现一个Factory生成Mapper的代理
*/
public class MapperProxyFactory<T>{
private Class<T> mapperInterface;
public MapperProxyFactory(Class<T> mapperInterface) {
this.mapperInterface = mapperInterface;
}
public T newInstance(CustomSqlSession sqlSession) {
return (T) Proxy.newProxyInstance(mapperInterface.getClassLoader(), new Class[] { mapperInterface }, new MapperProxy(sqlSession));
}
}
}到这里getMapper就实现好了,每次getMapper都能生成对应的MapperProxy代理。接下来实现Executor的查询方法。
先定义一个接口(2.0将加入CacheExecutor,面向接口编程便于扩展)。
/**
 * @description:
 * @author: linyh
 * @create: 2018-10-31 16:32
 **/
public interface CustomExecutor {
    <T> T query(String statement, String parameter);
}
然后是具体的实现类,其中使用JDBC查询。
/**
 * @description: 自定义Executor
 * @author: linyh
 * @create: 2018-10-31 17:46
 **/
public class CustomDefaultExecutor implements CustomExecutor{

    @Override
    public <T> T query(String statement, String parameter) {
        Connection conn = null;
        PreparedStatement preparedStatement = null;
        Test test = null;
        try {
            conn = getConnection();

            //TODO ParameterHandler
            preparedStatement = conn.prepareStatement(String.format(statement, Integer.parseInt(parameter)));
            preparedStatement.execute();
            ResultSet rs = preparedStatement.getResultSet();

            //TODO ObjectFactory
            test = new Test();

            //TODO ResultSetHandler
            while (rs.next()) {
                test.setId(rs.getInt(1));
                test.setNums(rs.getInt(2));
                test.setName(rs.getString(3));
            }

        } catch (SQLException e) {
            e.printStackTrace();
        } finally {
            try {
                conn.close();
            } catch (SQLException e) {
                e.printStackTrace();
            }
        }
        return (T)test;
    }

    public Connection getConnection() throws SQLException {
        String driver = "com.mysql.jdbc.Driver";
        String url = "jdbc:mysql://127.0.0.1:3306/gp?serverTimezone=UTC";
        String username = "root";
        String password = "admin";
        Connection conn = null;
        try {
            Class.forName(driver); //classLoader,加载对应驱动
            conn = DriverManager.getConnection(url, username, password);
        } catch (ClassNotFoundException e) {
            e.printStackTrace();
        } catch (SQLException e) {
            e.printStackTrace();
        }
        return conn;
    }
}
这样查询方法也大致完成了,创建实体与Mapper,然后开始测试一下吧~
/**
 * @description: 实体类
 * @author: linyh
 * @create: 2018-10-31 17:03
 **/
public class Test {

    private Integer id;
    private Integer nums;
    private String name;

    public Integer getId() {
        return id;
    }

    public void setId(Integer id) {
        this.id = id;
    }

    public Integer getNums() {
        return nums;
    }

    public void setNums(Integer nums) {
        this.nums = nums;
    }

    public String getName() {
        return name;
    }

    public void setName(String name) {
        this.name = name;
    }

    @Override
    public String toString() {
        return "Test{" +
                "id=" + id +
                ", nums=" + nums +
                ", name='" + name + '\'' +
                '}';
    }
}
/**
* @Author:linyh
* @Date: 2018/10/31 16:56
* @Modified By:
*/
public interface TestCustomMapper {
Test selectByPrimaryKey(int id);
}
/**
 * @description:
 * @author: linyh
 * @create: 2018-10-31 18:05
 **/
public class TestMybatis {
    public static void main(String[] args) {
        CustomSqlSession sqlSession = new CustomSqlSession(
                new CustomConfiguration(), new CustomDefaultExecutor());
        TestCustomMapper testCustomMapper = sqlSession.getMapper(TestCustomMapper.class);
        System.out.println(testCustomMapper.selectByPrimaryKey(2));
    }
}
控制台打印:
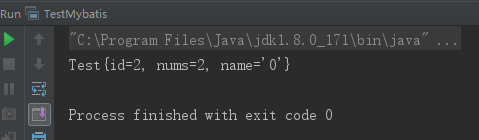
这样就完成了极简版MyBatisv1.0了,其中还有很多不足之处,我用了TODO标记,下面总结几点不足之处,统计2.0需要改进与增加的功能。
不足之处
- 解析Mapper信息时用了HardCode,需改用anontation方式去扫描Mapper与对应SQL语句。
- Executor不够单一职责,它不仅负责参数装配还负责查询语句加上结果集映射,不合理,需要细分职责。
增加的功能
- 新增anontation功能动态扫描Mapper类,去掉HardCode。
- 新增StatementHandler设置参数以及负责查询工作。
- 新增ObjectFactory动态创建实体类。
- 新增ResultSetHandler将结果集映射到实体类中。
- 增加一个Plugin功能。
- 增加CacheExecutor装饰者来为查询增加一个缓存功能。