版权声明:本文为博主原创文章,未经博主允许不得转载。 https://blog.csdn.net/yql_617540298/article/details/84842301
一、霍夫变换思想(Hough Transform)
霍夫变换主要是利用图片所在的空间和霍夫空间之间的变换,将图片所在的直角坐标系中具有形状的曲线或直线映射到霍夫空间的一个点上形成峰值,从而将检测任意形状的问题转化成了计算峰值的问题;
即在图片所在的直角坐标系的一个直线,转换到霍夫空间便成了一点,并且是由多条直线相交而成,我们统计的峰值也就是该相交点的橡胶线的条数。
Hough变换的基本原理在于利用点与线的对偶性,将原始图像空间的给定曲线通过曲线表达形式变为参数空间的一个点。这样就把原始图像给定曲线的检测问题,转化为检测参数空间的峰值问题,也就是把检测整体特性转化为检测局部特性。比如直线,椭圆,圆,弧线等。
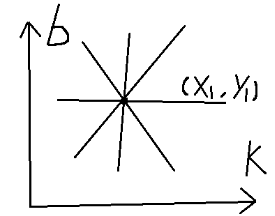
(1)设已知一黑白图像上画了一条直线,要求出这条直线所在的位置。我们知道,直线的方程可以用y=k*x+b 来表示,其中k和b是参数,分别是斜率和截距。也就是说,我们将原始图像需要检测的直线,表示成y = k*x + b, 只要找出唯一的k,b即可检测出该直线。该直线在原始图中是一系列离散点的集合,过该直线上某一点(x0,y0)的所有直线的参数都会满足方程y0=kx0+b。即点(x0,y0)确定了一条直线。而方程y0=kx0+b在参数k--b平面上是一条直线,(也可以是方程b=-x0*k+y0对应的直线).即点(x0,y0)在参数空间确定了一条直线。
(2)这样,图像x--y平面上的一个前景像素点就对应到参数平面上的一条直线。因此,图像x-y内需检测直线上的N个点,在参数平面会有N条直线。而图像x-y内的直线有唯一一个k,b,因此,相应的参数平面N条直线必然有唯一一个交点。
(3)图示:
二、倾斜文本校正
import os
import cv2
import math
import numpy as np
from scipy import misc, ndimage
from PIL import Image

filepath = 'C:/Users/Administrator/Desktop/test'
count = os.listdir(filepath)
resultpath = 'C:/Users/Administrator/Desktop/results'

#for filename in os.listdir(filepath):
for j in range(1,len(count)+1):
    img = cv2.imread(filepath+'/rgb_'+str(j).zfill(4)+'.png')
    img1 = Image.open(filepath+'/rgb_'+str(j).zfill(4)+'.png')
    img1 = img1.convert('RGBA')
    #img = cv2.imread(filepath+'/'+str(j).zfill(4)+'.png')
    #print("img",img)
    #img1 = Image.open(filepath+'/'+str(j).zfill(4)+'.png')
    n = img.shape[0]
    m = img.shape[1]
    #print(m,n)
    gray = cv2.cvtColor(img,cv2.COLOR_BGR2GRAY)
    edges = cv2.Canny(gray,50,150,apertureSize = 3)

    #霍夫变换
    lines = cv2.HoughLines(edges,1,np.pi/180,0)
    for rho,theta in lines[0]:
        a = np.cos(theta)
        b = np.sin(theta)
        x0 = a*rho
        y0 = b*rho
        x1 = int(x0 + 1000*(-b))
        y1 = int(y0 + 1000*(a))
        x2 = int(x0 - 1000*(-b))
        y2 = int(y0 - 1000*(a))
    if x1 == x2 or y1 == y2:
        continue
    t = float(y2-y1)/(x2-x1)
    rotate_angle = math.degrees(math.atan(t))
    if rotate_angle > 45:
        rotate_angle = -90 + rotate_angle
    elif rotate_angle < -45:
        rotate_angle = 90 + rotate_angle
    rotate_img = ndimage.rotate(img, rotate_angle)
    misc.imsave(resultpath+'/'+'rgb_'+str(j).zfill(4)+'.png', rotate_img)

可以看到得到的结果会出现黑色色块:
region = img1.crop((5,5,10,10))
region = np.array(region)
R = np.mean(region[:,:,0])
G = np.mean(region[:,:,1])
B = np.mean(region[:,:,2])

card = Image.new("RGBA", (m, n), (int(R),int(G),int(B)))
card.paste(rotate_image, (0, 0, m, n), rotate_image)