文章目录
Spring Cloud Config简介
Spring Cloud Config为分布式系统外部化配置提供了服务器端和客户端的支持,它包括Config Service和Config Client两部分。由于Config Service和Config Client都实现了对Spring Environment和PropertySource抽象的映射,因此,Spring Cloud Config非常适合Spring应用程序,当然也可以与其它任何语言编写的应用程序配合使用。
Config Server是一个可横向扩展、集中式的配置服务器,它用于集中管理应用程序各个环境下的配置,默认使用Git存储配置文件内容,也可以使用SVN存储,或者是本地文件存储。
Config Client是Config Server的客户端,用于操作存储在ConfigServer中的配置内容。微服务在启动时会请求Config Server获取配置文件的内容,请求到后再启动容器。
Git上的配置文件springcloud-config-resources
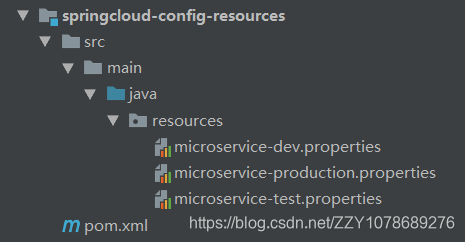
springcloud-config-resources项目结构
由于Spring Cloud Config Server默认采用的是Git,所以说我们就创建一个存放配置文件的目录,在这里,我将配置文件创建到了springcloud-config-resources中,其项目结构如下;
springcloud-config-resources源码
pom.xml源码:
<?xml version="1.0" encoding="UTF-8"?>

<project xmlns="http://maven.apache.org/POM/4.0.0" xmlns:xsi="http://www.w3.org/2001/XMLSchema-instance"
         xsi:schemaLocation="http://maven.apache.org/POM/4.0.0 http://maven.apache.org/xsd/maven-4.0.0.xsd">
    <parent>
        <artifactId>springcloud-parent</artifactId>
        <groupId>com.lyc</groupId>
        <version>1.0-RELEASE</version>
    </parent>
    <modelVersion>4.0.0</modelVersion>

    <artifactId>springcloud-config-resources</artifactId>

    <name>SpringCloud微服务::配置文件</name>
    <url>http://www.example.com</url>

    <properties>
        <project.build.sourceEncoding>UTF-8</project.build.sourceEncoding>
    </properties>

    <build>
        <finalName>${project.artifactId}</finalName>
    </build>

</project>
microservice-dev.properties源码:
jdbc.driverClassName=com.mysql.jdbc.Driver
jdbc.url=jdbc:mysql://192.168.1.1:3306/taobao?useUnicode=true
jdbc.username=root
jdbc.password=root
由于这个项目是用来演示的,所以说这里的生产环境microservice-production.properties与测试环境microservice-test.properties都与开发环境microservice-dev.properties中的内容是一样的,因而我就不重复贴代码了。
最后要做的就是将springcloud-config-resources发布到Git中,供配置文件中心Spring Cloud Config Server来访问。
springcloud-config-server
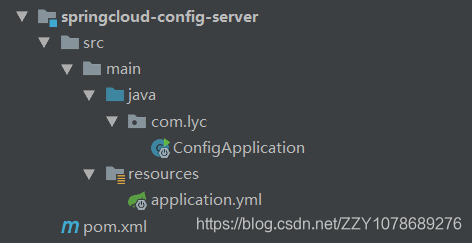
springcloud-config-server项目结构
springcloud-config-server源码
pom.xml源码:
<?xml version="1.0" encoding="UTF-8"?>

<project xmlns="http://maven.apache.org/POM/4.0.0" xmlns:xsi="http://www.w3.org/2001/XMLSchema-instance"
         xsi:schemaLocation="http://maven.apache.org/POM/4.0.0 http://maven.apache.org/xsd/maven-4.0.0.xsd">
    <parent>
        <artifactId>springcloud-parent</artifactId>
        <groupId>com.lyc</groupId>
        <version>1.0-RELEASE</version>
    </parent>
    <modelVersion>4.0.0</modelVersion>

    <artifactId>springcloud-config-server</artifactId>
    <packaging>jar</packaging>

    <name>SpringCloud微服务::配置文件服务器</name>
    <url>http://www.example.com</url>

    <properties>
        <project.build.sourceEncoding>UTF-8</project.build.sourceEncoding>
    </properties>

    <!--导入SpringCloud的依赖管理-->
    <dependencyManagement>
        <dependencies>
            <dependency>
                <groupId>org.springframework.cloud</groupId>
                <artifactId>spring-cloud-dependencies</artifactId>
                <version>Dalston.SR3</version>
                <type>pom</type>
                <scope>import</scope>
            </dependency>
        </dependencies>
    </dependencyManagement>

    <dependencies>
        <dependency>
            <groupId>org.springframework.cloud</groupId>
            <artifactId>spring-cloud-config-server</artifactId>
        </dependency>
        <dependency>
            <groupId>org.springframework.cloud</groupId>
            <artifactId>spring-cloud-starter-eureka-server</artifactId>
        </dependency>
        <dependency>
            <groupId>org.springframework.cloud</groupId>
            <artifactId>spring-cloud-starter-bus-amqp</artifactId>
        </dependency>
    </dependencies>

    <build>
        <finalName>${project.artifactId}</finalName>
    </build>

</project>
ConfigApplication源码:
package com.lyc;

import org.springframework.boot.SpringApplication;
import org.springframework.boot.autoconfigure.SpringBootApplication;
import org.springframework.cloud.config.server.EnableConfigServer;
import org.springframework.cloud.netflix.eureka.EnableEurekaClient;

@EnableEurekaClient
@EnableConfigServer  //开启配置服务
@SpringBootApplication
public class ConfigApplication {

    public static void main(String[] args) {
        SpringApplication.run(ConfigApplication.class,args);
    }

}
application.yml源码:
server:
  port: 6688  #服务端口

spring:
  application:
    name: springcloud-config-server #指定服务名
  cloud:
    config:
      server:
        git: #配置git仓库地址
          uri: [email protected]:zhangzhenyi/springcloud-parent.git
          search-paths: springcloud-config-resources/src/main/java/resources
          username: Git账号
          password: Git密码
  rabbitmq: #RabbitQM相关的配置
    host: 127.0.0.1
    port: 5672
    username: guest
    password: guest

eureka:
  client:
    registerWithEureka: true #是否将自己注册到Eureka服务中,本身就是所有无需注册
    fetchRegistry: true #是否从Eureka中获取注册信息
    serviceUrl: #Eureka客户端与Eureka服务端进行交互的地址
      defaultZone: http://root:[email protected]:6868/eureka/
  instance:
    prefer-ip-address: true #将自己的ip地址注册到Eureka服务中
    ip-address: 127.0.0.1

management:
  security:
    enabled: false #是否开启安全认证
项目的运行与分析
项目的运行
在配置文件中心中,我们不能直接以ip + 端口号的方式对其直接进行访问,因为当我们访问该地址:
http://127.0.0.1:6688/
时显示的结果是这样的:
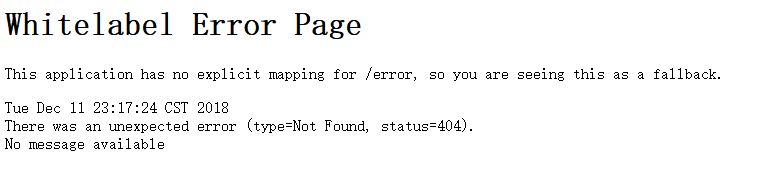
此时我们应该这样访问:
ip + 端口号 + 配置文件
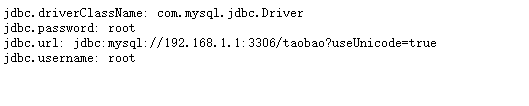
比如说我们在springcloud-config-resources中其中一个的配置文件为microservice-dev.properties,如果我们想在浏览器中访问该文件中的数据,我们应该这么访问:
http://127.0.0.1:6688/microservice-dev.properties
此时访问的结果为正确结果:
当然,注册中心支持以多种后缀的形式来访问,比如说以.yml后缀的形式访问,其访问路径为:
http://127.0.0.1:6688/microservice-dev.yml
分析
Git
由于配置文件中心的设置都在application.yml中,所以说这里就只讲springcloud-config-server中的application.yml
  cloud:
    config:
      server:
        git: #配置git仓库地址
          uri: [email protected]:zhangzhenyi/springcloud-parent.git
          search-paths: springcloud-config-resources/src/main/java/resources
          username: Git账号
          password: Git密码
这里的配置也比较简单,其中的git指的是自己的Git账号,这里的Git可以是GitHub,可以是码云,也可以是第三方的Gitlab等。
其中的uri指的是Git的项目访问地址,而这里的地址,默认的是当前所使用的默认地址,一般情况下指的就是默认的master分支。
search-paths指的是配置文件夹相对于项目根路径的相对路径。
username与password指的就是自己的Git账户的登录账号与密码。
RabbitMQ
这里我们还使用了RabbitMQ,如果没有RabbitMQ的话,可以参考这里进行安装与使用:
在application.yml中配置RabbitQM的方式如下:
rabbitmq: #RabbitQM相关的配置
  host: 127.0.0.1
  port: 5672
  username: guest
  password: guest
上面的配置过于简单,我就不说明其关键字了。
这里需要注意的是RabbitQM的访问地址是:
http://127.0.0.1:15672/
而不是:
http://127.0.0.1:5672/
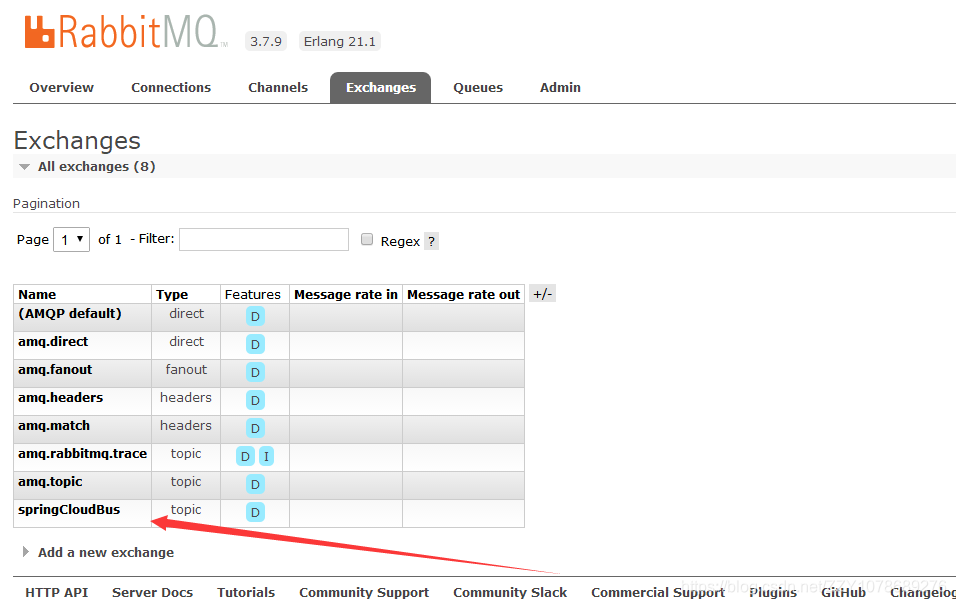
我们在RabbitQM中就可以查看到我们的配置文件中心中的springCloudBus,如下图所示:
其它
SpringCouldBus消息总线
在微服务架构的系统中,我们通常会使用轻量级的消息代理来构建一个共用的消息主题让系统中所有微服务实例都连接上来,由于该主题中产生的消息会被所有实例监听和消费,所以我们称它为消息总线。在总线上的各个实例都可以方便地广播一些需要让其他连接在该主题上的实例都知道的消息,例如配置信息的变更或者其他一些管理操作等。
由于消息总线在微服务架构系统中被广泛的使用,所以它同配置中心一样,几乎是微服务架构中的必备组件。SpringCloud作为微服务架构综合性的解决方案,对此自然也有自己的实现。通过使用SpringCloudBus,可以非常容易地搭建起消息总线,同时实现了一些消息总线中的常用功能,比如,配合SpringCloudConfig实现微服务应用配置信息的动态更新等。
目前SpringCloudBus消息总线只是实现了对RabbitMQ以及Kafka的支持