目录
1.1 appliacition.properties的编写
2.4.1 SecurityConfiguration的编写
3.1.1 There is no PasswordEncoder mapped for the id “null”
参考:There is no PasswordEncoder mapped for the id “null”
3.1.2 Encoded password does not look like BCrypt
前言:这个通过SpringSecurity实现了一个权限控制访问,拥有指定权限的用户才能访问指定的网页.
SpringBoot的版本为2.1.1,springSecurity的版本为5.1.2,前端用的是thymeleaf.
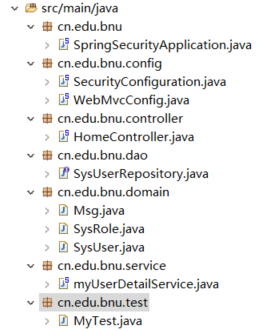
第一章 程序架构
config存放了配置文件,controller就是传统上的控制页面跳转的,domain里面装的是数据模型,dao就是SpringJPA那一套,service里放了一个自己实现的UserDetailsService,test用来测试一些东西
1.1 appliacition.properties的编写
这是复制的以前的项目的一个properties,和此项目相关性不大,只是为了能用省事,可根据自己的情况来配置
spring.datasource.url=jdbc:mysql://localhost:3306/testSpringSecurity?serverTimezone=GMT%2B8&useUnicode=true&characterEncoding=UTF-8&useSSL=true
spring.datasource.username=root
spring.datasource.password=123456
spring.datasource.driver-class-name=com.mysql.cj.jdbc.Driver
spring.thymeleaf.prefix=classpath:/templates/

spring.jpa.open-in-view=true

spring.jpa.properties.hibernate.enable_lazy_load_no_trans=true

spring.jpa.show-sql = true
spring.jpa.hibernate.ddl-auto=update
spring.thymeleaf.cache=false

logging.level.org.springframework.data=DEBUG

server.servlet.session.timeout=3600
server.servlet.context-path=/SpringSecurity
spring.jpa.database-platform=org.hibernate.dialect.MySQL5InnoDBDialect
第二章 代码编写
2.1 domain层的编写
SysUser与SysRole是多对多的关系
2.1.1 SysUser
实现UserDetails是因为需要一个实现此接口的类来提供权限等信息.
@Entity
public class SysUser implements UserDetails{
	private static final long serialVersionUID = 1L;
	@Id
	@GeneratedValue(strategy=GenerationType.IDENTITY)
	private Long id;
	@Column
	private String username;
	@Column
	private String password;
	@ManyToMany(cascade= {CascadeType.REFRESH},fetch=FetchType.EAGER)
	private List<SysRole>  roles;
	public SysUser() {
	}
	@Override
	public Collection<? extends GrantedAuthority> getAuthorities() {
		System.out.println("进入了cellection");
		List<GrantedAuthority> auths = new ArrayList<GrantedAuthority>();
		List<SysRole> roles=this.getRoles();
		for(SysRole role:roles)
			{
				auths.add(new SimpleGrantedAuthority(role.getName()));
			}
		return auths;
	}

	@Override
	public boolean isAccountNonExpired() {
		return true;
	}

	@Override
	public boolean isAccountNonLocked() {
		return true;
	}

	@Override
	public boolean isCredentialsNonExpired() {
		return true;
	}

	@Override
	public boolean isEnabled() {
		return true;
	}

	//省略get,set...
}
2.1.2 SysRole
@Entity
public class SysRole {
	@Id
	@GeneratedValue(strategy=GenerationType.IDENTITY)
	private Long id;
	@Column
	private String name;
	//省略get,set...


}
2.1.3 Msg
这个domain主要是我们为了测试一下controller与themeleaf运行的正确性
public class Msg {
	private String title;
	private String content;
	private String etraInfo;
	public  Msg(String title,String conten,String etraInfo) {
		super();
		this.title=title;
		this.content = conten;
		this.etraInfo = etraInfo;
	}
    //省略get,set...

}
2.2 dao层的编写
只要能根据用户名查找用户即可
public interface SysUserRepository extends JpaRepository<SysUser,Long>{
	SysUser findByUsername(String username);
}
2.3 service层的编写
SpringSecurity将调用实现了UserDetailService的类返回User
@Component
public class myUserDetailService implements UserDetailsService {
	@Autowired
	SysUserRepository sysUserRepository;
	@Override
	public UserDetails loadUserByUsername(String username) throws UsernameNotFoundException {
		SysUser user = sysUserRepository.findByUsername(username);
		if(user==null) {

			System.out.println("没有查找到用户");
		}
		return user;
	}

}
2.4 config的编写
2.4.1 SecurityConfiguration的编写
@Configuration
public class SecurityConfiguration extends WebSecurityConfigurerAdapter{

    //这里将我们刚才写的myUserDetailsService,将调用它返回user
	@Bean
	protected UserDetailsService myUserDetailsService() {
		return new myUserDetailService();
	}
    //将加密器注册为BEAN
	@Bean
	protected PasswordEncoder  PasswordEncoder() {
		return new BCryptPasswordEncoder();
	}
    //这是新版SpringSecurity的要求,要求必须指定加密器,不然会报null的错误,这里我们表示将用
//BCryptPasswordEncoder()来加密解密密码.
	@Override
	protected void configure(AuthenticationManagerBuilder auth) throws Exception {
		auth.userDetailsService(myUserDetailsService()).passwordEncoder(new BCryptPasswordEncoder());
	}
	@Override
	protected void configure(HttpSecurity http) throws Exception {
		http.authorizeRequests() //给请求授权,定义哪些URL需要被保护、哪些不需要被保护
			.antMatchers("/test1/**").hasRole("ADMIN")
			.antMatchers("/test2/**").hasRole("USER")
			.antMatchers("/test3/**").hasRole("TEACHER")
			.anyRequest().authenticated() //任何没有匹配上的其他的url请求,都需要用户被验证
			.and()
			.formLogin()   //定义登陆的一些事项
				.loginPage("/login") //  定义当需要用户登录时候,转到的登录页面
				.failureUrl("/login?error")
				.permitAll()
			.and()
			.logout().permitAll();
	}
}
2.4.2 WebMvcConfig的编写
这里就配置了一个页面跳转,和再controller配置效果是一样的.
@Configuration
public class WebMvcConfig implements WebMvcConfigurer{

	@Override
	public void addViewControllers(ViewControllerRegistry registry) {
		WebMvcConfigurer.super.addViewControllers(registry);
		registry.addViewController("/login").setViewName("login");
	}

}
2.5 controller的编写
这里登陆成功会自动跳转到主页.
@Controller
public class HomeController {
@RequestMapping("/")
public String index(Model model) {
Msg msg = new Msg("测试标题", "测试内容", "额外信息,只对管理员显示");
model.addAttribute("msg", msg);
return "home";
}
@RequestMapping("/test1")
public String test1(Model model) {
Msg msg = new Msg("测试标题", "测试内容", "额外信息,只对管理员显示");
model.addAttribute("msg", msg);
return "test1";
}
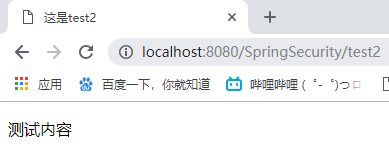
@RequestMapping("/test2")
public String test2(Model model) {
Msg msg = new Msg("测试标题", "测试内容", "额外信息,只对管理员显示");
model.addAttribute("msg", msg);
return "test2";
}
@RequestMapping("/test3")
public String test3(Model model) {
Msg msg = new Msg("测试标题", "测试内容", "额外信息,只对管理员显示");
model.addAttribute("msg", msg);
return "test3";
}
}2.6 temeplates的书写

home:
<!DOCTYPE html>
<html lang="en" xmlns:th="http://www.thymeleaf.org" xmlns:sec="http://www.thymeleaf.org/thymeleaf-extras-springsecurity4">
<head>
<meta content="text/html;charset=UTF-8">
<title sec:authentication="name"></title>
</head>
<body>
	<a th:href="@{/}">首页</a>
	<h1 th:text="${msg.title}"></h1>
	<p th:text="${msg.content}"></p>
	<!--这里本来是想测试下thymeleaf的权限功能,但是没成功,但这不影响我们测试页面的访问功能 -->
	<div sec:authorize="isAuthenticated()">
		<p th:text="${msg.etraInfo}"></p>
	</div>

	<span sec:authorize="hasRole('ROLE_ADMIN')">管理员</span>

	<div sec:authorize="hasRole('ROLE_USER')">
		<p >无更多信息显示</p>
	</div>
	<form th:action="@{/logout}" method="post">
		<input type="submit" value="注销"/>
	</form>

</body>
</html>
test1:
<!DOCTYPE html>
<html lang="en" xmlns:th="http://www.thymeleaf.org">
<head>
<meta charset="UTF-8">
<title>这是test1</title>
</head>
<body>
	<p th:text="${msg.content}"></p>
</body>
</html>
test2:
<!DOCTYPE html>
<html lang="en" xmlns:th="http://www.thymeleaf.org">
<head>
<meta charset="UTF-8">
<title>这是test2</title>
</head>
<body>
	<p th:text="${msg.content]"></p>
</body>
</html>
test3:
<!DOCTYPE html>
<html lang="en" xmlns:th="http://www.thymeleaf.org">
<head>
<meta charset="UTF-8">
<title>这是test3</title>
</head>
<body>
	<p th:text="${msg.content}"></p>
</body>
</html>
login:
<!DOCTYPE html>
<html lang="en" xmlns:th="http://www.thymeleaf.org">
<head>
<meta content="text/html;charset=UTF-8"/>
<title>登陆页面</title>
</head>
<body>
<a th:href="@{/}">首页</a>
<p th:if="${param.logout}">已成功注销</p>
<p th:if="${param.error}">有错误,请重试</p>
<form th:action="@{/login}" method="POST">
	<label>账号</label>
	<input type="text" name="username">
	<label>密码</label>
	<input type="password" name="password">
	<input type="submit" id="login" value="login"/>
</form>
</body>
</html>
第三章 操作之前的准备
3.1 运行的时候可能出现的错误
3.1.1 There is no PasswordEncoder mapped for the id “null”
参考:There is no PasswordEncoder mapped for the id “null”
就是没用类似BCrypt的加密器,现在这个版本的必须要用这个加密,按上面的加个BCrypt的Bean就好了.
3.1.2 Encoded password does not look like BCrypt
参考:https://blog.csdn.net/zhuyongru/article/details/82108543
就是数据库的密码不是加密过的,因为我们设置了加密器,所以加密器要求我们数据的密码是加密过的,具体的形式如下图.

如何插入加密后的密码?见下图,将用户的密码取出并加密
@SpringBootTest
@RunWith(SpringRunner.class)
public class MyTest {

	@Autowired
	SysUserRepository sysUserRepository;
	@Test
	public void test1() {
		System.out.println("第一个测试");
		SysUser user = sysUserRepository.findByUsername("zhangchen");
		BCryptPasswordEncoder passwordEncoder = new BCryptPasswordEncoder();
		user.setPassword(passwordEncoder.encode(user.getPassword()));
		sysUserRepository.save(user);
	}

}
3.2 数据库的配置

sys_role
注意,数据库里的权限我们要加上ROLE_

sys_user

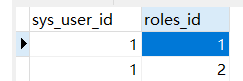
sys_user_roles

第四章 具体的操作
打开登陆页面
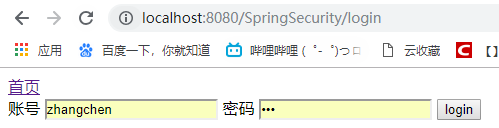
此时我们发现无论访问什么url都会跳转到登陆,于是我们输入账号密码进行登陆,登陆后跳转到首页

我们尝试访问/test1

再尝试访问/test2,可以访问被禁止了,因为没有USER权限

我们加上USER权限,再重新登陆,再访问test2,成功了