代码地址: https://github.com/youaresherlock/IntelligentInformationProcessing
前沿: 本实践是纯属小白练手入门小项目,希望未来可以手动自己用神经网络来识别人脸。共勉,加油!
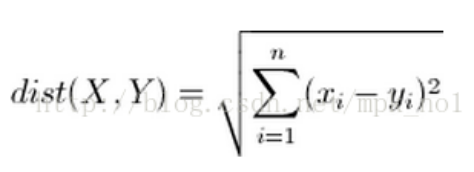
话不多说, 我们用加权欧氏距离KNN算法来实现人脸识别(Python实现)
题目内容:
针对标准人脸样本库,选择训练和测试样本,对基本的knn分类算法设计智能算法进行改进,能够对测试样本识别出身份。 题目要求:
1) 选择合适的编码方法;
2) 构造目标函数,设计算法进行求解;
3) 记录目标函数进化曲线,记录分配结果
4) 分析参数设置对算法结果的影响
5) 统计识别正确率
人脸数据库的选择: ORL人脸库
ORL人脸库(Olivetti Research Laboratory人脸数据库),诞生于英国剑桥Olivetti实验室。
开源下载地址: https://www.cl.cam.ac.uk/research/dtg/attarchive/facedatabase.html
ORL人脸数据库由该实验室从1992年4月到1994年4月期间拍摄的一系列人脸图像组成,共有40个不同年龄、不同性别和不同种族的对象。每个人10幅图像共计400幅灰度图像组成,图像尺寸是92×112,图像背景为黑色。其中人脸部分表情和细节均有变化,例如笑与不笑、眼睛睁着或闭着,戴或不戴眼镜等,人脸姿态也有变化,其深度旋转和平面旋转可达20度,人脸尺寸也有最多10%的变化。该库是目前使用最广泛的标准人脸数据库,特别是刚从事人脸识别研究的学生和初学者,研究ORL人脸库是个很好的开始。
使用加权KNN算法来分类人脸:
目标函数:
通过结合KNN本身的分类算法以及对前k个距离加权,来达到分类的目的 wk-nnc算法是对经典knn算法的改进,这种方法是对k个近邻的样本按照他们距离待分类样本的远近给一个权值w w(i) = (h(k) - h(i)) / (h(k) - h(1)) w(i)是第i个近邻的权值,其中1<i<k,h(i)是待测样本距离第i个近邻的距离

看代码:
图像特征提取三大法宝:HOG特征,LBP特征,Haar特征,Hog_descriptor这个类不是我写的,本来还想弄特征提取,结果分类结果很差,等待以后系统学习吧。
import os
import cv2
import shutil
import math
import random
import numpy as np
from PIL import Image
import matplotlib.pyplot as plt
import matplotlib.image as mpimg

class Hog_descriptor():
    def __init__(self, img, cell_size=16, bin_size=8):
        self.img = img
        self.img = np.sqrt(img / np.max(img))
        self.img = img * 255
        self.cell_size = cell_size
        self.bin_size = bin_size
        self.angle_unit = 360 / self.bin_size
        # assert type(self.bin_size) == int, "bin_size should be integer,"
        # assert type(self.cell_size) == int, "cell_size should be integer,"
        # assert type(self.angle_unit) == int, "bin_size should be divisible by 360"

    def extract(self):
        height, width = self.img.shape
        gradient_magnitude, gradient_angle = self.global_gradient()
        gradient_magnitude = abs(gradient_magnitude)

        cell_gradient_vector = np.zeros((int(height / self.cell_size), int(width / self.cell_size), self.bin_size))
        for i in range(cell_gradient_vector.shape[0]):
            for j in range(cell_gradient_vector.shape[1]):
                cell_magnitude = gradient_magnitude[i * self.cell_size:(i + 1) * self.cell_size,
                                 j * self.cell_size:(j + 1) * self.cell_size]
                cell_angle = gradient_angle[i * self.cell_size:(i + 1) * self.cell_size,
                             j * self.cell_size:(j + 1) * self.cell_size]
                cell_gradient_vector[i][j] = self.cell_gradient(cell_magnitude, cell_angle)

        hog_image = self.render_gradient(np.zeros([height, width]), cell_gradient_vector)
        hog_vector = []
        for i in range(cell_gradient_vector.shape[0] - 1):
            for j in range(cell_gradient_vector.shape[1] - 1):
                block_vector = []
                block_vector.extend(cell_gradient_vector[i][j])
                block_vector.extend(cell_gradient_vector[i][j + 1])
                block_vector.extend(cell_gradient_vector[i + 1][j])
                block_vector.extend(cell_gradient_vector[i + 1][j + 1])
                mag = lambda vector: math.sqrt(sum(i ** 2 for i in vector))
                magnitude = mag(block_vector)
                if magnitude != 0:
                    normalize = lambda block_vector, magnitude: [element / magnitude for element in block_vector]
                    block_vector = normalize(block_vector, magnitude)
                hog_vector.append(block_vector)
        return hog_vector, hog_image

    def global_gradient(self):
        gradient_values_x = cv2.Sobel(self.img, cv2.CV_64F, 1, 0, ksize=5)
        gradient_values_y = cv2.Sobel(self.img, cv2.CV_64F, 0, 1, ksize=5)
        gradient_magnitude = cv2.addWeighted(gradient_values_x, 0.5, gradient_values_y, 0.5, 0)
        gradient_angle = cv2.phase(gradient_values_x, gradient_values_y, angleInDegrees=True)
        return gradient_magnitude, gradient_angle

    def cell_gradient(self, cell_magnitude, cell_angle):
        orientation_centers = [0] * self.bin_size
        for i in range(cell_magnitude.shape[0]):
            for j in range(cell_magnitude.shape[1]):
                gradient_strength = cell_magnitude[i][j]
                gradient_angle = cell_angle[i][j]
                min_angle, max_angle, mod = self.get_closest_bins(gradient_angle)
                orientation_centers[min_angle] += (gradient_strength * (1 - (mod / self.angle_unit)))
                orientation_centers[max_angle] += (gradient_strength * (mod / self.angle_unit))
        return orientation_centers

    def get_closest_bins(self, gradient_angle):
        idx = int(gradient_angle / self.angle_unit)
        mod = gradient_angle % self.angle_unit
        return idx, (idx + 1) % self.bin_size, mod

    def render_gradient(self, image, cell_gradient):
        cell_width = self.cell_size / 2
        max_mag = np.array(cell_gradient).max()
        for x in range(cell_gradient.shape[0]):
            for y in range(cell_gradient.shape[1]):
                cell_grad = cell_gradient[x][y]
                cell_grad /= max_mag
                angle = 0
                angle_gap = self.angle_unit
                for magnitude in cell_grad:
                    angle_radian = math.radians(angle)
                    x1 = int(x * self.cell_size + magnitude * cell_width * math.cos(angle_radian))
                    y1 = int(y * self.cell_size + magnitude * cell_width * math.sin(angle_radian))
                    x2 = int(x * self.cell_size - magnitude * cell_width * math.cos(angle_radian))
                    y2 = int(y * self.cell_size - magnitude * cell_width * math.sin(angle_radian))
                    cv2.line(image, (y1, x1), (y2, x2), int(255 * math.sqrt(magnitude)))
                    angle += angle_gap
        return image

# move file to trainSet or testSet
def moveFile(srcFilePath, dstPath):
    if not os.path.isfile(srcFilePath):
        print("%s not exist!" %(srcFilePath))
    else:
        if not os.path.exists(dstPath):
            os.makedirs(dstPath)
        shutil.move(srcFilePath, dstPath)


#  transform bmp to jpg
def bmpToJpg(filePath):
    if not os.path.isdir(filePath):
        raise ValueError("filePath Error!")
    for each in os.listdir(filePath):
        filename = each.split('.')[0] + ".jpg"
        im = Image.open(os.path.join(filePath, each))
        im.save(os.path.join(filePath, filename))

# delete original bgm picture
def deleteImages(filePath, imageFormat):
    command = "del " + filePath + "\\*." + imageFormat
    os.system(command)

# The data sets are divided into training sets and sample sets
def makeSet(proportion):
    """
    :param proportion: user input the proportion of trainSet number
    :return:
    """
    path = ['trainingSet', 'testingSet']
    for each in path:
        if not os.path.exists(each):
            os.mkdir(each)
    src = 'orl_faces\\s'

    for i in range(40):
        random_list = os.listdir(src + str(i + 1))
        print("processing the number s{0} directory.....".format(i + 1))
        random.shuffle(random_list)
        k = proportion * 10
        for j in range(len(random_list)):
            dstPath = path[0] if j < k else path[1]
            filename = random_list[j]
            srcFilePath = os.path.join(src + str(i + 1), filename)
            moveFile(srcFilePath, dstPath)
            srcfile = os.path.join(dstPath, filename)
            dstfile = os.path.join(dstPath, str(10 * (i + 1) + int(filename.split('.')[0])) + '.pgm')
            os.rename(srcfile, dstfile)
            print("move samples from directory {0} ----> {1}".format(srcFilePath, dstfile))

# change the gray picture to row vector
def img2vector(filename):
    img = mpimg.imread(filename)
    # print(img.shape)
    # plt.imshow(img)
    # plt.show()
    # hog = Hog_descriptor(img, cell_size = 4, bin_size = 8)
    # vector, image = hog.extract()
    # return vector[0] # 1*32个特征值

    return img.reshape(1, -1)

# 读取训练集和数据集
def readData(trainFilePath, testFilePath):
    trainingFileList = os.listdir(trainFilePath)
    testFileList = os.listdir(testFilePath)

    trainingLen = len(trainingFileList)
    trainLabels = []
    trainSet = np.zeros((trainingLen, 92 * 112)) # 92 * 112
    for i in np.arange(trainingLen):
        filename = trainingFileList[i]
        classNum = int(filename.split('.')[0])
        classNum = math.ceil(classNum / 10) - 1
        trainLabels.append(classNum)
        trainSet[i] = img2vector(os.path.join(trainFilePath, filename))

    testingLen = len(testFileList)
    testSet = np.zeros((testingLen, 92 * 112))
    testLabels = []
    for i in np.arange(testingLen):
        filename = testFileList[i]
        classNum = int(filename.split('.')[0])
        classNum = math.ceil(classNum / 10) - 1
        testLabels.append(classNum)
        testSet[i] = img2vector(os.path.join(testFilePath, filename))

    return {'trainSet' : trainSet, 'trainLabels' : trainLabels,
            'testSet' : testSet, 'testLabels' : testLabels}

# 进行归一化处理 normalization
def maxmin_norm(array):
    """
    :param array: 每行为一个样本,每列为一个特征,且只包含数据,没有包含标签
    :return:
    """
    maxcols = array.max(axis = 0)
    mincols = array.min(axis = 0)
    data_shape = array.shape
    data_rows, data_cols = data_shape
    t = np.empty((data_rows, data_cols))
    for i in range(data_cols):
        t[:, i] = (array[:, i] - mincols[i]) / (maxcols[i] - mincols[i])
    return t

# KNN classifier
def kNNClassify(inX, dataSet, labels, k = 3):
    """
    :param inX: 测试的样本的112*92灰度数据
    :param dataSet: 训练集
    :param labels: 训练集的标签列表('1' '2' ..... '40'共40类别)
    :param k: k值
    :return: 预测标签label
    distance是[5 50 149...]是测试样本距离每个训练样本的距离向量40 * 1
    """
    distance = np.sum(np.power((dataSet - inX), 2), axis = 1) # 计算欧几里得距离
    sortedArray = np.argsort(distance, kind = "quicksort")[:k]

    # 给距离加入权重
    w = []
    for i in range(k):
        w.append((distance[sortedArray[k-1]] - distance[sortedArray[i]])\
                 / (distance[sortedArray[k-1]] - distance[sortedArray[0]]))

    count = np.zeros(41)
    temp = 0
    for each in sortedArray:
        count[labels[each]] += 1 + w[temp]
        temp += 1

    label = np.argmax(count) # 如果label中有多个一样的样本数,那么取第一个最大的样本类别
    return label

def main(k):
    # generate the trainingSet and the testingSet
    if not os.path.exists('testingSet') and not os.path.exists("trainingSet"):
        prompt = "Please input the proportion(0~1): "
        while True:
            receive = input(prompt)
            proportion = round(float(receive), 1)
            if  0 < proportion < 1:
                break
            prompt = "Please input again ! :) :"
        makeSet(proportion)

    # read data
    data = readData('trainingSet', 'testingSet')
    trainSet = data['trainSet']
    trainLabels = data['trainLabels']
    testSet = data['testSet']
    testLabels = data['testLabels']

    # normalization
    temp = trainSet.shape[0]
    array = np.vstack((trainSet, testSet))
    normalized_array = maxmin_norm(array)
    trainSet, testSet = normalized_array[:temp], normalized_array[temp:]

    correct_count = 0
    test_number = testSet.shape[0]
    string = "test sample serial number: {0}, sample label: {1}, classify label: {2}------>correct?: {3}"
    for i in np.arange(test_number):
       label =  kNNClassify(testSet[i], trainSet, trainLabels, k = k)
       if label == testLabels[i]:
           correct_count += 1
       print(string.format(i + 1, testLabels[i], label, label == testLabels[i]))

    print("face recognization accuracy: {}%".format((correct_count / test_number) * 100))
    return (correct_count / test_number) * 100

# verify the proper k
def selectK():
    x = list()
    y = list()
    for i in range(3, 11):
        x.append(i)
        y.append(main(i))
    plt.plot(x, y)
    plt.show()

if __name__ == "__main__":
   main(4)

# bmpToJpg('orl_faces\\s1')
# print(img2vector('orl_faces\s1\\1.jpg').shape)
# deleteImages('orl_faces\s1', 'jpg')
40个人脸可以用show_face(flag = True)函数来显示到一张图中
人脸图如下所示:

结果: 可以看到准确率96.25%,现在的用神经网络来进行人脸识别准确率已经99.5%左右了,这个是小白练手了
............................................................................
test sample serial number: 58, sample label: 36, classify label: 36------>correct?: True
test sample serial number: 59, sample label: 3, classify label: 3------>correct?: True
test sample serial number: 60, sample label: 37, classify label: 37------>correct?: True
test sample serial number: 61, sample label: 3, classify label: 3------>correct?: True
test sample serial number: 62, sample label: 37, classify label: 37------>correct?: True
test sample serial number: 63, sample label: 38, classify label: 38------>correct?: True
test sample serial number: 64, sample label: 38, classify label: 38------>correct?: True
test sample serial number: 65, sample label: 39, classify label: 39------>correct?: True
test sample serial number: 66, sample label: 39, classify label: 39------>correct?: True
test sample serial number: 67, sample label: 40, classify label: 40------>correct?: True
test sample serial number: 68, sample label: 40, classify label: 40------>correct?: True
test sample serial number: 69, sample label: 4, classify label: 4------>correct?: True
test sample serial number: 70, sample label: 4, classify label: 4------>correct?: True
test sample serial number: 71, sample label: 5, classify label: 5------>correct?: True
test sample serial number: 72, sample label: 5, classify label: 5------>correct?: True
test sample serial number: 73, sample label: 6, classify label: 6------>correct?: True
test sample serial number: 74, sample label: 6, classify label: 6------>correct?: True
test sample serial number: 75, sample label: 7, classify label: 7------>correct?: True
test sample serial number: 76, sample label: 7, classify label: 7------>correct?: True
test sample serial number: 77, sample label: 8, classify label: 8------>correct?: True
test sample serial number: 78, sample label: 8, classify label: 8------>correct?: True
test sample serial number: 79, sample label: 9, classify label: 9------>correct?: True
test sample serial number: 80, sample label: 9, classify label: 9------>correct?: True
face recognization accuracy: 96.25%
K值的选取:
通过不断尝试K值的选取,最终是3,4识别率最高

结论:
1.算法复杂度太多,还需要经过一些手段对人脸数据特征进行提取和压缩
2.认识到了自己知识的不足之处,希望接下来的学习中能够继续加油!