1、互斥锁(ReentrantLock):
互斥锁是JDK1.5的新特性,目的就是为了替换同步代码块(同步锁),使进程间的通信更加简洁
下面重写我们上一篇的三个及三个以上线程间的通信:
思路:
- ReentrantLock类的lock() 和unlock() 方法可以替换synchronized同步代码块(基本上就是可以直接替换)
- newCondition() 方法返回一个实现了Condition接口的对象,再用await() 方法使之等待,用signal() 唤醒下一个线程,这两个方法就相当于Object的wait() 和notify() 方法(每一个线程都要创建一个实现了Condition接口的对象,一开一关)
package cn.xinhua;

import java.util.concurrent.locks.Condition;
import java.util.concurrent.locks.ReentrantLock;

public class ThreadTest {

	public static void main(String[] args) {
		Print p = new Print();
		Thread t1 = new Thread() {
			public void run() {
				for (int i = 0; i < 1000; i++) {
					try {
						p.print1();
					} catch (InterruptedException e) {
						// TODO Auto-generated catch block
						e.printStackTrace();
					}
				}
			}
		};

		Thread t2 = new Thread() {
			public void run() {
				for (int i = 0; i < 1000; i++) {
					try {
						p.print2();
					} catch (InterruptedException e) {
						// TODO Auto-generated catch block
						e.printStackTrace();
					}
				}
			}
		};

		Thread t3 = new Thread() {
			public void run() {
				for (int i = 0; i < 1000; i++) {
					try {
						p.print3();
					} catch (InterruptedException e) {
						// TODO Auto-generated catch block
						e.printStackTrace();
					}
				}
			}
		};

		t1.start();
		t2.start();
		t3.start();

	}

}

// 互斥锁
class Print extends Thread {
	final private ReentrantLock r = new ReentrantLock();
	final private Condition c1 = r.newCondition();
	final private Condition c2 = r.newCondition();
	final private Condition c3 = r.newCondition();
	final Object obj = new Object();
	private int target = 1;

	public void print1() throws InterruptedException {

		r.lock();

		if (target != 1) {
			c1.await();
		}
		System.out.print("我");
		System.out.print("是");
		System.out.print("吴");
		System.out.print("彦");
		System.out.print("祖");
		System.out.println();
		target = 2;
		c2.signal();

		r.unlock();
	}

	public void print2() throws InterruptedException {
		r.lock();
		if (target != 2) {
			c2.await();
		}
		System.out.print("你");
		System.out.print("要");
		System.out.print("相");
		System.out.print("信");
		System.out.print("我");
		System.out.println();
		target = 3;
		c3.signal();
		r.unlock();
	}

	public void print3() throws InterruptedException {
		r.lock();
		if (target != 3) {
			c3.await();
		}
		System.out.print("不");
		System.out.print("信");
		System.out.print("我");
		System.out.print("拉");
		System.out.print("倒");
		System.out.println();
		target = 1;
		c1.signal();
		r.unlock();
	}
}

输出:
我是吴彦祖
你要相信我
不信我拉倒
我是吴彦祖
你要相信我
不信我拉倒
我是吴彦祖
你要相信我
不信我拉倒
我是吴彦祖
你要相信我
不信我拉倒
。。。
2、线程组:
线程组就是利用Thread的一个构造方法,将我们创建的线程统一放到一个线程组里方便操作
- 创建线程组对象
- 用构造方法创建Thread对象并将线程放到线程组里
 1. 创建线程组对象
ThreadGroup tg = new ThreadGroup("我是线程组");

 2. 用构造方法创建Thread对象并将线程放到线程组里
Thread t1 = new Thread(tg,"吴彦祖")
Thread t2 = new Thread(tg,"周杰伦")
Thread t3 = new Thread(tg,"林宥嘉")

System.out.println(t1.getName());
System.out.println(t2.getName());
System.out.println(t3.getThreadGroup().getName());

输出:

吴彦祖
周杰伦
我是线程组
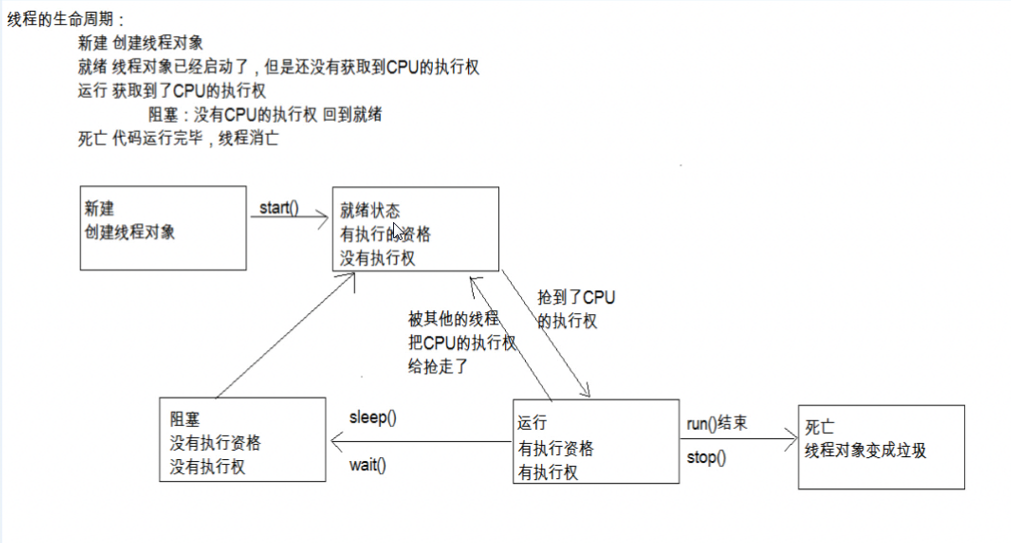
3、线程的生命周期:
4、线程池:
- 创建线程池
- 将线程放进线程池里并执行
- 关闭线程池
 1. 创建线程池
ExecutorService pool = Executors.newFixedThreadPool(2);
 2. 将线程放进线程池里并执行
pool.submit(new MyRunable);
pool.submit(new MyRunable);
 3. 关闭线程池
pool.shutdown();