版权声明:本文为博主原创文章,未经博主允许不得转载。 https://blog.csdn.net/wangchengming1/article/details/84107248
原型模式在我们平时工作中还是很常用的,而且使用起来非常简单,其核心是一个clone方法。
- 原型模式的定义
Specify the kinds of objects to create using a prototypical instance,and create new objects by copying this prototype. 用原型实例指定创建对象的种类,并且通过拷贝这些原型创建新的对象。 - 原型模式的要点
- 原型模式主要用于对象的复制。
- 原型类Prototype必须实现Cloneable接口。在Java中提供了一个Cloneable接口,来标识这个对象是可以拷贝的,在JVM中具有这个标记的对象才有可能被拷贝。
- 重写Object类中的clone方法。作用是返回对象的一个拷贝,但是其作用域protected类型的,一般的类无法调用。所以Prototype类需要将clone方法的作用域修改为public类型。
- 原型模式的通用类图
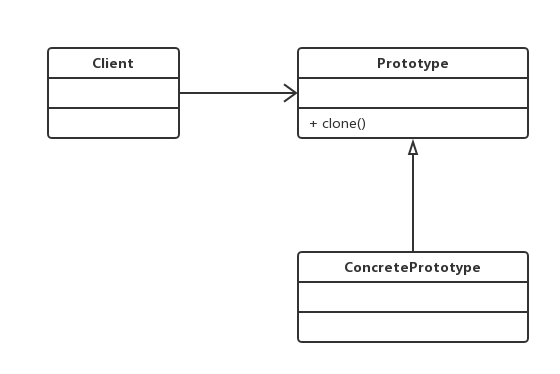
- 原型模式的通用代码
原型类
public class Prototype implements Cloneable {

	/* (non-Javadoc)
	 * @see java.lang.Object#clone()
	 *
	 * 重写Object的clone()方法,必须是public
	 *
	 */
	@Override
	public Prototype clone() {

		Protptype prototype = null;
		try {
			prototype = (Protptype) super.clone();
		} catch (CloneNotSupportedException ex) {
			ex.printStackTrace();
		}
		return prototype;
	}
}
实现类
class ConcretePrototype extends Prototype{
    public void show(){
        System.out.println("原型模式实现类");
    }
}
public class Client {

	public static void main(String[] args) {
		ConcretePrototype cp = new ConcretePrototype();
		for (int i = 0; i < 10; i++) {
			ConcretePrototype clonecp = (ConcretePrototype) cp.clone();
			clonecp.show();
		}
	}
}
运行结果
原型模式实现类
原型模式实现类
原型模式实现类
原型模式实现类
原型模式实现类
原型模式实现类
原型模式实现类
原型模式实现类
原型模式实现类
原型模式实现类
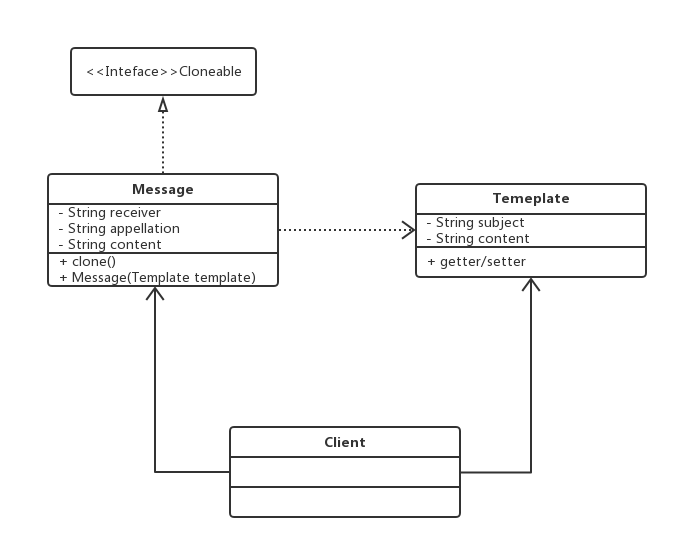
- 原型模式的实例类图
在现实生活中有这样一种场景,说起来也很烦。双十一刚过,各种垃圾短信一顿狂轰乱炸,让人很不爽。其实这种大批量的发送短信的场景,原型模式是最适合不过了。
- 原型模式的实例代码
模板如下
package example;

public class Temeplate {

	// 短信名字
	private String subject = "【天猫双11活动】";

	private String content = "双11活动通知:满99减66.";

	public String getSubject() {
		return subject;
	}

	public String getContent() {
		return content;
	}
}
Message类如下
public class Message implements Cloneable {

	private String receiver;

	private String subject;

	private String content;

	public Message(Temeplate temeplate) {
		this.subject = temeplate.getSubject();
		this.content = temeplate.getContent();
	}

	@Override
	public Message clone() {
		Message msg = null;
		try {
			msg = (Message)super.clone();
		}catch(CloneNotSupportedException ex) {
			ex.printStackTrace();
		}
		return msg;
	}

	public String getReceiver() {
		return receiver;
	}

	public void setReceiver(String receiver) {
		this.receiver = receiver;
	}

	public String getSubject() {
		return subject;
	}

	public void setSubject(String subject) {
		this.subject = subject;
	}

	public String getContent() {
		return content;
	}

	public void setContent(String content) {
		this.content = content;
	}
}
实现类
public class Client {

	private static int count = 10;

	public static void main(String[] args) {

		int i = 0;
		Message msg = new Message(new Temeplate());
		while (i < count) {
			Message cloneMsg = msg.clone();
			Random rand = new Random();
			cloneMsg.setReceiver(rand.nextInt(1000000000) + 1+"@qq.com");
			send(cloneMsg);
			i++;
		}
	}

	public static void send(Message msg) {
		System.out.println(msg.getReceiver()+"接收成功");
	}
}
输出结果如下
[email protected]接收成功
[email protected]接收成功
[email protected]接收成功
[email protected]接收成功
[email protected]接收成功
[email protected]接收成功
[email protected]接收成功
[email protected]接收成功
[email protected]接收成功
[email protected]接收成功
这样子就可以做到群发的效果,也就是商家只需要一份名单,就可以给名单里的人发送一样的短信。
- 原型模式的注意事项
- 使用原型模式复制对象不会调用类的构造方法。因为对象的复制是通过调用Object类的clone方法来完成的,它直接在内存中复制数据,因此不会调用到类的构造方法。
- 深拷贝与浅拷贝。Object类的clone方法只会拷贝对象中的基本的数据类型(byte、char、short、int、long、float、double、boolean)。如果要实现深拷贝,必须将原型模式中的数组、容器对象、引用对象等另行拷贝。
- clone和final是有冲突的。
- 原型模式的优点及适用场景
- 使用原型模式创建对象比直接new一个对象在性能上要好的多。
- 简化对象的创建。
参考书籍:设计模式之禅
实例代码放在这里。