SpringBoot我就不详细介绍了,约定大于配置,上手十分简单,开发快速简洁且功能强大。
MyBatis 是一款优秀的持久层框架,它支持定制化 SQL、存储过程以及高级映射。MyBatis 避免了几乎所有的 JDBC 代码和手动设置参数以及获取结果集。MyBatis 可以使用简单的 XML 或注解来配置和映射原生信息,将接口和 Java 的 POJOs(Plain Old Java Objects,普通的 Java对象)映射成数据库中的记录。
用xml配置的方法我就不讲了,xml的映射配置总觉得有点麻烦。使用mybatis generator 自动生成代码的方式,接口定义和映射离散在不同的文件中,阅读起来不是很方便。于是,准备使用mybatis的注解方式实现映射。
首先快速构建springboot项目这里就不说了
项目架构:

1.pom.xml文件加上mybatis的依赖
       <!--mybatis-->
        <dependency>
            <groupId>org.mybatis.spring.boot</groupId>
            <artifactId>mybatis-spring-boot-starter</artifactId>
            <version>1.3.0</version>
        </dependency>
2.application.properties配置文件中加入如下配置信息:
spring.datasource.url=jdbc:mysql://localhost/questionbank?useSSL=true&characterEncoding=utf8&zeroDateTimeBehavior=convertToNull
spring.datasource.username=root
spring.datasource.password=root
spring.datasource.driver-class-name=com.mysql.jdbc.Driver
spring.datasource.type=com.alibaba.druid.pool.DruidDataSource
3.实体层entity(和数据库表相对应):
package olcp.entity;

import javax.persistence.*;
import java.io.Serializable;
import java.util.Date;

/**
 * 题目
 */
@Entity
@Table(name="question")
public class question implements Serializable{
    private static final long serialVersionUID = 1L;
    /**
     * 题目Id
     */
    @Id
    @GeneratedValue(strategy = GenerationType.AUTO)
    @Column
    private Integer id;
    /**
     * 题目内容
     */
    @Column
    private String content;
    /**
     * 题目选项
     */
    @Column
    private String option;
    /**
     * 题目图片地址
     */
    @Column
    private String imgurl;
    /**
     * 题目类型
     */
    @Column
    private Integer type;
    /**
     * 难度
     */
    @Column
    private Integer difficulty;
    /**
     * 题目创建时间
     */
    @Column
    private Date creation_time;
    /**
     * 题目方向
     */
    @Column
    private String direction;
    /**
     * 题目热度
     */
    @Column
    private Integer hot;

    @Column
    @Transient
    private question question;

    public question getQuestion() {
        return question;
    }

    public void setQuestion(question question) {
        this.question = question;
    }
    public question(){

    }

    public question(String content, String option, String imgurl, Integer type, Integer difficulty, Date
            creation_time, String direction, Integer hot) {
        this.content = content;
        this.option = option;
        this.imgurl = imgurl;
        this.type = type;
        this.difficulty = difficulty;
        this.creation_time = creation_time;
        this.direction = direction;
        this.hot = hot;
    }

    public Integer getId() {
        return id;
    }

    public void setId(Integer id) {
        this.id = id;
    }

    public String getContent() {
        return content;
    }

    public void setContent(String content) {
        this.content = content;
    }

    public String getOption() {
        return option;
    }

    public void setOption(String option) {
        this.option = option;
    }

    public String getImgurl() {
        return imgurl;
    }

    public void setImgurl(String imgurl) {
        this.imgurl = imgurl;
    }

    public Integer getType() {
        return type;
    }

    public void setType(Integer type) {
        this.type = type;
    }

    public Integer getDifficulty() {
        return difficulty;
    }

    public void setDifficulty(Integer difficulty) {
        this.difficulty = difficulty;
    }

    public Date getCreation_time() {
        return creation_time;
    }

    public void setCreation_time(Date creation_time) {
        this.creation_time = creation_time;
    }

    public String getDirection() {
        return direction;
    }

    public void setDirection(String direction) {
        this.direction = direction;
    }

    public Integer getHot() {
        return hot;
    }

    public void setHot(Integer hot) {
        this.hot = hot;
    }
}
4.mapper层(接口)
package olcp.mapper;

import olcp.entity.question;;
import org.apache.ibatis.annotations.Insert;
import org.apache.ibatis.annotations.Mapper;
import org.apache.ibatis.annotations.Param;
import org.apache.ibatis.annotations.Select;

import java.util.List;

@Mapper
public interface QuestionMapper {

    @Select("SELECT * FROM question WHERE DIRECTION = #{direction}")
    List<question> findByDirection(@Param("direction") String direction);

    @Insert("INSERT INTO question(DIRECTION) VALUES(#{direction})")
    int insert(@Param("direction") String direction);

}
多种注解配置如下:
传参方式:
1.使用@Param,上面的代码已经展示了这种用法
2.使用Map
    @Insert("INSERT INTO question(DIRECTION) VALUES(" + "#{direction, jdbcType=VARCHAR})")
    int insertByMap(Map<String, Object> map);
对于Insert语句中需要的参数,我们只需要在map中填入同名的内容即可
Map<String, Object> map = new HashMap<>();
        map.put("direction","c++");
        QuestionMapper.insertByMap(map);
3.使用对象
使用普通的java对象作为查询条件的参数:
   @Insert("INSERT INTO question(DIRECTION) VALUES(#{direction})")
    int insertByQuestion(question question1);
只需要语句中的#{direction}对应question对象中的direction属性即可。
        question q = new question();
        q.setDirection("c++");
        QuestionMapper.insertByQuestion(q);
增删改查(CRUD):
 @Select("SELECT * FROM question WHERE DIRECTION = #{direction}")
    question findByDirection(@Param("direction") String direction);

    @Insert("INSERT INTO question(DIRECTION) VALUES(#{direction})")
    int insertByDirection(question question1);

    @Update("UPDATE question SET CONTENT = #{content} WHERE DIRECTION = #{direction}")
    void update(question question1);

    @Delete("DELETE FROM question WHERE ID = #{id}")
    void delete(Integer id);
返回结果绑定
通过@Results和@Result注解来进行绑定
    @Results({
            @Result(property = "direction", column = "DIRECTION"),
            @Result(property = "content", column = "CONTENT")
    })
    @Select("SELECT DIRECTION, CONTENT FROM question")
    List<question> findAll();
5.控制层(实现逻辑)
package olcp.web.admin;

import olcp.entity.question;
import olcp.mapper.QuestionMapper;
import org.springframework.beans.factory.annotation.Autowired;
import org.springframework.web.bind.annotation.*;

import java.util.List;

@RestController
@RequestMapping("/admin/question")
public class adminQuestionController {
    @Autowired
    private QuestionMapper QuestionMapper;

    /**
     * 查看对应方向的题目
     */
    @RequestMapping("/all")
    public List<question> getall(String direction) {
        List<question> questions = QuestionMapper.findByDirection(direction);
        return questions;
    }
}
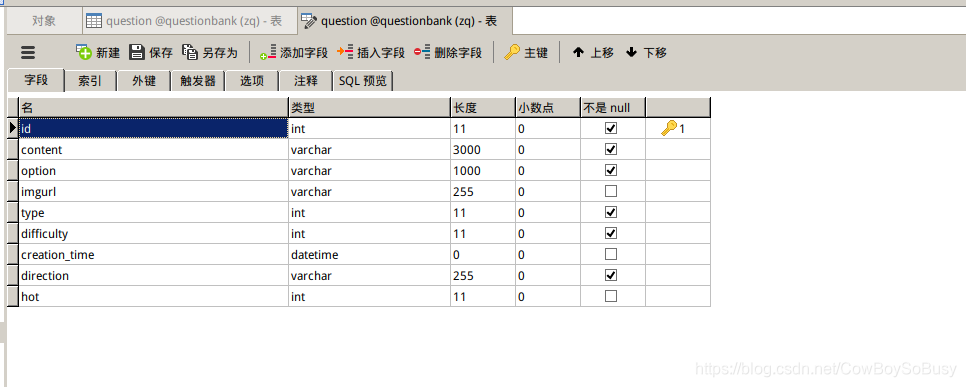
数据库表设计:

下面运行springboot项目,在浏览器上输入对应的访问路径,可以看到对应的json数据
我这里配的是http://localhost:8081/tc/admin/question/all?direction=java

当然我这里只是举的一个简单的例子,直接把数据接口中的json数据显示到前台了,并没有用h5+css+js或者前端框架那些去渲染数据了,有兴趣的同学可以用到自己的前后端分离的项目中去。
MyBatis的内容还远不止我讲的这些,还有很多内层的以及一些注解什么的我就没讲了,这些到后面有机会再补充,这里先介绍SpringBoot整合MyBatis完成数据接口获取的操作(后端部分)。