1 商品新增
1.1 图片上传
基本知识点:
文件上传页面三要素:
1、 form表单提交方式一定是post
2、 form表单的enctype一定是multipart/form-data
3、 form表单中一定要有一个input的type是 file
文件上传一定要有的jar
Commons-io和commons-fileupload
Springmvc文件上传:
1、 springmvc.xml中一定要有 多媒体解析器
2、 后台Controller中的方法中形参使用MultipartFile类型接收文件,参数的名称一定要和页面上的参数名称保持一致
第一步:完成上传按钮的方法

Controller.js代码:
$scope.uploadFile=function () {
    uploadService.uploadFile().success(function (response) {
        if(response.success){
       // 上传成功后 获取图片路径 放到imageUrl
       //      {success:true,message:"192.168.25.133/1298863/fdg/dfa.jpg"}
            $scope.image.url=response.message;
        }else{
            alert(response.message);
        }
    })
}
uploadService.js代码:
this.uploadFile=function () {
     var formData = new FormData();// html5的对象 用来向表单中放需要提交的数据
      // file.files[0]  file.files代表整个页面中所有的input类型是file的输入框
      formData.append("file",file.files[0])
return $http({
          method:'POST',
   url:'../upload/uploadFile',
   data:formData,
    headers: {'Content-Type':undefined}, // ‘Content-Type’: undefined,这样浏览器会帮我们把 Content-Type 设置为 multipart/form-data
          transformRequest: angular.identity// transformRequest: angular.identity ,anjularjs transformRequest function 将序列化我们的formdata object.
})
  }
第二步:完成后台的代码
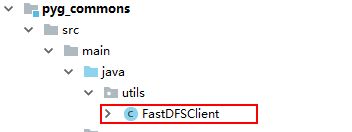
1、 拷贝一个工具类,放入到pyg_commons中
2、 向pyg_shop_web中添加配置文件

3、 创建UploadController完成上传方法
@RestController =controller+responseBody
@RequestMapping("/upload")
public class UploadController {

    @Value("${uploadServer}")
    private String uploadServer;

    @RequestMapping("/uploadFile")
    public Result uploadFile(MultipartFile file){
        try {
            FastDFSClient fastDFSClient = new FastDFSClient("classpath:config/fdfs_client.conf");
//           b.1.jpg   split  subStr
            String filename = file.getOriginalFilename();
            String extName = filename.substring(filename.lastIndexOf(".")+1);
            String fileUrl = fastDFSClient.uploadFile(file.getBytes(), extName);
//             /group1/M00/00/00/wKgZhVv3f0qAJ-H-AAFP0yQoHiA752.jpg
            return new Result(true,uploadServer+fileUrl);
        } catch (Exception e) {
            e.printStackTrace();
            return new Result(false,"上传失败");
        }
    }
}
第三步:修改前端代码使用image对象的url属性接收上传完成后的地址
知识点:最终我们上传文件的数据都会保存到tb_goods_desc的item_image属性上
第四步:完成保存按钮,动态添加行
$scope.addItemImage=function () {
 // 向 $scope.entity.tbGoodsDesc.itemImages 数组中追加对象 $scope.image
    $scope.entity.tbGoodsDesc.itemImages.push($scope.image);
}
第五步:完成动态删除行
$scope.deleItemImages=function (index) {
// 从 $scope.entity.tbGoodsDesc.itemImages 数组中移除对象
$scope.entity.tbGoodsDesc.itemImages.splice(index,1);
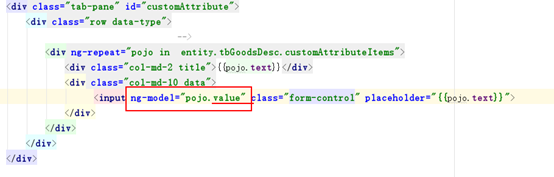
}1.2 扩展属性
第一步:从模板中获取扩展属性
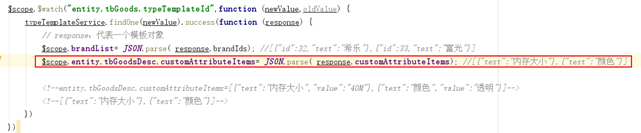
但是从模板中获取的扩展属性中的对象里没有value属性
第二步:添加value属性
1.3 规格
1.3.1 页面上显示规格
第一步:分析

结论:需要
[{id:27,text:'网络',options:[{optionName:'移动3G'},{optionName:'移动4G'}]},
{id:32:''机身内存,options:[{optionName:'16G'},{optionName:'32G'}]}]
的数据结构才能显示到页面上
第二步:在后台拼凑这样的数据格式
Js代码:

后台service代码:
    @Override
   public List<Map> findSpecList(Long id) {
//    [{"id":27,"text":"网络","options":[{"id":113,"optionName":"电信4G","orders":6,"specId":27},{"id":117,"optionName":"双卡","orders":10,"specId":27}
//,{"id":32,"text":"机身内存","options":[{"id":100,"optionName":"16G","orders":3,"specId":32}]}]
      TbTypeTemplate tbTypeTemplate = typeTemplateMapper.selectByPrimaryKey(id);
      String specIds = tbTypeTemplate.getSpecIds();  //[{"id":27,"text":"网络"},{"id":32,"text":"机身内存"}]

//    JSON.toJSONString()
//    List<Map>---->[{"id":27,"text":"网络"},{"id":32,"text":"机身内存"}]
      List<Map> specList = JSON.parseArray(specIds, Map.class);
      for (Map map : specList) {
//       select * from tb_specification where spec_id=?
         TbSpecificationOptionExample example = new TbSpecificationOptionExample();
         example.createCriteria().andSpecIdEqualTo(Long.parseLong(map.get("id")+"") );
         List<TbSpecificationOption> tbSpecificationOptions = specificationOptionMapper.selectByExample(example);
         map.put("options",tbSpecificationOptions);
      }
      return specList;
   }
页面:
1.3.2 通过勾选拼凑表中需要的格式
第一步:在规格小项上添加方法
Html:

JS:
$scope.updateSpecificationItems=function(event,key,value){
  // 先判断即将追加的value值 在大数组中是否有一个对象和key对应
    var specItem = findObjectFromArray($scope.entity.tbGoodsDesc.specificationItems,key);
    if(event.target.checked){
       if(specItem==null){
           $scope.entity.tbGoodsDesc.specificationItems.push({attributeName:key,attributeValue:[value]});
       }else{
           specItem.attributeValue.push(value);
       }
    }else{
        var index = specItem.attributeValue.indexOf(value);
        specItem.attributeValue.splice(index,1);
        // 还需要判断specItem.attributeValue是否为空 ,如果为空应该把specItem从大数组中移除
        if(specItem.attributeValue.length==0){
            var _index=$scope.entity.tbGoodsDesc.specificationItems.indexOf(specItem);
            $scope.entity.tbGoodsDesc.specificationItems.splice(_index,1);
        }
    }
 }
//从大数组中根据key找对象
function findObjectFromArray(specificationItems,key) {
    for (var i = 0; i < specificationItems.length; i++) {
        if(  specificationItems[i].attributeName==key){
             return specificationItems[i];
        }
    }
    return null;
}
1.3.3 深浅克隆
JSON.parse:将js字符串转成JS json对象
JSON.stringify:将json对象转成字符串
1.4 动态产生sku
Sku列表数据的产生是和specificationItems有关系

<script type="text/javascript">
    var myapp = angular.module('myApp',[]); //定义一个模块
    myapp.controller("myController",function($scope,$http){  //$scope 是 js和html交互的入口
         $scope.user1={username:"zhangsan"};
      $scope.copyUser=function () {
           $scope.user2 =$scope.user1 ; //浅刻隆
           $scope.user2 =JSON.parse( JSON.stringify($scope.user1)) ; //深刻隆
       }
    })
</script>
</head>
<body ng-app="myApp" ng-controller="myController"   >
  user1的用户名是:{{user1.username}}<br/>
  <button ng-click="copyUser()">拷贝</button><br/>
  user2的用户名:<input ng-model="user2.username">
</body>
</html>
// 动态生成sku列表 entity.itemList
function createItemList() {
 $scope.entity.itemList=[{spec:{},price:0,num:9999,status:"1",isDefault:'0'}];
    var specItems = $scope.entity.tbGoodsDesc.specificationItems;
    //     [{attributeName:'网络',attributeValue:['移动4G','联通4G']},
    //         {attributeName:'机身内存',attributeValue:['32G','64G']}]
    for (var i = 0; i < specItems.length; i++) {
        $scope.entity.itemList = addColumn($scope.entity.itemList,specItems[i].attributeName,specItems[i].attributeValue);
    }
   }
function addColumn(itemList,attributeName,attributeValue) {
 var newItemList=[];
    for (var i = 0; i < itemList.length; i++) {
        for (var j = 0; j < attributeValue.length; j++) {
            var newRow = JSON.parse(JSON.stringify(itemList[i]));
            newRow.spec[attributeName]=attributeValue[j];    //---{网络:移动4G}
            newItemList.push(newRow);
        }
    }
    return newItemList;
}
1.5 是否启用规格
第一步:对是否启动规格给一个默认值
![]()
第二步:在复选框上添加指令
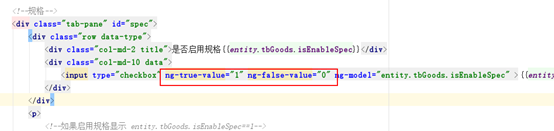
第三步:控制显隐
