Spring Cloud介绍
Spring Cloud是一个相对比较新的微服务框架,2016才推出1.0的release版本. 虽然Spring Cloud时间最短, 但是相比Dubbo等RPC框架, Spring Cloud提供的全套的分布式系统解决方案。
Spring Cloud 为开发者提供了在分布式系统(配置管理,服务发现,熔断,路由,微代理,控制总线,一次性token,全居琐,leader选举,分布式session,集群状态)中快速构建的工具,使用Spring Cloud的开发者可以快速的启动服务或构建应用、同时能够快速和云平台资源进行对接。
微服务架构
服务注册与发现
接下来我们通过实际案例来看看如何使用Spring Cloud搭建服务注册与发现模块,案例中核心内容就是服务发现模块:Eureka
1、首先创建“服务注册中心”
(1)创建一个Maven工程,并在pom.xml中引入需要的依赖内容:
<parent>
	<groupId>org.springframework.boot</groupId>
	<artifactId>spring-boot-starter-parent</artifactId>
	<version>1.3.5.RELEASE</version>
	<relativePath/>
</parent>
<properties>
	<project.build.sourceEncoding>UTF-8</project.build.sourceEncoding>
	<java.version>1.7</java.version>
</properties>
<dependencies>
	<dependency>
		<groupId>org.springframework.boot</groupId>
		<artifactId>spring-boot-starter-test</artifactId>
		<scope>test</scope>
	</dependency>
	<dependency>
		<groupId>org.springframework.cloud</groupId>
		<artifactId>spring-cloud-starter-eureka-server</artifactId>
	</dependency>
</dependencies>
<dependencyManagement>
	<dependencies>
		<dependency>
			<groupId>org.springframework.cloud</groupId>
			<artifactId>spring-cloud-dependencies</artifactId>
			<version>Brixton.RELEASE</version>
			<type>pom</type>
			<scope>import</scope>
		</dependency>
	</dependencies>
</dependencyManagement>
<build>
	<plugins>
		<plugin>
			<groupId>org.springframework.boot</groupId>
			<artifactId>spring-boot-maven-plugin</artifactId>
		</plugin>
	</plugins>
</build>@EnableEurekaServer
注解启动一个服务注册中心提供给其他应用进行对话。这一步非常的简单,只需要在一个普通的Spring Boot应用中添加这个注解就能开启此功能,创建一个Application.java,如下所示:
package com.wys;

import org.springframework.boot.autoconfigure.SpringBootApplication;
import org.springframework.boot.builder.SpringApplicationBuilder;
import org.springframework.cloud.netflix.eureka.server.EnableEurekaServer;

@EnableEurekaServer
@SpringBootApplication
public class Application {
	public static void main(String[] args) {
		new SpringApplicationBuilder(Application.class).web(true).run(args);
	}
}application.properties
中问增加如下配置:
server.port=1111
#eureka.instance.hostname=localhost
eureka.client.register-with-eureka=false
eureka.client.fetch-registry=false
eureka.client.serviceUrl.defaultZone=http://localhost:${server.port}/eureka/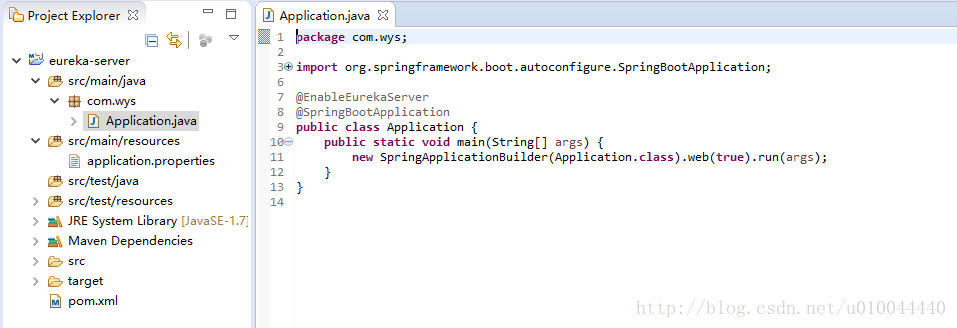
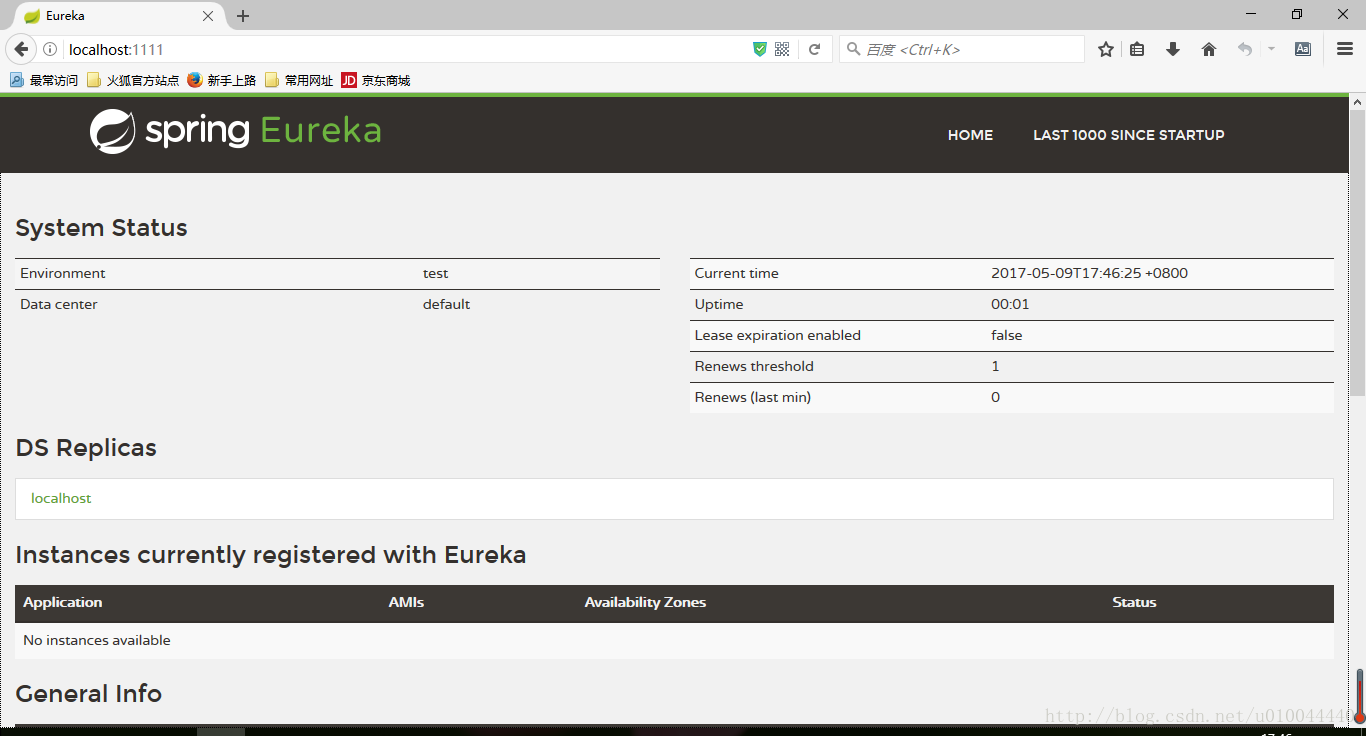
现在启动工程(Application.java),访问:http://localhost:1111/ (注意这里的1111是自己在application.properties文件中设置的端口号)
此时,可以看到下面的页面,其中还没有发现任何服务
该工程可参考:eureka-server
(4)创建“服务提供方”
接下来我们创建提供服务的客户端,并向服务注册中心注册自己。
假设我们有一个提供计算功能的微服务模块,我们实现一个RESTful API,通过传入两个参数a和b,最后返回a + b的结果。
首先,创建一个Maven工程,在pom.xml文件中加入依赖,如下所示。
<parent>
	<groupId>org.springframework.boot</groupId>
	<artifactId>spring-boot-starter-parent</artifactId>
	<version>1.3.5.RELEASE</version>
	<relativePath/>
</parent>
<properties>
	<project.build.sourceEncoding>UTF-8</project.build.sourceEncoding>
	<java.version>1.7</java.version>
</properties>
<dependencies>
	<dependency>
		<groupId>org.springframework.cloud</groupId>
		<artifactId>spring-cloud-starter-eureka</artifactId>
	</dependency>
	<dependency>
		<groupId>org.springframework.boot</groupId>
		<artifactId>spring-boot-starter-test</artifactId>
		<scope>test</scope>
	</dependency>
</dependencies>
<dependencyManagement>
	<dependencies>
		<dependency>
			<groupId>org.springframework.cloud</groupId>
			<artifactId>spring-cloud-dependencies</artifactId>
			<version>Brixton.RELEASE</version>
			<type>pom</type>
			<scope>import</scope>
		</dependency>
	</dependencies>
</dependencyManagement>
<build>
	<plugins>
		<plugin>
			<groupId>org.springframework.boot</groupId>
			<artifactId>spring-boot-maven-plugin</artifactId>
		</plugin>
	</plugins>
</build>/add请求处理接口,通过DiscoveryClient对象,在日志中打印出服务实例的相关内容
package com.wys.web;
import org.apache.log4j.Logger;
import org.springframework.beans.factory.annotation.Autowired;
import org.springframework.cloud.client.ServiceInstance;
import org.springframework.cloud.client.discovery.DiscoveryClient;
import org.springframework.web.bind.annotation.RequestMapping;
import org.springframework.web.bind.annotation.RequestMethod;
import org.springframework.web.bind.annotation.RequestParam;
import org.springframework.web.bind.annotation.RestController;

@RestController
public class ComputeController {
	private final Logger logger=Logger.getLogger(getClass());
	@Autowired
	private DiscoveryClient client;
	@RequestMapping(value="/add",method=RequestMethod.GET)
	public Integer add(@RequestParam Integer a,@RequestParam Integer b){
		ServiceInstance instance=client.getLocalServiceInstance();
		Integer r=a+b;
		logger.info("/add, host:" + instance.getHost() + ", service_id:" + instance.getServiceId() + ", result:" + r);
		return r;
	}
}
@EnableDiscoveryClient
注解,该注解能激活Eureka中的
DiscoveryClient
实现,才能实现Controller中对服务信息的输出。
package com.wys;

import org.springframework.boot.autoconfigure.SpringBootApplication;
import org.springframework.boot.builder.SpringApplicationBuilder;
import org.springframework.cloud.client.discovery.EnableDiscoveryClient;
@EnableDiscoveryClient
@SpringBootApplication
public class ComputeServiceApplication {

	public static void main(String[] args) {
		new SpringApplicationBuilder(ComputeServiceApplication.class).web(true).run(args);
	}

}
application.properties
做一些配置工作,具体如下:
spring.application.name=compute-service
server.port=2222
eureka.client.serviceUrl.defaultZone=http://localhost:1111/eureka/eureka.client.serviceUrl.defaultZone属性对应服务注册中心的配置内容,指定服务注册中心的位置。
为了在本机上测试区分服务提供方和服务注册中心,使用server.port属性可以设置不同的端口。
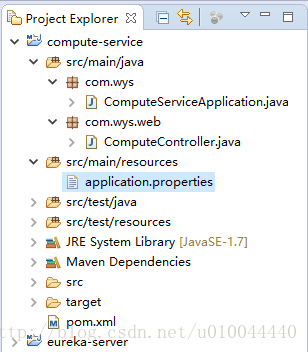
至此,“服务提供方”已经创建好了,整体项目结构如下:
启动该工程之前,先启动刚刚创建的服务注册中心(eureka-server中的Application.java)
访问:http://localhost:1111/ 可以看到,我们定义的服务被注册了。

该工程可参考:compute-service