版权声明:博客知识产权来源命运的信徒,切勿侵权 https://blog.csdn.net/qq_37591637/article/details/85322988
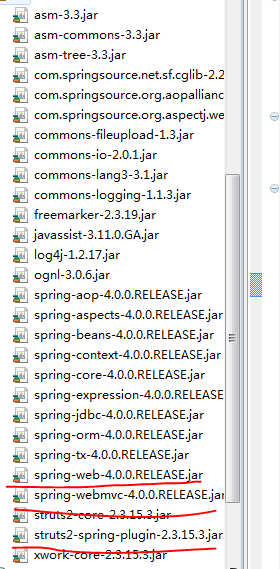
第一步、导包(特别注意的是要有这三个jar包)
第二步、新建applicationContext.xml+新建struts.xml文件
第三步、在web.xml文件中
1、使得applicationContext.xml资源属性
2、让web资源项目可以访问ioc容器
3、配置拦截器
<?xml version="1.0" encoding="UTF-8"?>
<web-app version="3.0" xmlns="http://java.sun.com/xml/ns/javaee"
	xmlns:xsi="http://www.w3.org/2001/XMLSchema-instance"
	xsi:schemaLocation="http://java.sun.com/xml/ns/javaee
	http://java.sun.com/xml/ns/javaee/web-app_3_0.xsd">
	<display-name></display-name>
	<welcome-file-list>
		<welcome-file>index.jsp</welcome-file>
	</welcome-file-list>
	<context-param>
		<param-name>contextConfigLocation</param-name>
		<param-value>classpath:applicationContext.xml</param-value>
	</context-param>

	<listener>
		<listener-class>org.springframework.web.context.ContextLoaderListener</listener-class>
	</listener>
	<!-- 拦截器设置 -->
   <!-- 配置 Struts2 的 Filter -->
	<filter>
        <filter-name>struts2</filter-name>
        <filter-class>org.apache.struts2.dispatcher.ng.filter.StrutsPrepareAndExecuteFilter</filter-class>
    </filter>

    <filter-mapping>
        <filter-name>struts2</filter-name>
        <url-pattern>/*</url-pattern>
    </filter-mapping>
</web-app>
第四步、创建一个普通类和一个请求Action类
Person.java
package cn.com.beans;

public class Person {
//	这个类存在的意义,在Spring的配置文件中被初始化,然后IOC容器调用,
private String name;
public void setName(String name) {
	this.name = name;
}
public void hello(){
	System.out.println("my name is:"+name);
}
}
PersonSErvice.java
package cn.com.service;

import cn.com.beans.Person;

public class PersonService {
private Person pp;
public void setPp(Person pp) {
	this.pp = pp;
}

public String save(){
	System.out.println("PersonService's save....");
	pp.hello();
	return "success";

}
}
applicationContext.xml
一定要有scope="prototype"
<?xml version="1.0" encoding="UTF-8"?>
<beans
	xmlns="http://www.springframework.org/schema/beans"
	xmlns:xsi="http://www.w3.org/2001/XMLSchema-instance"
	xmlns:p="http://www.springframework.org/schema/p"
	xsi:schemaLocation="http://www.springframework.org/schema/beans http://www.springframework.org/schema/beans/spring-beans-3.1.xsd">
<bean class="cn.com.beans.Person" id="person">
<property name="name" value="atguigu"></property>
</bean>
<bean class="cn.com.service.PersonService" id="personService" scope="prototype">
<property name="pp" ref="person"></property>
</bean>

</beans>
struts.xml
注意,这里的class="是applicationContext.xml里面bean对应类的名称"
<?xml version="1.0" encoding="UTF-8" ?>
<!DOCTYPE struts PUBLIC
	"-//Apache Software Foundation//DTD Struts Configuration 2.3//EN"
	"http://struts.apache.org/dtds/struts-2.3.dtd">
<struts>
 <constant name="struts.action.extension"  value="do,action,kk"></constant>
    <package name="tjn" extends="struts-default">
    <action name="person_save" class="personService" method="save">
    <result name="success">/success.jsp</result>
    </action>
    </package>
</struts>
测试页面
<body>
    <a href="person_save.action">Spring整合Struts2的最终版本</a>
  </body>
再新建一个success.jsp
里面随便写内容作一个识别的页面
结果如下
