日常android项目开发中,各种Activity的界面通常都会有一套TitleBar样式,但是各个界面又可能具有差异性。很显然,我们不可能每一个界面都去写一套TitleBar.因此封装一个通用的TitleBar是很有必要的。
1.通用的自定义TitleBar的布局文件
title_bar_layout.xml
<?xml version="1.0" encoding="utf-8"?>
<FrameLayout xmlns:android="http://schemas.android.com/apk/res/android"
    android:layout_width="match_parent"
    android:layout_height="60dp"
    android:background="#1F5EF3">

    <TextView
        android:id="@+id/title_text"
        android:layout_width="wrap_content"
        android:layout_height="wrap_content"
        android:layout_gravity="center"
        android:text="Title"
        android:textColor="#FFFFFF"
        android:textSize="12dp" />

    <LinearLayout
        android:id="@+id/left_layout"
        android:layout_width="wrap_content"
        android:layout_height="match_parent"
        android:layout_gravity="center_vertical"
        android:layout_marginLeft="20dp"
        android:orientation="horizontal"
        android:paddingEnd="10dp"
        android:paddingRight="10dp">

        <ImageView
            android:id="@+id/left_image"
            android:layout_width="30dp"
            android:layout_height="30dp"
            android:layout_gravity="center_vertical"
            android:gravity="center_vertical"
            android:src="@mipmap/backk" />

        <TextView
            android:id="@+id/left_text"
            android:layout_width="wrap_content"
            android:layout_height="wrap_content"
            android:layout_gravity="center_vertical"
            android:layout_marginLeft="10dp"
            android:gravity="center_vertical"
            android:text="返回"
            android:textColor="#ffffff"
            android:textSize="12dp" />
    </LinearLayout>

    <LinearLayout
        android:id="@+id/right_layout"
        android:layout_width="wrap_content"
        android:layout_height="match_parent"
        android:layout_gravity="center_vertical|right"
        android:layout_marginRight="12dp"
        android:orientation="horizontal"
        android:paddingLeft="30dp">

        <TextView
            android:id="@+id/right_text"
            android:layout_width="wrap_content"
            android:layout_height="wrap_content"
            android:layout_gravity="center_vertical"
            android:gravity="center_vertical"
            android:text="Confirm"
            android:textColor="#FFFFFF"
            android:textSize="12dp" />

        <ImageView
            android:id="@+id/right_image"
            android:layout_width="30dp"
            android:layout_height="30dp"
            android:layout_gravity="center_vertical"
            android:layout_marginLeft="10dp"
            android:src="@mipmap/setting" />
    </LinearLayout>

</FrameLayout>
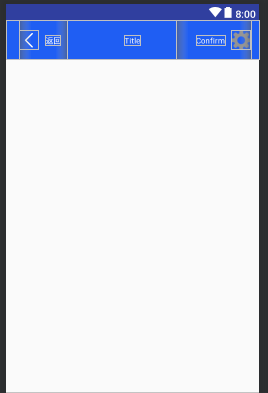
布局效果如下图,可以自定义。
2.通用的自定义TitleBar 文件
TitleBar .java
package com.example.qunzhang.commontitledemo.view;

import android.graphics.Typeface;
import android.graphics.drawable.Drawable;
import android.util.TypedValue;
import android.view.View;
import android.widget.ImageView;
import android.widget.LinearLayout;
import android.widget.TextView;

import com.example.qunzhang.commontitledemo.R;

/**
 * 方便灵活进行TitleBar中相关控件的定制
 */
public class TitleBar {
    private View mRoot;
    private TextView mTitleView;
    private ImageView mLeftImageView;
    private TextView mLeftTextView;
    private LinearLayout mLeftLayout;
    private TextView mRightTextView;
    private ImageView mRightImageView;
    private LinearLayout mRightLayout;

    public TitleBar(View root) {
        mRoot = root;
        mTitleView = mRoot.findViewById(R.id.title_text);
        mLeftImageView = mRoot.findViewById(R.id.left_image);
        mLeftTextView = mRoot.findViewById(R.id.left_text);
        mLeftLayout = mRoot.findViewById(R.id.left_layout);
        mRightImageView = mRoot.findViewById(R.id.right_image);
        mRightTextView = mRoot.findViewById(R.id.right_text);
        mRightLayout = mRoot.findViewById(R.id.right_layout);

        mTitleView.setTypeface(Typeface.defaultFromStyle(Typeface.BOLD));
        reset();
    }

    public void reset() {
        mLeftImageView.setVisibility(View.GONE);
        mLeftTextView.setVisibility(View.GONE);
        mRightImageView.setVisibility(View.GONE);
        mRightTextView.setVisibility(View.GONE);

        mRightLayout.setOnClickListener(null);
        mLeftLayout.setOnClickListener(null);
    }

    /**
     * set center title
     *
     * @param text
     */
    public void setTitleText(String text) {
        mTitleView.setText(text);
    }

    /**
     * set the show and gone of the right image
     *
     * @param show
     */
    public void showRightImageView(boolean show) {
        mRightImageView.setVisibility(show ? View.VISIBLE : View.GONE);
    }

    /**
     * set  show or gone of the right text
     *
     * @param show
     */
    public void showRightTextView(boolean show) {
        mRightTextView.setVisibility(show ? View.VISIBLE : View.GONE);
    }

    /**
     * set the size of right text
     *
     * @param size
     */
    public void setRightTextSize(float size) {
        mRightTextView.setTextSize(TypedValue.COMPLEX_UNIT_SP, size);
    }

    /**
     * set the res id of the right image
     *
     * @param res
     */
    public void setRightImageResource(int res) {
        mRightImageView.setImageResource(res);
    }

    /**
     * set the right text
     *
     * @param text
     */
    public void setRightText(String text) {
        mRightTextView.setText(text);
    }

    /**
     * set the right click event
     *
     * @param l
     */
    public void setRightClickListener(View.OnClickListener l) {
        mRightLayout.setOnClickListener(l);
    }

    /**
     * set res id of left image
     *
     * @param res
     */
    public void setLeftImageResource(int res) {
        mLeftImageView.setImageResource(res);
    }

    /**
     * set show or gone og left text
     *
     * @param show
     */
    public void showLeftTextView(boolean show) {
        mLeftTextView.setVisibility(show ? View.VISIBLE : View.GONE);
    }

    public void setLeftCompoundDrawablesRelativeWithIntrinsicBounds(int left, int top, int right, int bottom) {
        mLeftTextView.setCompoundDrawablesRelativeWithIntrinsicBounds(left, top, right, bottom);
    }

    public void setLeftCompoundDrawables(Drawable left, Drawable top, Drawable right, Drawable bottom) {
        mLeftTextView.setCompoundDrawables(left, top, right, bottom);
    }

    public void setLeftCompoundDrawablePadding(int padding) {
        mLeftTextView.setCompoundDrawablePadding(padding);
    }

    public void setRightCompoundDrawablesRelativeWithIntrinsicBounds(int left, int top, int right, int bottom) {
        mRightTextView.setCompoundDrawablesRelativeWithIntrinsicBounds(left, top, right, bottom);
    }

    public void setRightCompoundDrawables(Drawable left, Drawable top, Drawable right, Drawable bottom) {
        mRightTextView.setCompoundDrawables(left, top, right, bottom);
    }

    public void setRightCompoundDrawablePadding(int padding) {
        mRightTextView.setCompoundDrawablePadding(padding);
    }

    public void setLeftText(String text) {
        mLeftTextView.setText(text);
    }

    public void showLeftImageView(boolean show) {
        mLeftImageView.setVisibility(show ? View.VISIBLE : View.GONE);
    }

    public void setLeftClickListener(View.OnClickListener l) {
        mLeftLayout.setOnClickListener(l);
    }

    public void setTitleCompoundDrawables(Drawable left, Drawable top, Drawable right, Drawable bottom) {
        mTitleView.setCompoundDrawables(left, top, right, bottom);
    }

    public void setTitleCompoundDrawablePadding(int padding) {
        mTitleView.setCompoundDrawablePadding(padding);
    }

    public void setTitleClickListener(View.OnClickListener l) {
        mTitleView.setOnClickListener(l);
    }

}
上述自定义的TitleBar 类中封装了各种各样可供调节的 api,主要包括以下几块:
(1).可控制各个控件的显示与隐藏
(2).可控制left_layout和right_layout中TextView和ImageView的相对位置和间距
(3).设置字体的大小以及图标res id等等
3.使用方法
TitleBar titleBar = new TitleBar(findViewById(R.id.title_bar));
//todo 只要拿到了TitleBar 的对象,那么下面要做什么样的设置,就随心所欲了
//比如隐藏右侧图标
titleBar.showRightImageView(true);
其中new TitleBar()的入参findViewById(R.id.title_bar)中的R.id.title_bar来源如下:
<?xml version="1.0" encoding="utf-8"?>
<RelativeLayout xmlns:android="http://schemas.android.com/apk/res/android"
    xmlns:tools="http://schemas.android.com/tools"
    android:layout_width="match_parent"
    android:layout_height="match_parent"
    tools:context=".MainActivity">

    <include
        android:id="@+id/title_bar"
        layout="@layout/title_bar_layout" />

</RelativeLayout>
好了,完了,一步步来。今天先写通用的自定义TitleBar,后续会写BaseActivity和BaseFragment的搭建等等,等到这后续些点都搞定了,基本上android项目框架基本就成形了。