ok,上一章已经把基本需要的javabean以及dao类建立起来了。那么接下来的工作就是写页面的显示效果,然后完成点击后的handler处理请求的方法,显示到页面上即可。
这一章的主要教大家实现查询操作。
一 、XML配置
首先在web/WEN-INF/目录下创建一个views目录,里面存放你想展示的视图,我们先在里面创建一个list.jsp,用来展示数据库的所有数据。

接着在src目录下写好 springmvc.xml配置文件
springmvc.xml
<?xml version="1.0" encoding="UTF-8"?>
<beans xmlns="http://www.springframework.org/schema/beans"
       xmlns:xsi="http://www.w3.org/2001/XMLSchema-instance"
       xmlns:context="http://www.springframework.org/schema/context"
       xmlns:mvc="http://www.springframework.org/schema/mvc"
       xsi:schemaLocation="http://www.springframework.org/schema/beans http://www.springframework.org/schema/beans/spring-beans.xsd http://www.springframework.org/schema/context http://www.springframework.org/schema/context/spring-context.xsd http://www.springframework.org/schema/mvc http://www.springframework.org/schema/mvc/spring-mvc.xsd">


    <!--配置自动扫描的包-->
    <context:component-scan base-package="com.springmvc"></context:component-scan>

    <!--配置视图解析器-->
    <bean class="org.springframework.web.servlet.view.InternalResourceViewResolver">
        <property name="prefix" value="/WEB-INF/views/"></property>
        <property name="suffix" value=".jsp"></property>
    </bean>

    <mvc:default-servlet-handler/>

    <mvc:annotation-driven></mvc:annotation-driven>
    <mvc:resources mapping="/scripts/**" location="WEB-INF/scripts/"/>

</beans>
然后配置web.xml
<?xml version="1.0" encoding="UTF-8"?>
<web-app xmlns="http://xmlns.jcp.org/xml/ns/javaee"
         xmlns:xsi="http://www.w3.org/2001/XMLSchema-instance"
         xsi:schemaLocation="http://xmlns.jcp.org/xml/ns/javaee http://xmlns.jcp.org/xml/ns/javaee/web-app_4_0.xsd"
         version="4.0">

    <!--配置SpringMVC的 DispatcherServlet-->
    <servlet>
        <servlet-name>springDispatcherServlet</servlet-name>
        <servlet-class>org.springframework.web.servlet.DispatcherServlet</servlet-class>
        <init-param>
            <param-name>contextConfigLocation</param-name>
            <param-value>classpath:springmvc.xml</param-value>
        </init-param>
        <load-on-startup>1</load-on-startup>
    </servlet>

    <!--Map all requests to the DispatcherServlet for handling-->
    <servlet-mapping>
        <servlet-name>springDispatcherServlet</servlet-name>
        <url-pattern>/</url-pattern>
    </servlet-mapping>

    </web-app>
初步的xml配置就完成了。
二、处理请求
在index.jsp页面写一个简单的< a>标签 ,作用就是通过我们的handler方法将数据放在request域中 ,再跳转到 list.jsp显示出来。
index.jsp
<%@ page contentType="text/html;charset=UTF-8" language="java" %>
<html>
  <head>
    <title>$Title$</title>
  </head>
  <body>

      <a href="emps">List All Employees</a>  //这里的href对应的是之后写的handler方法的@requestMapping

  </body>
</html>
那么我们开始写handler方法,在com.springmvc.crud下创建一个包handlers,再创建一个类EmployeeHandler.java
开始编写
EmployeeHandler.java
package com.springmvc.crud.handlers;

import com.springmvc.crud.dao.DepartmentDao;
import com.springmvc.crud.dao.EmployeeDao;
import com.springmvc.crud.entities.Employee;
import org.springframework.beans.factory.annotation.Autowired;
import org.springframework.stereotype.Controller;
import org.springframework.web.bind.annotation.*;

import java.util.Map;

@Controller
public class EmployeeHandler {

    @Autowired
    private EmployeeDao employeeDao;

    @Autowired
    private DepartmentDao departmentDao;


    @RequestMapping("/emps")
    public String list(Map<String,Object> map){

        map.put("employees",employeeDao.getAll());
        return "list";
    }

}

接着让我们来搞定list.jsp的显示
<%@ page contentType="text/html;charset=UTF-8" language="java" %>
<%@ taglib prefix="c" uri="http://java.sun.com/jsp/jstl/core" %>
<html>
<head>
    <meta http-equiv="Content-Type" content="text/html;charset=UTF-8">
    <title>Title</title>

</head>
<body>


    <c:if test="${empty requestScope.employees}">
        当前没有数据
    </c:if>
    <c:if test="${!empty requestScope.employees}">
        <table border="1" cellspacing="0" cellpadding="10">
            <tr>
                <th>ID</th>
                <th>LastName</th>
                <th>Email</th>
                <th>Gender</th>
                <th>Department</th>
                <th>Edit</th>
                <th>Delete</th>
            </tr>
            <c:forEach items="${requestScope.employees}" var="emp">
                <tr>
                    <td>${emp.id}</td>
                    <td>${emp.lastName}</td>
                    <td>${emp.email}</td>
                    <td>${emp.gender == 0 ? "Female" : "Male"}</td>
                    <td>${emp.department.departmentName}</td>
                    <td><a href="emp/${emp.id}">Edit</a></td>
                    <td><a class="delete" href="emp/${emp.id}">Delete</a></td>
                </tr>
            </c:forEach>
        </table>
    </c:if>
    <br><br>

</body>
</html>
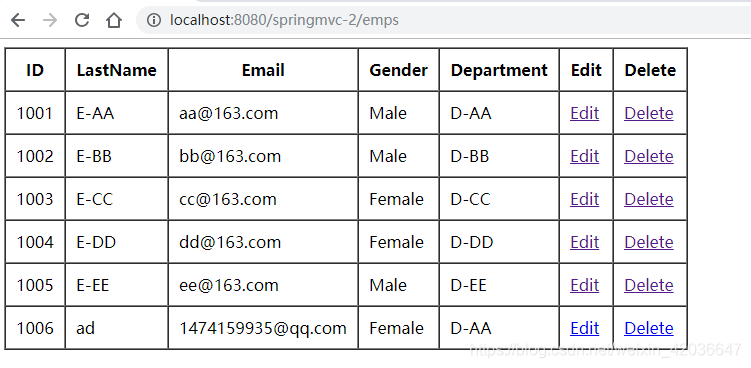
三、显示效果:
在点击了index.jsp的< a>标签后