NanoPi M1 是全志(Allwinner)H3的开发板。
但官方文档只有ubantu等系统的移植方法,而当前(2019年1月9日)最新OpenWRT里是不支持这个NanoPi M1的,仅仅支持NanoPi NEO ,NanoPi M1 Plus。而 NanoPi M1 Plus 的 img是不适配 NanoPi M1板子的,烧录进去后会有如下报错(网口不通):
[   11.711019] NOHZ: local_softirq_pending 80
[   11.713159] dwmac-sun8i 1c30000.ethernet eth0: Could not attach to PHY
[   11.713169] dwmac-sun8i 1c30000.ethernet eth0: stmmac_open: Cannot attach to PHY (error: -19)
[   11.713775] stmmac_ethtool_get_link_ksettings: eth0: PHY is not registered
[   11.713790] br-lan: port 1(eth0) entered blocking state
[   11.713802] br-lan: port 1(eth0) entered disabled state
[   11.714135] device eth0 entered promiscuous mode
[   11.715509] IPv6: ADDRCONF(NETDEV_UP): br-lan: link is not ready
通过对比官方sdk,最终发现问题在于dts文件需要修改,修改之后网口正常工作。这里我从头到尾整理一下NanoPi M1 移植OenWRT的过程:
1.下载OpenWRT
git clone https://github.com/openwrt/openwrt.git
2.添加target NanoPi M1
需要修改两个文件:
1.package/boot/uboot-sunxi/Makefile
2.target/linux/sunxi/image/cortex-a7.mk b/target/linux/sunxi/image/cortex-a7.mk
--- a/package/boot/uboot-sunxi/Makefile
+++ b/package/boot/uboot-sunxi/Makefile
@@ -138,6 +138,12 @@ define U-Boot/nanopi_m1_plus
  BUILD_DEVICES:=sun8i-h3-nanopi-m1-plus
endef

+define U-Boot/nanopi_m1
+  BUILD_SUBTARGET:=cortexa7
+  NAME:=NanoPi M1 (H3)
+  BUILD_DEVICES:=sun8i-h3-nanopi-m1
+endef
+
define U-Boot/nanopi_neo
  BUILD_SUBTARGET:=cortexa7
  NAME:=U-Boot for NanoPi NEO (H3)
@@ -249,6 +255,7 @@ UBOOT_TARGETS := \
       Linksprite_pcDuino3 \
       Lamobo_R1 \
       nanopi_m1_plus \
+       nanopi_m1 \
       nanopi_neo \
       nanopi_neo_plus2 \
       nanopi_neo2 \
diff --git a/target/linux/sunxi/image/cortex-a7.mk b/target/linux/sunxi/image/cortex-a7.mk
old mode 100644
new mode 100755
index 969864b..92d2ef7
--- a/target/linux/sunxi/image/cortex-a7.mk
+++ b/target/linux/sunxi/image/cortex-a7.mk
@@ -139,6 +139,16 @@ endef

TARGET_DEVICES += sun8i-h3-nanopi-m1-plus

+define Device/sun8i-h3-nanopi-m1
+  DEVICE_TITLE:=FriendlyArm NanoPi M1
+  DEVICE_PACKAGES:=kmod-rtc-sunxi \
+       kmod-leds-gpio kmod-ledtrig-heartbeat \
+       kmod-brcmfmac brcmfmac-firmware-43430-sdio wpad-basic
+  SUPPORTED_DEVICES:=friendlyarm,nanopi-m1
+  SUNXI_DTS:=sun8i-h3-nanopi-m1
+endef
+
+TARGET_DEVICES += sun8i-h3-nanopi-m1

define Device/sun8i-h3-nanopi-neo
  DEVICE_TITLE:=FriendlyARM NanoPi NEO
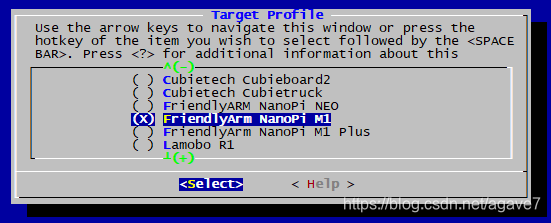
修改完后,就可以在make menuconfig 中看到 NanoPi M1:如图:
3.内核添加dts补丁
内核的已有补丁是放在 target/linux/sunxi/patches-4.14/里的,make 的时候会自动安装里面所有的补丁,按照文件名开头数字从小到大顺序安装。
我这里是使用quilt 进行打补丁,quilt 使用方法可参考其他文章
3.1 准备内核源码
make target/linux/{clean,prepare} V=s QUILT=1
3.2 进入内核解压目录 & 安装已有补丁(patch)
openwrt 的所有要编译的包都解压在build_dir/target-xxx/目录下
cd build_dir/target-arm_cortex-a7+neon-vfpv4_musl_eabi/linux-sunxi_cortexa7/linux-4.14.90/
quilt push -a
3.3 创建新patch
quilt new platform/999-nanopi-m1-emac.pacth
这里文件名数字999,也可以是其它,只要比已有补丁数字大就行,使用命令quilt series查看已有patch的列表。
3.4 修改 arch/arm/boot/dts/sun8i-h3-nanopi-m1.dts
quilt edit arch/arm/boot/dts/sun8i-h3-nanopi-m1.dts
在文件末尾添加这几行:
&emac {
    phy-handle = <&int_mii_phy>;
    phy-mode = "mii";
    allwinner,leds-active-low;
    status = "okay";
};

&i2c0 {
    status = "okay";
};

&i2c1 {
    status = "okay";
};

&i2c2 {
    status = "okay";
};

&spi1 {
    status = "okay";
};
保存退出,可用 quilt diff 查看修改内容。
3.5 更新修改到patch文件
quilt refresh
此命令会将补丁保存到 patches/platform/999-nanopi-m1-emac.pacth
3.6 返回openwrt 目录 并保存patch文件到 target/linux/sunxi/patches-4.14/
cd ../../../../
make target/linux/update V=s
此命令会保存patch文件到 target/linux/sunxi/patches-4.14/
4.编译生成img.gz
make menuconfig
选好相关target,如下图:
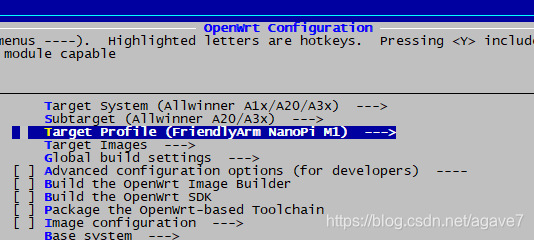
make V=s -j9
编译成功后在 cd bin/targets/sunxi/cortexa7/ 目录下可以看见
openwrt-sunxi-cortexa7-sun8i-h3-nanopi-m1-ext4-sdcard.img.gz 文件
将这个文件解压得到
openwrt-sunxi-cortexa7-sun8i-h3-nanopi-m1-ext4-sdcard.img
5.将img 写入TF卡
TF接读卡器插入电脑:
dd if=openwrt-sunxi-cortexa7-sun8i-h3-nanopi-m1-ext4-sdcard.img of=/dev/sdx
/dev/sdx 根据实际情况来定,可通过命令dmesg | tail 查看,如看到 sdb: sdb1 sdb2,则是/dev/sdb
此命令有点耗时,请耐心等待命令完成
6.将TF卡插入NanoPi M1开发板
上电测试系统运行情况,网口识别正常。至此,移植成功!
root@OpenWrt:/# ping 172.16.0.1
PING 172.16.0.1 (172.16.0.1): 56 data bytes
64 bytes from 172.16.0.1: seq=0 ttl=64 time=8.011 ms
64 bytes from 172.16.0.1: seq=1 ttl=64 time=7.594 ms
64 bytes from 172.16.0.1: seq=2 ttl=64 time=3.426 ms
64 bytes from 172.16.0.1: seq=3 ttl=64 time=3.228 ms
64 bytes from 172.16.0.1: seq=4 ttl=64 time=3.027 ms
64 bytes from 172.16.0.1: seq=5 ttl=64 time=2.879 ms
64 bytes from 172.16.0.1: seq=6 ttl=64 time=2.823 ms
64 bytes from 172.16.0.1: seq=7 ttl=64 time=6.544 ms
^C
--- 172.16.0.1 ping statistics ---
8 packets transmitted, 8 packets received, 0% packet loss
round-trip min/avg/max = 2.823/4.691/8.011 ms
总结:
NanoPi M1 移植 OpenWRT其实步骤很简单,首先是要添加tartget,只需要修改两个文件
1.package/boot/uboot-sunxi/Makefile
2.target/linux/sunxi/image/cortex-a7.mk b/target/linux/sunxi/image/cortex-a7.mk
添加对 NanoPi M1 的支持,这里其实完全按照NanoPi M1 Plus
然后是添加修改dts 文件,添加PHY的配置,这里需要打补丁。