这篇介绍rwthlm输入层的结构,以及整个网络训练的框架。对于rwthlm的rnn结构部分在隐层我觉的还是比较常见的实现方式了,如果在训练rwthlm时指定了用rnn来训练,那么输入层的结构也会带有循环部分,关于这一点,在代码中我会说明。仍然是如果有任何错误,欢迎看到的朋友指出,再次谢过~
输入层的实现在tablelookup.cc里面,在第一次看这个包时,看文件名大概就知道哪些文件属于神经网络的哪些部分了,比如lstm.cc, output.cc,找了很久没找到输入层,后面才知道输入层就是这个tablelookup, 至于为啥叫tablelookup, 我想应该是输入层的word作为输入时需要对应的映射实数向量,而这个映射的实数向量在一个矩阵里面,就相当于查表一样。这里的实现方式和Bengio在其03年那篇文章里面是一致的,输入的编码并未使用1-of-V的方式。先看一下头文件的一些变量吧:
<span style="font-family:Microsoft YaHei;"> //is_feedforward这个含义在后面具体解释,其值不同就是训练算法的不同
const bool is_feedforward_;
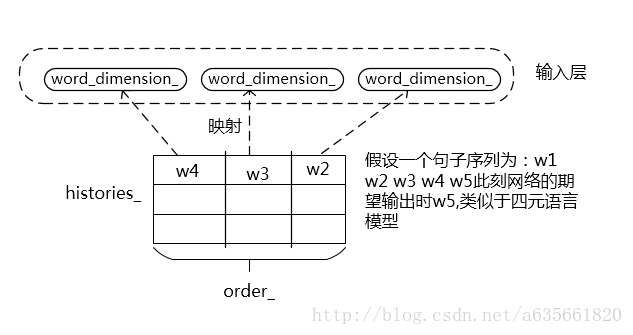
//order_指定训练的历史数,这里并不是语言模型的阶数,而是语言模型的阶数减1
//word_dimension_是指一个word映射为实数向量的维度
const size_t order_, word_dimension_;
//histories_存放着网络的输入信息
std::vector<std::vector<int>> histories_;
Real *b_, *b_t_, *delta_, *delta_t_, *weights_, *bias_;
//输入层的循环结构部分
RecurrencyPointer recurrency_; </span>先解析一下容器histories_是如何作为网络的输入的,histories_容器的更新实现代码如下:
<span style="font-family:Microsoft YaHei;">void TableLookup::UpdateHistories(const size_t size, const Real x[]) {
 // std::cout << "This is UpdateHistories\n";
  if (histories_.empty()) {
    for (size_t i = 0; i < size; ++i)
      //std::vector<int>(order_, static_cast<int>(x[i]))
      //的含义是构造order_个值为x[i]的元素,放入容器
      histories_.push_back(std::vector<int>(order_, static_cast<int>(x[i])));
  //  std::cout << "push into empty:\n";
  //  PrintHistories();
  } else {
    for (size_t i = 0; i < size; ++i) {
      std::vector<int> &history(histories_[i]);
      //新来的数加入到第一个位置上
      history.insert(history.begin(), static_cast<int>(x[i]));
      //删除最后一个元素
      history.pop_back();
    }
 //   PrintHistories();
  }
}</span>
先不看其他实现部分,举一个例子,看下histories_的工作方式,这样在看下面的代码时就能非常快的明白了。比如现在需要处理的batch是下面这样的:

实际上在data容器中是不会直接存储字符串的,而是字符串对应的索引,如下:

那么假设现在整个网络运作起来了,它的输入历史数假设是3,根据上面histories_更新的实现代码,知道初始化的内容为<sb>。
第一次更新histories_:
3 3 3
3 3 3
3 3 3
这个时候网络的期望输出是23, 13, 10
第二次更新histories_:
23 3 3
12 3 3
10 3 3
此时网络的期望输出是29, 25, 2
如此反复,知道最后一次更新历史:
4 14 28
4 15 18
注意此时只有两行了,因为最后一行(即第三个句子)已经在前一次完成了本批次的输入了,这个时候网络的期望输出时3, 3
无循环结构的输入层的结构类似于下面的图:
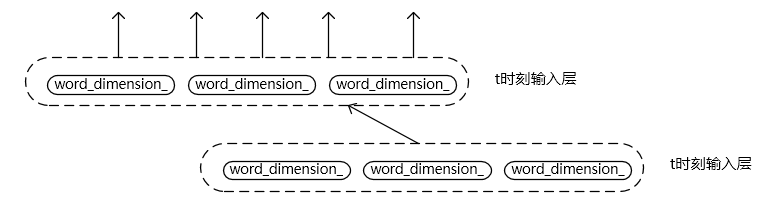
当is_recurrent == true下面看一下输入层的结构变化,这里我不知道自己是否理解错了没,因为以前没见过rnn结构在输入层做循环的,一般都是在隐层,如果明白的朋友看到希望普及一下知识,也希望我这里的代码分析没弄错。当设定为循环网络时,输入层也会有循环的部分,结构图如下:
输入层的核心实现代码及注释如下:
<span style="font-family:Microsoft YaHei;">TableLookup::TableLookup(const int input_dimension,
                         const int output_dimension,
                         const int max_batch_size,
                         const int max_sequence_length,
                         const int order,
                         const bool is_recurrent,
                         const bool use_bias,
                         const bool is_feedforward,
                         ActivationFunctionPointer activation_function)
    : Function(input_dimension,
               output_dimension,
               max_batch_size,
               max_sequence_length),
      order_(order),	//历史数
      is_feedforward_(is_feedforward),
      word_dimension_(output_dimension / order),	//一个word对应的维度
      activation_function_(std::move(activation_function)) {
  assert(order == 0 || output_dimension == word_dimension_ * order);
  //和前面结构类似,这里表示输入层的输出
  b_ = FastMalloc(output_dimension * max_batch_size * max_sequence_length);
  //误差
  delta_ = FastMalloc(output_dimension * max_batch_size * max_sequence_length);
  //input_dimension即voc的大小(包含<sb>标签),这里weights_就是所谓的词向量
  weights_ = FastMalloc(word_dimension_ * input_dimension);
  bias_ = use_bias ? FastMalloc(word_dimension_) : nullptr;

  //循环结构
  if (is_recurrent) {
    recurrency_ = RecurrencyPointer(new Recurrency(output_dimension,
                                                   max_batch_size,
                                                   max_sequence_length,
                                                   b_,
                                                   b_t_,
                                                   delta_,
                                                   delta_t_));
  }
 //清空历史信息
  ResetHistories();
}

const Real *TableLookup::Evaluate(const Slice &slice, const Real x[]) {

 //std::cout << "This is Evaluate\n";
  Real *result = b_t_;
  //更新历史,即新的x元素进入history第一个位置,末尾的删掉
  UpdateHistories(slice.size(), x);
  if (bias_) {
   //把偏置复制到b_t_,下一步相当于加上了偏置
    for (size_t i = 0; i < slice.size() * order_; ++i)
      FastCopy(bias_, word_dimension_, b_t_ + i * word_dimension_);
  }

//#pragma omp parallel for

  for (int i = 0; i < slice.size() * order_; ++i) {
    //下面的代码就是在遍历histories_,遍历的顺序是
    //for (int i=0; i<histories_.size(); i++) {
    //    for (int j=0; j<histories_[i].size(); j++) histories_[i][j];
    //}
    //std::cout << i / order_ << "\t" << i % order_ << std::endl;
    const int word = histories_[i / order_][i % order_];
    //这里关于weights_的结构如图,对于一个word,它在weights中的定位是:
    //word * word_dimension_,然后word_dimension_个长度单元的值都属于它
    //这里计算当前历史所形成的输入
    FastAdd(&weights_[word * word_dimension_],
            word_dimension_,
            b_t_ + i * word_dimension_,
            b_t_ + i * word_dimension_);
  }
 //如果是循环网络结构
  if (recurrency_)
    //则计算前一段的历史信息乘以权值加上本次历史信息的和作为输入
    //这个循环结构我第一次看到,在word往输入层上映射时加了一层循环
    //我做了图,不知道这里理解是否正确。那么这样的话,我个人理解如果对网络的组合是历史数n(n>1) + 循环结构
    //效果应该会比较混乱吧,因为历史数一旦大于1,再利用这种循环结构,输入层就会出现历史重叠,而标准的rnnlm都是历史数为1
    //后面补充:看到代码后面的框架时,发现如果是循环网络,历史数只能是1,程序是规定了的
    recurrency_->Evaluate(slice, x);
  //计算输入层的输出
  activation_function_->Evaluate(output_dimension(), slice.size(), result);
  b_t_ = result + GetOffset();
  return result;
}

void TableLookup::ComputeDelta(const Slice &slice, FunctionPointer f) {
 // std::cout << "This is ComputeDelta\n";
  //从末时刻往0走
  b_t_ -= GetOffset();
  //获得隐层流过来的误差
  f->AddDelta(slice, delta_t_);
  if (recurrency_)
    //t+1时刻输入层流向t时刻的误差
    recurrency_->ComputeDelta(slice, f);
  //计算输入层的误差信号
  activation_function_->MultiplyDerivative(output_dimension(), slice.size(),
                                           b_t_, delta_t_);
  delta_t_ += GetOffset();
}

void TableLookup::AddDelta(const Slice &slice, Real delta_t[]) {
  // there is no layer prior to the table lookup layer
}

const Real *TableLookup::UpdateWeights(const Slice &slice,
                                       const Real learning_rate,
                                       const Real x[]) {
 // std::cout << "This is UpdateWeights\n";
  delta_t_ -= GetOffset();
  //注意下面的is_feedforward_的意思不是指判断是否为循环结构还是前向的结构,官网上看的介绍说是打开这个开关
  //则是用的标准BP算法,否在使用epochwise backpropagation through time
  //有点不太明白它啥意思
  //自己的理解是:这里UpdateHistories应该是必须要执行的,因为后面会更新word所在的实数向量
  //就必须找到word对应的向量,而word存在历史中,Evaluate函数的反复执行中,历史在histories_中最终
  //只存下了句子结尾处的信息,所以需要清空histories_后,像原来加入histories_那样再执行一遍,这样
  //才能找到对应的word,并执行下面的更新

  //补充:看了后面的代码算是明白了,is_feedforward的训练方式是网络输入一次,更新一次
  //而默认情况下是网络输入多次,然后一起来更新。如果是is_feedforward则没必要执行UpdateHistories()
  if (!is_feedforward_)
    UpdateHistories(slice.size(), x);
  if (bias_) {
   //计算对bias的改变量
    for (size_t i = 0; i < slice.size() * order_; ++i) {
      FastMultiplyByConstantAdd(-learning_rate,
                                delta_t_ + i * word_dimension_,
                                word_dimension_,
                                bias_);
    }
  }

  //word映射为word_dimension_维度的实数向量,这里更新它
  for (size_t i = 0; i < slice.size() * order_; ++i) {
    const int word = histories_[i / order_][i % order_];
    FastMultiplyByConstantAdd(
        -learning_rate,
        delta_t_ + i * word_dimension_,
        word_dimension_,
        weights_ + word_dimension_ * word);
  }
  //更新输入层自连的权值
  if (recurrency_)
    recurrency_->UpdateWeights(slice, learning_rate, x);
  const Real *result = b_t_;
  //从0到t时刻走
  b_t_ += GetOffset();
  return result;
}

void TableLookup::UpdateMomentumWeights(const Real momentum) {
  if (recurrency_)
    recurrency_->UpdateMomentumWeights(momentum);
}

void TableLookup::ResetMomentum() {
  if (recurrency_)
    recurrency_->ResetMomentum();
}

void TableLookup::UpdateHistories(const size_t size, const Real x[]) {
 // std::cout << "This is UpdateHistories\n";
  if (histories_.empty()) {
    for (size_t i = 0; i < size; ++i)
      //std::vector<int>(order_, static_cast<int>(x[i]))
      //的含义是构造order_个值为x[i]的元素,放入容器
      histories_.push_back(std::vector<int>(order_, static_cast<int>(x[i])));
  //  std::cout << "push into empty:\n";
  //  PrintHistories();
  } else {
    for (size_t i = 0; i < size; ++i) {
      std::vector<int> &history(histories_[i]);
      //新来的数加入到第一个位置上
      history.insert(history.begin(), static_cast<int>(x[i]));
      //删除最后一个元素
      history.pop_back();
    }
 //   PrintHistories();
  }
}</span>
上面便是输入部分的结构,下面在看一下训练的框架,下面的部分直接贴注释了,因为注释内容比较详细。
在train.cc里面,几个核心的训练函数代码如下:
<span style="font-family:Microsoft YaHei;">//这个函数负责对语料训练一遍
void Trainer::TrainEpoch() {
  Real log_probability = 0.;
  int64_t num_running_words = 0;
  //batch遍历data,就是一次一个batch
  for (const Batch &batch : *training_data_) {
    net_->Reset(false);
    net_->ResetHistories();
    bp::ptime time;
    if (verbose_)
      time = bp::microsec_clock::local_time();
    //默认情况is_feedforward_ == false的

    //下面训练一个batch
    if (is_feedforward_)
      TrainBatchFeedforward(batch, &log_probability, &num_running_words);
    else
      TrainBatch(batch, &log_probability, &num_running_words);
    if (verbose_) {
      std::cout << "training perplexity = " << std::fixed <<
                   std::setprecision(2) << exp(-log_probability /
                   num_running_words) << std::endl;
      std::cout << "time = " << std::fixed << std::setprecision(3) <<
                   (bp::microsec_clock::local_time() - time).
                   total_milliseconds() / 1000. << " seconds" << std::endl;
    }
  }
}

void Trainer::TrainBatch(const Batch &batch,
                         Real *log_probability,
                         int64_t *num_running_words) {
  // forward pass

  //previous_slice是一个vector,存放是int类型的
  //previous_slice最开始指示着<sb>
  auto previous_slice(*batch.Begin(0));
  //PrintSlice(previous_slice);

 //next_slice初始值和previous_slice不同,它是从句子第一个word开始的
 //这里previous_slice表示网络的输入(对于含有历史信息的,再加上历史),next_slice表示网络的期望输出
  for (auto next_slice : batch) {

    //Caster(previous_slice).Cast()将previous_slice转换为real类型,并且返回一个指针指向它
    //结果返回值到x,x就是网络的输出
    const Real *x = net_->Evaluate(next_slice, Caster(previous_slice).Cast());

   //ComputeLogProbability返回以e为底的对数概率值,这个是在一个slice上面对数概率累加
   //*log_probability记录的就是一个batch的累加值
    *log_probability += net_->ComputeLogProbability(next_slice, x, false);

   //统计训练的word数目
    *num_running_words += next_slice.size();
    previous_slice = next_slice;
  }

  // backward pass

 //现在的slice是指向batch最后一个word的后面,就是什么都没有
 //--slice后,指向最后一个word
  auto slice = batch.End(1);
  do {
    --slice;
    //这里的slice表示期望的输出
    net_->ComputeDelta(*slice, FunctionPointer());
  } while (slice != batch.Begin(1));
  //这段循环一直走到slice在句子第一个word,然后计算误差后结束循环

  //主要是输入层清空历史,必须要清空的原因是需要重建历史
  //因为要准备更新,输入层的历史word对应的实数向量是有具体的位置的
  net_->ResetHistories();

  // weight update
  //这里计算需要更新的量,并未真正进行更新
  //previous_slice仍然表示网络当前的输入
  previous_slice = *batch.Begin(0);
  //next_slice仍然表示网络期望的输出
  for (auto next_slice : batch) {
    net_->UpdateWeights(next_slice, Caster(previous_slice).Cast());
    previous_slice = next_slice;
  }
  //这一步更新参数
  net_->UpdateMomentumWeights();
}

void Trainer::TrainBatchFeedforward(const Batch &batch,
                                    Real *log_probability,
                                    int64_t *num_running_words) {
  // forward pass
  //这里的过程和前面差不多,更新的方式是输入一次,更新一次
  //前面是输入多次,后累加起来,然后一并更新
  auto previous_slice(*batch.Begin(0));
  for (auto next_slice : batch) {
    net_->Reset(false);
    const Real *x = net_->Evaluate(next_slice, Caster(previous_slice).Cast());
    *log_probability += net_->ComputeLogProbability(next_slice, x, false);
    *num_running_words += next_slice.size();
    net_->ComputeDelta(next_slice, FunctionPointer());
    net_->UpdateWeights(next_slice, Caster(previous_slice).Cast());
    previous_slice = next_slice;
    net_->UpdateMomentumWeights();
  }
}</span>
其中里面调用的函数时net.cc提供的,比如Evaluate函数,更新函数等,net.cc核心代码如下:
<span style="font-family:Microsoft YaHei;">//f里面装入的层顺序是:输入,隐层,输出层。这样的,这个函数的功能
//相当于计算整个网络的输出,返回的x即使网络的输出,经过softmax后的
const Real *Net::Evaluate(const Slice &slice, const Real x[]) {
  for (FunctionPointer f : functions_)
    //这里Evaluate返回的是当前层的输出,再下一次迭代时,就作为上层的输入
    x = f->Evaluate(slice, x);
  return x;
}

//计算误差,恰好是反着的,从输出层开始往输入层计算
void Net::ComputeDelta(const Slice &slice, FunctionPointer f) {
  //因为是functions_是将输入到输出顺序装入的,所以这里用reverse
  for (FunctionPointer g : boost::adaptors::reverse(functions_)) {
    //这里的f是表示g的前面一层,在计算输出层的ComputeDelta时,f无用处
    //在后面中间层时,计算误差需要计算输出层传过来的误差,也就需要上一层的指针
    g->ComputeDelta(slice, f);
    f = g;
  }
}

const Real *Net::UpdateWeights(const Slice &slice, const Real x[]) {
  return UpdateWeights(slice, learning_rate(), x);
}

//更新权值,下面的函数应该只是计算需要更新的量
const Real *Net::UpdateWeights(const Slice &slice,
                               const Real learning_rate,
                               const Real x[]) {
//f里面装入的层顺序是:输入,隐层,输出层
//更新的顺序是从输入->输出的
  for (FunctionPointer f : functions_)
    //这里的x表示前层的输出,UpdateWeights返回值是该更新层的输出
    x = f->UpdateWeights(slice, learning_rate, x);
  return x;
}</span>
好啦,对rwthlm的学习就到此为止了,从3月份开始从rnnlm一直到lstmlm这段学习也要告一段落了。未来继续学习,加油吧,少年!