IDEA,支付宝小程序
grammar_cjkRuby: true
前置条件
-
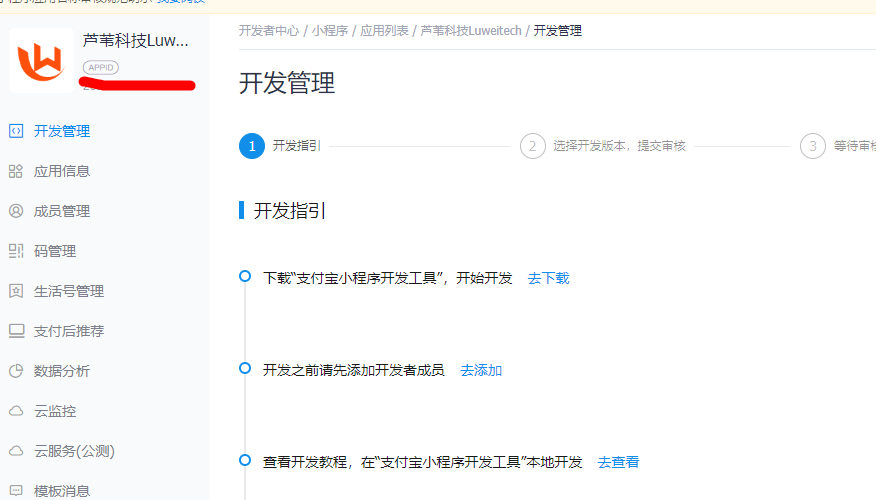
获取APPID
-
添加获取会员信息服务
详情 > 开发管理 > 功能列表 > 添加功能 > 勾选 获取会员信息 > 确认,添加完成后的效果如下图所示*PS:如果想获取手机号和姓名等真实信息,需要额外申请获取 敏感信息申请 流程
-
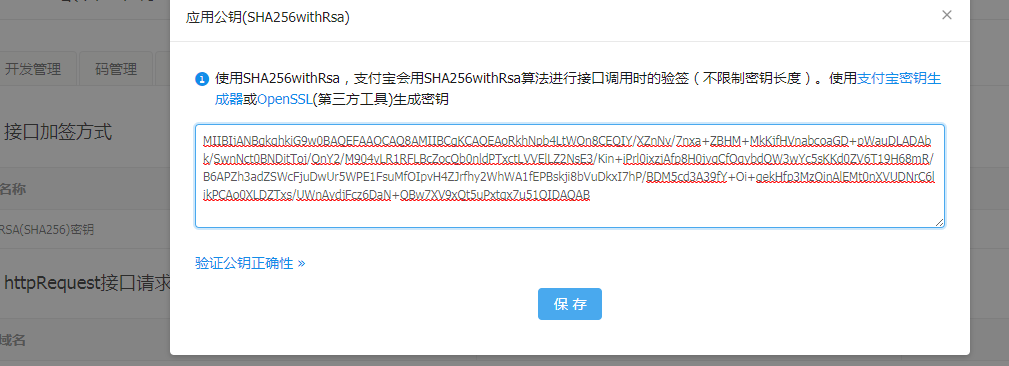
设置秘钥
- 用阿里的密钥生成工具生成公私钥
- 上传应用公钥并获取支付宝公钥
- 登录开放平台-开发者中心,选择小程序,找到对应的小程序,点击【查看】>【设置】> 【开发设置】 >【接口加签方式】 > 【设置应用公钥】 > 【设置应用公钥】 > 把签名验签工具里“公钥”的内容复制到此处,点击“保存”完成密钥设置
保存成功后页面变成下图所示
公钥用于验签使用


服务器端
-
在项目的pom.xml中添加服务端SDK
<dependency> <groupId>com.alipay.sdk</groupId> <artifactId>alipay-sdk-java</artifactId> <version>3.4.49.ALL</version> </dependency> -
在application.yaml文件中添加appid、公钥、私钥的配置
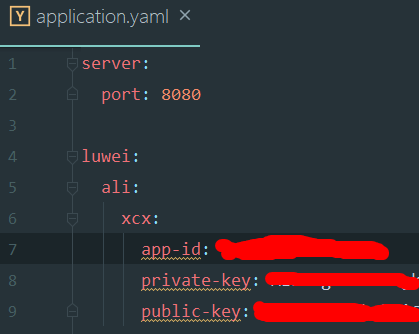
tips: 公钥不是工具生成的公钥,而是【公钥设置成功页面]里】点击查看支付宝公钥里获取的公钥
-
读取配置文件工具类AliXcxProperty.java
package com.example.demo.properties; import lombok.Data; import org.springframework.boot.context.properties.ConfigurationProperties; import org.springframework.stereotype.Component; /** * @Description * @Author LW-mochengdong * @Date 2018/12/22 11:42 **/ @Data @Component @ConfigurationProperties(prefix = "luwei.ali.xcx") public class AliXcxProperty { private String serverUrl; private String appId; private String privateKey; private String publicKey; } -
IndexController.java的代码
@GetMapping("/auth") public AlipayUserInfoShareResponse auth(@RequestParam String authcode){ return indexService.auth(authcode); } -
IndexService.java
package com.example.demo.service;

import com.alibaba.fastjson.JSONObject;
import com.alipay.api.AlipayApiException;
import com.alipay.api.AlipayClient;
import com.alipay.api.DefaultAlipayClient;
import com.alipay.api.request.AlipaySystemOauthTokenRequest;
import com.alipay.api.request.AlipayUserInfoShareRequest;
import com.alipay.api.response.AlipaySystemOauthTokenResponse;
import com.alipay.api.response.AlipayUserInfoShareResponse;
import com.example.demo.properties.AliXcxProperty;
import lombok.extern.slf4j.Slf4j;
import org.springframework.stereotype.Service;

import javax.annotation.Resource;

/**
 * @Description
 * @Author LW-mochengdong
 * @Date 2018/12/22 11:38
 **/
@Slf4j
@Service
public class IndexService {

	@Resource
	private AliXcxProperty aliXcxProperty;

	public AlipayUserInfoShareResponse auth(String authcode) {
		AlipayClient alipayClient = new DefaultAlipayClient(aliXcxProperty.getServerUrl(),
				aliXcxProperty.getAppId(),
				aliXcxProperty.getPrivateKey(),
				"JSON", "utf-8", aliXcxProperty.getPublicKey(), "RSA2");
		//获取uid&token
		AlipaySystemOauthTokenRequest request = new AlipaySystemOauthTokenRequest();
		request.setGrantType("authorization_code");//值为authorization_code时,代表用code换取;值为refresh_token时,代表用refresh_token换取
		request.setCode(authcode);
		try {
			AlipaySystemOauthTokenResponse response = alipayClient.execute(request);
			if (response.isSuccess()) {
				log.info("auth success [{}]", JSONObject.toJSONString(response));

				AlipayUserInfoShareRequest alipayUserInfoShareRequest = new AlipayUserInfoShareRequest();
				AlipayUserInfoShareResponse alipayUserInfoShareResponse = alipayClient.execute(alipayUserInfoShareRequest, response.getAccessToken());
				if (alipayUserInfoShareResponse.isSuccess()) {
					log.info("AlipayUserInfoShareResponse success [{}]", JSONObject.toJSONString(alipayUserInfoShareResponse));
				} else {
					log.info("AlipayUserInfoShareResponse fail [{}]", JSONObject.toJSONString(alipayUserInfoShareResponse));
				}
				return alipayUserInfoShareResponse;
			} else {
				log.info("auth fail [{}]", JSONObject.toJSONString(response));
			}
		} catch (AlipayApiException e) {
			log.error("auth exception", e);
		}
		return null;
	}

}
以上,服务器端的授权登录工作完毕,发布即可!
客户端
-
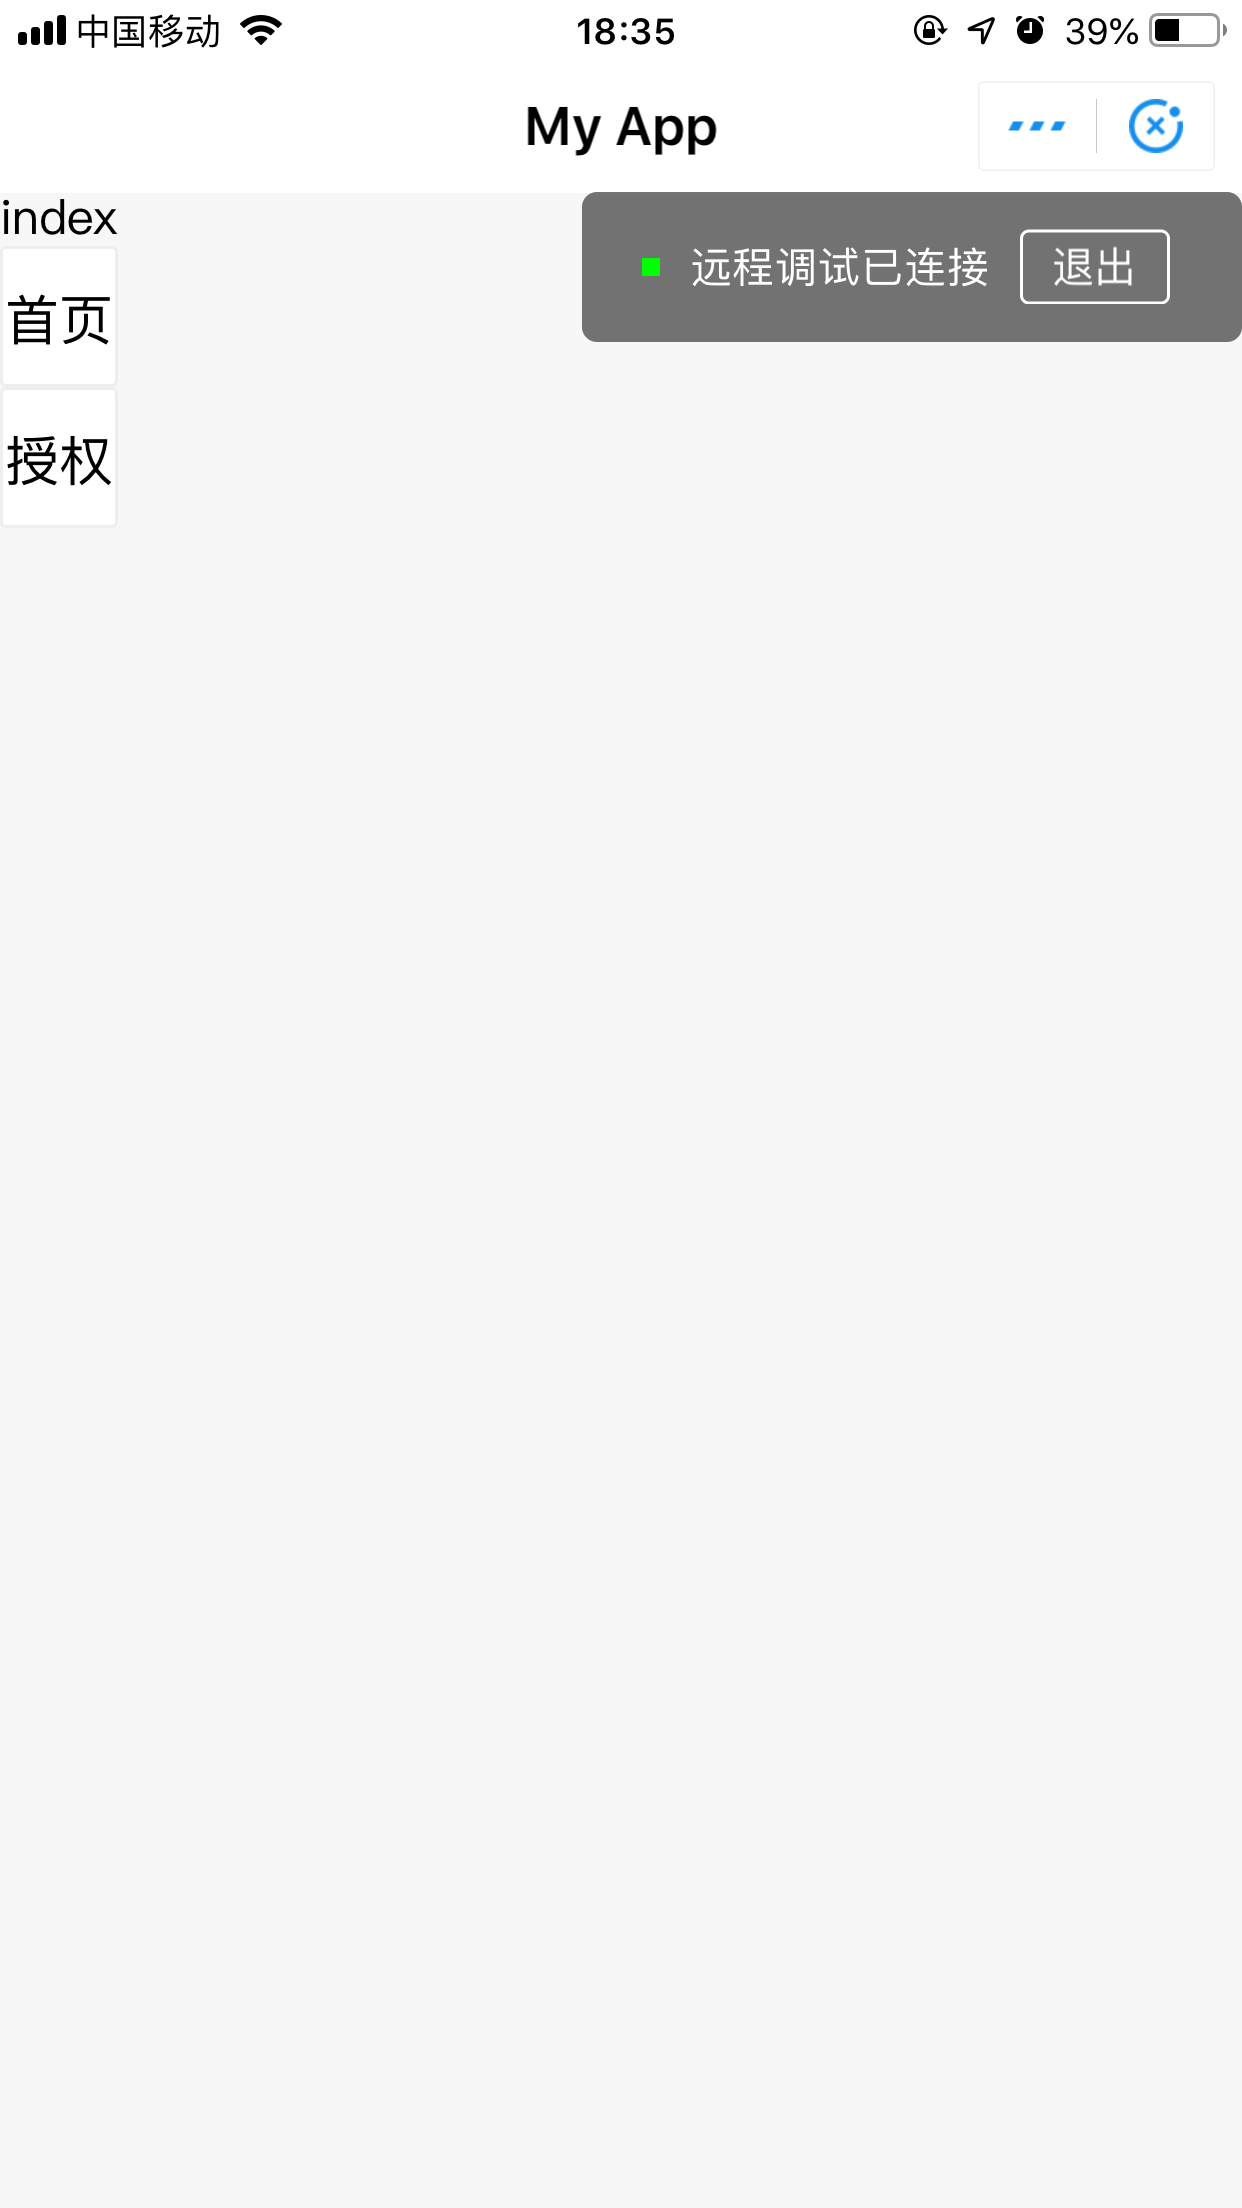
index.axml文件
<view> {{index}} <button onTap="index"> 首页 </button> <button onTap="getAuthCode"> 授权 </button> </view> -
index.js文件
getAuthCode(){ my.getAuthCode({ scopes: 'auth_user', // 主动授权(弹框):auth_user,静默授权(不弹框):auth_base success: (res) => { if (res.authCode) { // 认证成功 // 调用自己的服务端接口,让服务端进行后端的授权认证,并且种session,需要解决跨域问题 my.httpRequest({ url: 'https://app2120230256test.mapp-test.xyz/auth', // 该url是自己的服务地址,实现的功能是服务端拿到authcode去开放平台进行token验证 data: { authcode: res.authCode }, success: () => { // 授权成功并且服务器端登录成功 }, fail: () => { // 根据自己的业务场景来进行错误处理 }, }); } }, }); }-
保存用真机扫码测试
-
-
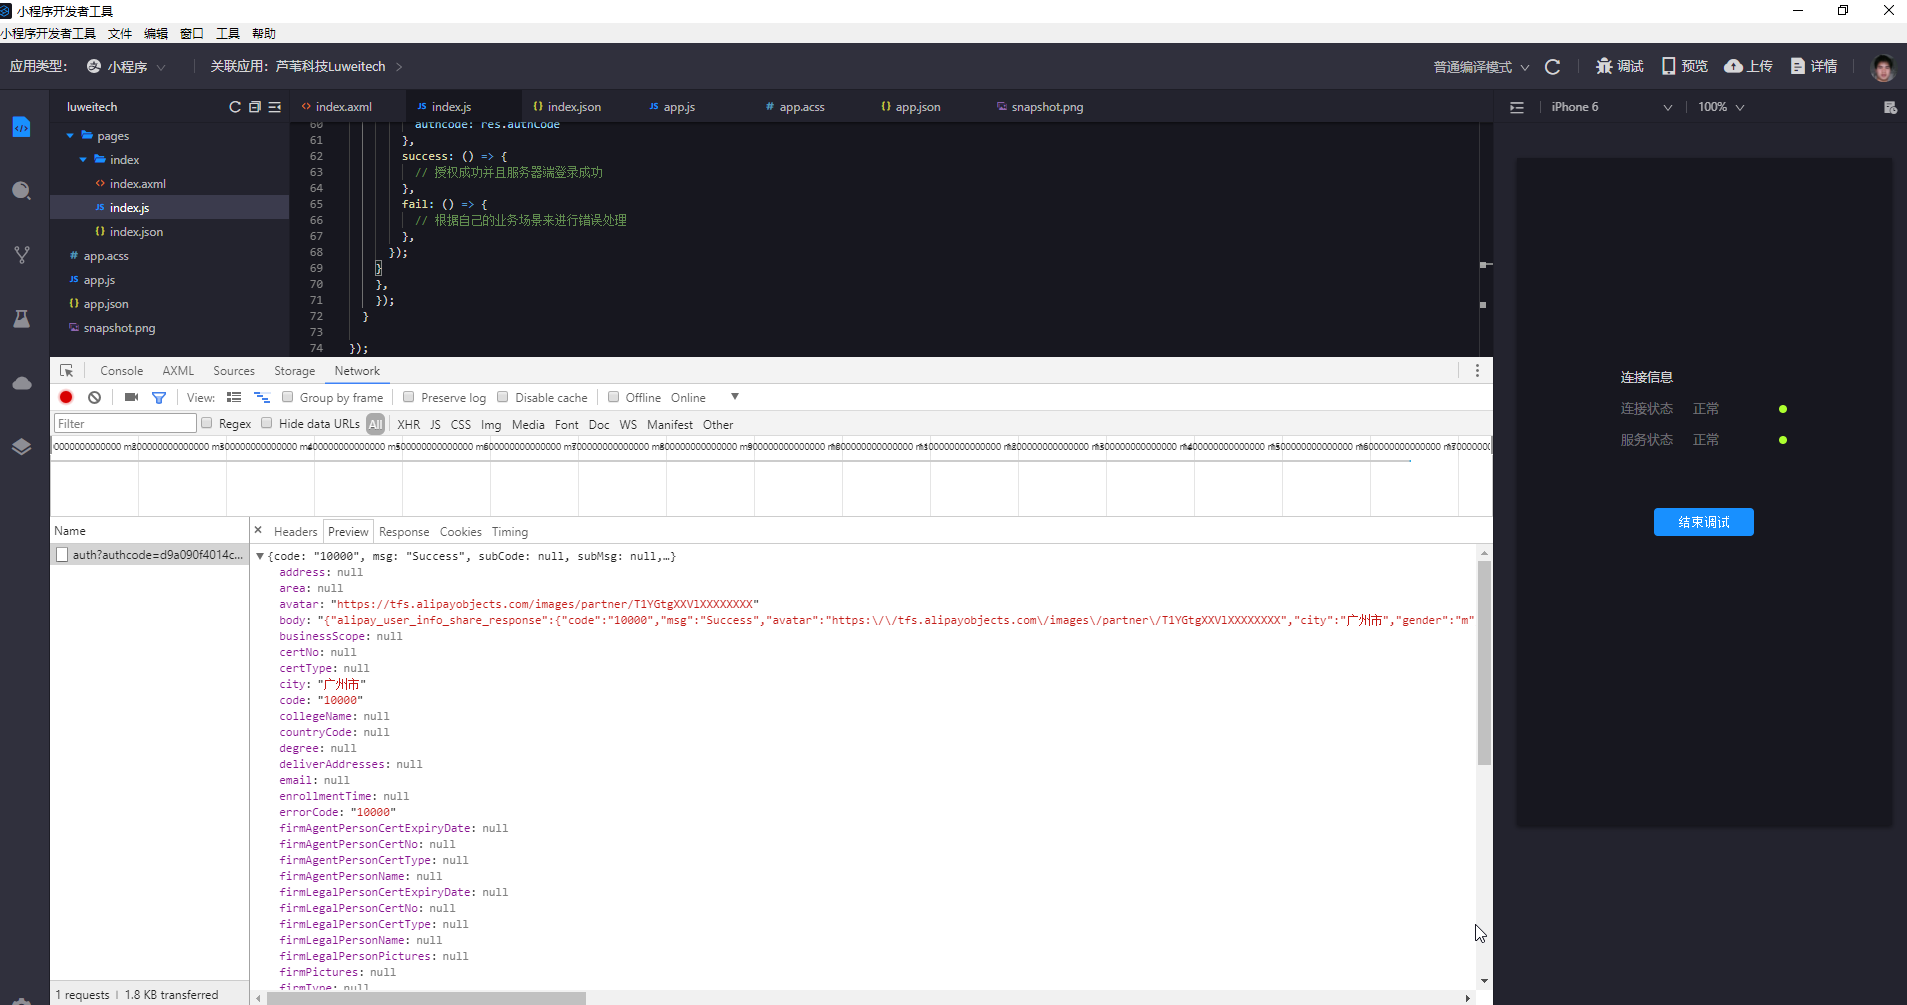
点击 授权 查看控制台network视图的数据如下
以上说明整个授权过程成功!
-
服务器控制台的log也证实了这点

开启日志流程
- 我的小程序 > 查看 > 云服务(公测) > 环境资源 > 更多 > 开启远程日志服务
下次部署项目时即可生效,不记得服务器密码的可以重置服务器密码,重置后需要重启服务器才能生效,日志的路径为/home/admin/logs
至此,支付宝小程序的授权登录流程已完成,感谢各位大神的观看、评价、校正。PS:下一篇将实现授支付功能!
成东
广州芦苇科技Java开发团队
芦苇科技-广州专业互联网软件服务公司
抓住每一处细节 ,创造每一个美好
关注我们的公众号,了解更多
想和我们一起奋斗吗?lagou搜索“ 芦苇科技 ”或者投放简历到 [email protected] 加入我们吧

关注我们,你的评论和点赞对我们最大的支持