版权声明:本文为博主原创文章,未经博主允许不得转载。 https://blog.csdn.net/yangwenxue_admin/article/details/84824298
SpringCloud微服务开发-Eureka集群配置
Eureka集群图例
Eureka集群配置例子如下:
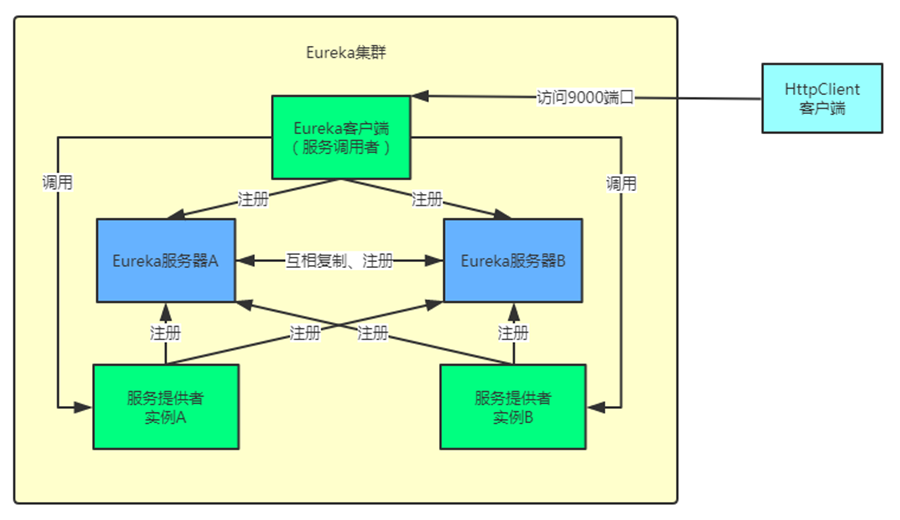
以上图为例,在我们的Eureka服务器里面会启动两个实例,这两个实例会相互注册。
然后服务提供者也会启动两个实例,这两个实例都会注册到我们服务器的两个实例,像图中那样一个服务提供者实例分别向两个服务器实例注册;服务调用者也会注册到两个服务器实例上面。
Eureka服务集群及微服务注册于发现工程截图如下:

修改映射配置
找到C:\Windows\System32\drivers\etc路径下的hosts文件,
修改映射文件添加配置项如下:
127.0.0.1 eureka8001.com
127.0.0.1 eureka8002.com
127.0.0.1 eureka8003.com
Eureka服务启动类
分别在Eureka服务启动类上加入Eureka的注解标签@EnableEurekaServer:
@SpringBootApplication
@EnableEurekaServer // EurekaServer服务器端启动类,接受其它微服务注册进来
public class EurekaServer8001_App
{
	public static void main(String[] args)
	{
		SpringApplication.run(EurekaServer8001_App.class, args);
	}
}
EurekaServer的yml配置
springcloud-eureka8001的yml配置:
server:
  port: 8001

eureka:
  instance:
    hostname: eureka8001.com #eureka服务端的实例名称
  client:
    register-with-eureka: false     #false表示不向注册中心注册自己。
    fetch-registry: false     #false表示自己端就是注册中心,我的职责就是维护服务实例,并不需要去检索服务
    service-url:
      #单机 defaultZone: http://${eureka.instance.hostname}:${server.port}/eureka/       #设置与Eureka Server交互的地址查询服务和注册服务都需要依赖这个地址(单机)。
      defaultZone: http://eureka8002.com:8002/eureka/,http://eureka8003.com:8003/eureka/
springcloud-eureka8002的yml配置:
server:
  port: 8002

eureka:
  instance:
    hostname: eureka8002.com #eureka服务端的实例名称
  client:
    register-with-eureka: false     #false表示不向注册中心注册自己。
    fetch-registry: false     #false表示自己端就是注册中心,我的职责就是维护服务实例,并不需要去检索服务
    service-url:
      #单机 defaultZone: http://${eureka.instance.hostname}:${server.port}/eureka/       #设置与Eureka Server交互的地址查询服务和注册服务都需要依赖这个地址(单机)。
      defaultZone: http://eureka8001.com:8001/eureka/,http://eureka8003.com:8003/eureka/
springcloud-eureka8003的yml配置:
server:
  port: 8003

eureka:
  instance:
    hostname: eureka8003.com #eureka服务端的实例名称
  client:
    register-with-eureka: false     #false表示不向注册中心注册自己。
    fetch-registry: false     #false表示自己端就是注册中心,我的职责就是维护服务实例,并不需要去检索服务
    service-url:
      #单机 defaultZone: http://${eureka.instance.hostname}:${server.port}/eureka/       #设置与Eureka Server交互的地址查询服务和注册服务都需要依赖这个地址(单机)。
      defaultZone: http://eureka8001.com:8001/eureka/,http://eureka8002.com:8002/eureka/
以上,Eureka的集群已经配置完成,测试Eureka集群效果:
分别运行以上三个EurekaServer的启动程序,可以看到集群效果如下:


将微服务注册进Eureka集群中
这里以一个简单的微服务例子举例,编写微服务启动程序如下:
@SpringBootApplication
@EnableEurekaClient //本服务启动后会自动注册进eureka服务中
@EnableDiscoveryClient //提供服务发现,对外暴露自己。
@EnableAutoConfiguration(exclude={DataSourceAutoConfiguration.class})//测试demo,不需要注入dataSource bean
public class Provider8081_App
{
	public static void main(String[] args)
	{
		SpringApplication.run(Provider8081_App.class, args);
	}
}
微服务入驻Eureka集群的yml配置(关键点):
server:
  port: 8081

spring:
   application:
    name: springcloud-provider8081

eureka:
  client: #客户端注册进eureka服务列表内
    service-url:
      #defaultZone: http://localhost:8001/eureka
       defaultZone: http://eureka8001.com:8001/eureka/,http://eureka8002.com:8002/eureka/,http://eureka8003.com:8003/eureka/ #入驻eureka集群
  instance:
    instance-id: springcloud-provider8081
    prefer-ip-address: true     #访问路径可以显示IP地址

info:
  app.name: springcloud-provider8081
  company.name: https://blog.csdn.net/yangwenxue_admin
  build.artifactId: $project.artifactId$
  build.version: $project.version$
微服务注册到Eureka集群中,测试结果如下:


微服务后台提供了一个简单的Rest服务请求,测试结果如下:
