
一、前期基础知识储备
使用了ViewPager, PagerSlidingTabStrip, SwipeRefreshLayout模仿Douban客户端的下拉刷新以及滑动的效果。
ViewPager—视图滑动切换工具——通过手势滑动可以完成View的切换,一般是用来做APP 的引导页或者实现图片轮播——意味着ViewPager中经常放的东西有两个:①图片,实现图片轮播器;②View视图,实现View 的切换,如应用启动页面。
ViewPager就是一个简单的页面切换组件,我们可以往里面填充多个View,然后我们可以左右滑动,从而切换不同的View。和前面学的ListView,GridView一样,我们也需要一个Adapter (适配器)将我们的View和ViewPager进行绑定,而ViewPager则有一个特定的Adapter—— PagerAdapter!另外,Google官方是建议我们使用Fragment来填充ViewPager的,这样 可以更加方便的生成每个Page,以及管理每个Page的生命周期!给我们提供了两个Fragment 专用的Adapter:FragmentPageAdapter(页面少+简单)和FragmentStatePagerAdapter(页面多+复杂)。
二、上代码,简单实现一个ViewPager
第一步:在主布局文件中添加ViewPager控件;
<?xml version="1.0" encoding="utf-8"?>
<RelativeLayout xmlns:android="http://schemas.android.com/apk/res/android"
    xmlns:tools="http://schemas.android.com/tools"
    android:layout_width="match_parent"
    android:layout_height="match_parent"
    android:paddingBottom="@dimen/activity_vertical_margin"
    android:paddingLeft="@dimen/activity_horizontal_margin"
    android:paddingRight="@dimen/activity_horizontal_margin"
    android:paddingTop="@dimen/activity_vertical_margin"
    tools:context="com.example.administrator.douban.MainActivity">

    <android.support.v4.view.ViewPager
        android:id="@+id/viewpage"
        android:layout_gravity="center"
        android:layout_weight="1.0"
        android:flipInterval="30"
        android:layout_width="match_parent"
        android:layout_height="match_parent"
        android:persistentDrawingCache="animation"/>
</RelativeLayout>
第二步:创建三个Itemzi布局,用于放置View,比如图片,本例中放入一个文本控件
<?xml version="1.0" encoding="utf-8"?>
<LinearLayout xmlns:android="http://schemas.android.com/apk/res/android"
    android:layout_width="match_parent"
    android:layout_height="match_parent"
    android:background="#f4ff55"
    android:gravity="center"
    android:orientation="vertical">

    <TextView
        android:layout_width="wrap_content"
        android:layout_height="wrap_content"
        android:text="第一个Page"
        android:textColor="#000000"
        android:textSize="18sp"
        android:textStyle="bold" />
</LinearLayout>
由于一样,代码就不重复贴了
第三步:创建适配器类,在里面实现ViewPager的四个方法;
pagerAdapter = new PagerAdapter() {
            @Override
            public int getCount() {
                return viewList.size();
            }

            @Override
            public boolean isViewFromObject(View view, Object object) {
                return view == object;
            }


            //移除当前容器上的布局文件(切换为其他页面)
            @Override
            public void destroyItem(ViewGroup container, int position, Object object) {
                container.removeView(viewList.get(position));
            }

            //为当前容器添加布局文件(即想要显示的布局文件)
            @Override
            public Object instantiateItem(ViewGroup container, int position) {
                container.addView(viewList.get(position));
                return viewList.get(position);
            }
        };
getCount():获得viewpager中有多少个view;
destroyItem():移除一个给定位置的页面。适配器有责任从容器中删除这个视图;
instantiateItem(): ①将给定位置的view添加到ViewGroup(容器)中,创建并显示出来;
isViewFromObject(): 判断instantiateItem(ViewGroup, int)函数所返回来的Key与一个页面视图是否是代表的同一个视图(即它俩是否是对应的,对应的表示同一个View),通常我们直接写 return view == object!
第四步:Activity代码中绑定适配器和初始化View数据;
public class MainActivity extends AppCompatActivity {

    private View view1, view2,view3;
    private ViewPager viewPager;
    private PagerAdapter pagerAdapter;

    private List<View> viewList = new ArrayList<>();
    //创建一个ArrayList用来保存要切换的View
    @Override
    protected void onCreate(Bundle savedInstanceState) {
        super.onCreate(savedInstanceState);
        setContentView(R.layout.activity_main);
        viewPager = (ViewPager) findViewById(R.id.viewpage);
        LayoutInflater inflater = getLayoutInflater();

        view1 = inflater.inflate(R.layout.view_one, null);
        view2 = inflater.inflate(R.layout.view_two, null);
        view3 = inflater.inflate(R.layout.view_three, null);
        viewList.add(view1);
        viewList.add(view2);
        viewList.add(view3);
        //将三个布局文件放进ArrayList中
		        //将 pagerAdapter与 viewPager绑定
        viewPager.setAdapter(pagerAdapter);
    }
}
小结:通过以上四步,我们就简单地实现了一个ViewPager的使用。通常我们利用这种ViewPager的实现方式通常是用于创建一个图片轮播器。
————————————————————我是分隔线————————————————————

下面,我们来简单实现一次ViewPager和Fragment的联合使用。使用之前首先我们首先要分析两个关键逻辑:
①如何实现用户点击菜单栏,然后显示对应的页面?
②如何实现用户滑动ViewPager,对应的菜单栏也发生改变?
本例中实现的方式都是采用了监听点击事件的方式来实现的。
第一步:创建三个碎片的布局,用于和碎片绑定,去替换单独的Item子布局;
<?xml version="1.0" encoding="utf-8"?>
<LinearLayout xmlns:android="http://schemas.android.com/apk/res/android"
    android:layout_width="match_parent"
    android:layout_height="match_parent"
    android:background="#FFBA55"
    android:gravity="center"
    android:orientation="vertical">


    <TextView
        android:layout_width="wrap_content"
        android:layout_height="wrap_content"
        android:text="第一个Page"
        android:textColor="#000000"
        android:textSize="18sp"
        android:textStyle="bold" />
</LinearLayout>
由于是重复代码,这里就不全贴了。
第二步:创建三个碎片类,用于装载碎片的布局;
public class OneFragment extends Fragment {
    @Nullable
    @Override
    public View onCreateView(LayoutInflater inflater,
                             @Nullable ViewGroup container, @Nullable Bundle savedInstanceState) {
        View view = inflater.inflate(R.layout.view_one, null);
        return view;
    }
}
由于是重复代码,这里就不全贴了。
第三步:创建主布局文件,这里放入三个文本控件和一个ViewPager,前者用于实现菜单栏的效果,后者用于实现视图替换的效果。
<?xml version="1.0" encoding="utf-8"?>
<LinearLayout xmlns:android="http://schemas.android.com/apk/res/android"
    xmlns:tools="http://schemas.android.com/tools"
    android:layout_width="match_parent"
    android:layout_height="match_parent"
    android:orientation="vertical"
    tools:context="com.example.administrator.douban.MainActivity">

    <LinearLayout
        android:layout_width="match_parent"
        android:layout_height="wrap_content"
        android:orientation="horizontal" >

        <TextView
            android:id="@+id/tv_item_one"
            android:layout_width="wrap_content"
            android:layout_height="wrap_content"
            android:layout_weight="1"
            android:gravity="center_horizontal"
            android:text="菜单一" />

        <TextView
            android:id="@+id/tv_item_two"
            android:layout_width="wrap_content"
            android:layout_height="wrap_content"
            android:layout_weight="1"
            android:gravity="center_horizontal"
            android:text="菜单二" />

        <TextView
            android:id="@+id/tv_item_three"
            android:layout_width="wrap_content"
            android:layout_height="wrap_content"
            android:layout_weight="1"
            android:gravity="center_horizontal"
            android:text="菜单三" />
    </LinearLayout>

    <android.support.v4.view.ViewPager
        android:id="@+id/myViewPager"
        android:layout_width="match_parent"
        android:layout_height="match_parent"
        android:layout_weight="1" />

</LinearLayout>
第四步:创建适配器——核心步骤,这里使用的是专属的适配器实现;
public class TabFragmentPagerAdapter extends FragmentPagerAdapter {
    private FragmentManager mfragmentManager;
    private List<Fragment> mlist;

    //这是一段构造器,我没写的时候,第一次代码是报错的,在我做了下面这个构造器之后,没有报错!!!
    public TabFragmentPagerAdapter(FragmentManager fm, List<Fragment> list) {
        super(fm);
        this.mlist = list;
    }
	//显示第几个页面
    @Override
    public Fragment getItem(int position) {
        return mlist.get(position);
    }
	//一共有几个页面,注意,使用Fragment特有的构造器时,和ViewPager的原生构造器的方法不同
    @Override
    public int getCount() {
        return mlist.size();
    }
}
第五步:创建主Activity代码,在这里做了三件事:①初始化碎片数据;②为ViewPager绑定适配器;③为菜单栏和View写入点击监听事件
public class MainActivity extends ActionBarActivity implements View.OnClickListener {

    private TextView tv_item_one;
    private TextView tv_item_two;
    private TextView tv_item_three;
    private ViewPager myViewPager;
    private List<Fragment> list;
    private TabFragmentPagerAdapter adapter;

    @Override
    protected void onCreate(Bundle savedInstanceState) {
        super.onCreate(savedInstanceState);
        setContentView(R.layout.activity_main);
        InitView();

        // 设置菜单栏的点击事件
        tv_item_one.setOnClickListener(this);
        tv_item_two.setOnClickListener(this);
        tv_item_three.setOnClickListener(this);
        myViewPager.setOnPageChangeListener(new MyPagerChangeListener());

        //把Fragment添加到List集合里面
        list = new ArrayList<>();
        list.add(new OneFragment());
        list.add(new TwoFragment());
        list.add(new ThreeFragment());
        adapter = new TabFragmentPagerAdapter(getSupportFragmentManager(), list);
        myViewPager.setAdapter(adapter);
        myViewPager.setCurrentItem(0);  //初始化显示第一个页面
        tv_item_one.setBackgroundColor(Color.RED);//被选中就为红色
    }

    private void InitView() {
        tv_item_one = (TextView) findViewById(R.id.tv_item_one);
        tv_item_two = (TextView) findViewById(R.id.tv_item_two);
        tv_item_three = (TextView) findViewById(R.id.tv_item_three);
        myViewPager = (ViewPager) findViewById(R.id.myViewPager);
    }
	//第一次设置点击监听事件,为菜单栏设置监听事件,监听的对象是页面的滑动
    @Override
    public void onClick(View v) {
        switch (v.getId()) {
            case R.id.tv_item_one:
                myViewPager.setCurrentItem(0);
                tv_item_one.setBackgroundColor(Color.RED);
                tv_item_two.setBackgroundColor(Color.WHITE);
                tv_item_three.setBackgroundColor(Color.WHITE);
                break;
            case R.id.tv_item_two:
                myViewPager.setCurrentItem(1);
                tv_item_one.setBackgroundColor(Color.WHITE);
                tv_item_two.setBackgroundColor(Color.RED);
                tv_item_three.setBackgroundColor(Color.WHITE);
                break;
            case R.id.tv_item_three:
                myViewPager.setCurrentItem(2);
                tv_item_one.setBackgroundColor(Color.WHITE);
                tv_item_two.setBackgroundColor(Color.WHITE);
                tv_item_three.setBackgroundColor(Color.RED);
                break;
        }
    }
	//第二次设置点击监听事件,为ViewPager设置监听事件,用于实现菜单栏的样式变化
    private class MyPagerChangeListener implements ViewPager.OnPageChangeListener {
        @Override
        public void onPageScrolled(int position, float positionOffset, int positionOffsetPixels) {

        }

        @Override
        public void onPageSelected(int position) {
            switch (position) {
                case 0:
                    tv_item_one.setBackgroundColor(Color.RED);
                    tv_item_two.setBackgroundColor(Color.WHITE);
                    tv_item_three.setBackgroundColor(Color.WHITE);
                    break;
                case 1:
                    tv_item_one.setBackgroundColor(Color.WHITE);
                    tv_item_two.setBackgroundColor(Color.RED);
                    tv_item_three.setBackgroundColor(Color.WHITE);
                    break;
                case 2:
                    tv_item_one.setBackgroundColor(Color.WHITE);
                    tv_item_two.setBackgroundColor(Color.WHITE);
                    tv_item_three.setBackgroundColor(Color.RED);
                    break;
            }
        }

        @Override
        public void onPageScrollStateChanged(int state) {

        }
    }
}
运行效果如下:
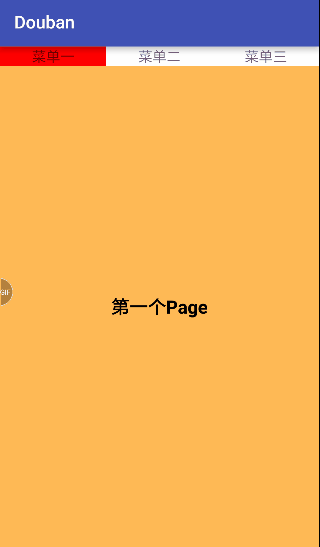
总结:单独使用ViewPager比较简单,把ViewPager看成是普通的容器控件,是一个大方块,里面实现好了滑动显示逻辑,我们要做的就是做好适配器,然后往适配器里面加东西,比如三张图片,三个TextView——使用起来是比较简单的。
使用ViewPager+Fragment和单独使用ViewPager也比较类似,只是把单个的View布局文件换成了碎片。而构造器用的也是Fragment专属的构造器。需要注意的一点就是,为了实现①如何实现用户点击菜单栏,然后显示对应的页面?②如何实现用户滑动ViewPager,对应的菜单栏也发生改变?这两个关键逻辑,需要分别为菜单栏和ViewPager注册点击监听事件。