一、异常处理
1、异常:导致程序的正常流程被中断的事件
FileNotFoundException文件不存在异常 ParseException解析异常
2、异常处理:
①、try{} catch(){}
1.将可能抛出FileNotFoundException 文件不存在异常的代码放在try里
2.如果文件存在,就会顺序往下执行,并且不执行catch块中的代码
3. 如果文件不存在,try 里的代码会立即终止,程序流程会运行到对应的catch块中
4. e.printStackTrace(); 会打印出方法的调用痕迹
也可以使用异常的父类进行catch
②、多异常捕捉办法:
ⅰ、分别进行catch
public static void main(String[] args) {

        File f = new File("d:/LOL.exe");

        try {
            System.out.println("试图打开 d:/LOL.exe");
            new FileInputStream(f);
            System.out.println("成功打开");
            SimpleDateFormat sdf = new SimpleDateFormat("yyyy-MM-dd");
            Date d = sdf.parse("2016-06-03");
        } catch (FileNotFoundException e) {
            System.out.println("d:/LOL.exe不存在");
            e.printStackTrace();
        } catch (ParseException e) {
            System.out.println("日期格式解析错误");
            e.printStackTrace();
        }
    }
ⅱ、把多个异常,放在一个catch里统一捕捉 这种方式从 JDK7开始支持,好处是捕捉的代码更紧凑,不足之处是,一旦发生异常,不能确定到底是哪种异常,需要通过instanceof 进行判断具体的异常类型
public static void main(String[] args) {

        File f = new File("d:/LOL.exe");

        try {
            System.out.println("试图打开 d:/LOL.exe");
            new FileInputStream(f);
            System.out.println("成功打开");
            SimpleDateFormat sdf = new SimpleDateFormat("yyyy-MM-dd");
            Date d = sdf.parse("2016-06-03");
        } catch (FileNotFoundException | ParseException e) {
            if (e instanceof FileNotFoundException)
                System.out.println("d:/LOL.exe不存在");
            if (e instanceof ParseException)
                System.out.println("日期格式解析错误");

            e.printStackTrace();
        }

    }
③、finally:无论是否出现异常,finally中的代码都会被执行
public static void main(String[] args) {

        File f= new File("d:/LOL.exe");

        try{
            System.out.println("试图打开 d:/LOL.exe");
            new FileInputStream(f);
            System.out.println("成功打开");
        }
        catch(FileNotFoundException e){
            System.out.println("d:/LOL.exe不存在");
            e.printStackTrace();
        }
        finally{
            System.out.println("无论文件是否存在, 都会执行的代码");
        }
    }
④、throws:抛出异常
考虑如下情况:
主方法调用method1
method1调用method2
method2中打开文件
method2中需要进行异常处理
但是method2不打算处理,而是把这个异常通过throws抛出去
那么method1就会接到该异常。 处理办法也是两种,要么是try catch处理掉,要么也是抛出去。
method1选择本地try catch住 一旦try catch住了,就相当于把这个异常消化掉了,主方法在调用method1的时候,就不需要进行异常处理了
⑤、throws与throw这两个关键字接近,不过意义不一样,有如下区别:
1. throws 出现在方法声明上,而throw通常都出现在方法体内。
2. throws 表示出现异常的一种可能性,并不一定会发生这些异常;throw则是抛出了异常,执行throw则一定抛出了某个异常对象。
3、异常分类:可查异常CheckedException,运行时异常和错误3种
其中,运行时异常和错误又叫非可查异常
①、可查异常CheckedException:即必须处理的异常,要么try catch,要么throws跑出去。
原则:谁调用,谁处理。 若不处理,编译器无法通过
②、运行时异常RuntimeException:不是必须进行try catch的异常
常见运行时异常:
除数不能为零异常:ArithmeticException
下表越界异常:ArrayIndexOutOfBoundsException
空指针异常:NullPointerException
在编写代码的时候,依然可使用try catch throws进行处理,与可查异常不同之处在于,即便不进行try catch,也不会有编译错误
Java之所以会设计运行时异常的原因之一,是因为下标越界,空指针这些运行时异常太过于普遍,如果都需要进行捕捉,代码的可读性就会变得很糟糕。
③、错误Error:系统级别的异常,通常是内存用光了。OutOfMemoryError
与运行时异常一样,错误也是不要求强制捕捉的。
 ParseException
☏运行时异常与非运行时异常的区别:
运行时异常是不可查异常,不需要进行显式的捕捉
非运行时异常是可查异常,必须进行显式的捕捉,或者抛出
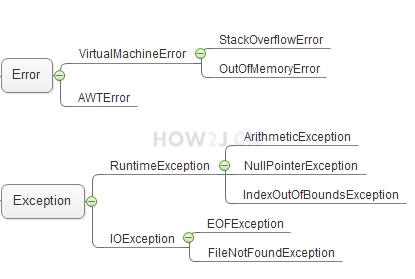
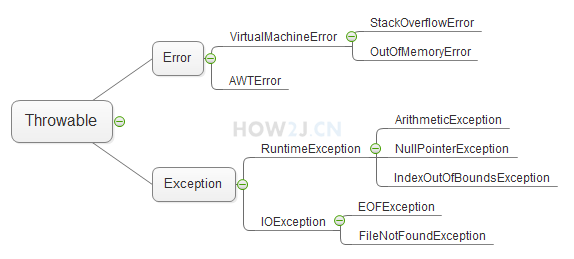
4、Throwable:
Throwable是类,Exception和Error都继承了该类
所以在捕捉的时候,也可以使用Throwable进行捕捉
如图: 异常分Error和Exception
Exception里又分运行时异常和可查异常。
创建自定义异常:提供两个构造方法
1. 无参的构造方法
2. 带参的构造方法,并调用父类的对应的构造方法
class EnemyHeroIsDeadException extends Exception{

    public EnemyHeroIsDeadException(){

    }
    public EnemyHeroIsDeadException(String msg){
        super(msg);
    }
}
抛出自定义异常:在外部调用attack方法的时候,就需要进行捕捉,并且捕捉的时候,可以通过e.getMessage() 获取当时出错的具体原因
1. 创建一个EnemyHeroIsDeadException实例
2. 通过throw 抛出该异常
3. 当前方法通过 throws 抛出该异常
package charactor;

public class Hero {
    public String name;
    protected float hp;

    public void attackHero(Hero h) throws EnemyHeroIsDeadException{
        if(h.hp == 0){
            throw new EnemyHeroIsDeadException(h.name + " 已经挂了,不需要施放技能" );
        }
    }

    public String toString(){
        return name;
    }

    class EnemyHeroIsDeadException extends Exception{

        public EnemyHeroIsDeadException(){

        }
        public EnemyHeroIsDeadException(String msg){
            super(msg);
        }
    }

    public static void main(String[] args) {

        Hero garen =  new Hero();
        garen.name = "盖伦";
        garen.hp = 616;

        Hero teemo =  new Hero();
        teemo.name = "提莫";
        teemo.hp = 0;

        try {
            garen.attackHero(teemo);

        } catch (EnemyHeroIsDeadException e) {
            // TODO Auto-generated catch block
            System.out.println("异常的具体原因:"+e.getMessage());
            e.printStackTrace();
        }

    }
}
银行存取款功能:
package Other;
/**
 * 银行存取款功能
 * 1.查看余额功能   2.存款 3.取款(可以透支) 4.直接离开
 */
import java.awt.AWTException;
import java.awt.Robot;
import java.awt.event.InputEvent;
import java.awt.event.KeyEvent;
import java.util.Scanner;

public class Account {
    protected double balance;     //存款,余额

    // 设置balance余额方法
    public Account(double init) {
        this.balance = init;
    }

    // 获取balance余额方法
    public double getBalance() {
        return balance;
    }

    // 显示余额方法
    public void balance() {
        System.out.println("当前余额为" + getBalance());
        returnButton();
    }

    // 存钱方法
    public void deposit(double amt) {
        balance += amt; // 余额+存入钱数
        System.out.println("存入成功");
        System.out.println("当前金额为" + getBalance());
        returnButton();
    }

    // 取钱方法
    public void withdraw(double amt) throws OverdraftException {
        double deficit = (new OverdraftException()).getDeficit(); // 获取可透支金额
        Scanner scan = new Scanner(System.in);
        if ((getBalance() - amt) < 0) { // 首先判断能不能直接取出
            System.out.println("您的余额不足,是否透支(Y/N)");// 不能直接取出,询问是否透支
            String check = scan.nextLine();
            while ((!"Y".equalsIgnoreCase(check)) & (!"N".equalsIgnoreCase(check))) {
                System.out.println("输入错误,请重新输入,是否透支(Y/N)");
                check = scan.nextLine();
            }
            if ("Y".equalsIgnoreCase(check)) { // 如果进行透支,则对余额进行比较,余额+透支金额 >= 取款金额
                if (((getBalance() + deficit) - amt) >= 0) {
                    balance -= amt; // 能透支,直接相减,得出一个负数
                } else { // 不能透支,超出透支范围,抛出OverdraftException异常
                    System.out.println("您的存款:" + (getBalance()));
                    throw new OverdraftException("超出透支范围", deficit);
                }
            } else {// 不进行透支取款,抛出异常,进入case3中的catch代码块
                throw new OverdraftException("取款失败!!!");
            }
        } else {// 能直接取款,直接相减,得正数
            balance -= amt;
        }
    }

    //返回主页面按钮的循环判断
    public void returnButton() {

        Scanner scan = new Scanner(System.in);
        System.out.println("1.返回主页面 2.离开");
        int position = scan.nextInt();
        while (position != 1 && position != 2) {
            System.out.println("您输入的按钮有误! 请重新输入");
            System.out.println("1.返回主页面 2.离开");
            position = scan.nextInt();
        }
        if (position == 1) {
            System.out.println("*****************************");
            Bank(); // 当输入希望返回主页面后,递归调用Bank方法 再次进入主页面
            return; //每次递归回来后,需要跳出循环

        } else if (position == 2) {
            return; // 直接退出

        }
    }

    //主页面
    public void Bank() {
        System.out.println("您要办理什么业务?  1.查询余额   2.存款   3.取款   4.离开  (请按下1~4按钮)");
        Scanner scan = new Scanner(System.in);
        int value = scan.nextInt(); // 循环判断输入字符是否有错误,如果有重复输入
        while (value != 1 && value != 2 && value != 3 && value != 4) {
            System.out.println("您输入的按钮有误! 请重新输入");
            System.out.println("1.查询余额   2.存款   3.取款   4.离开  (请按下1~4按钮)");
            value = scan.nextInt();
        }
        boolean flag = false; // 取钱失败后,重新进入取钱方法的开关
        while (true) {
            if (flag) { // 若开关为true,则进入case3的取款方法
                value = 3;
            }
            switch (value) {
            case 1: { // 查看余额
                balance();// 访问余额方法
                return;// 跳出while

            }

            case 2: { // 存钱方法
                System.out.println("请输入存款金额:");
                double money = scan.nextDouble();
                deposit(money); // 访问存钱方法
                return;// 结束递归后,跳出while

            }

            case 3: { // 取款
                System.out.println("请输入取款金额:");
                double money = scan.nextDouble();
                try {
                    withdraw(money); // 访问取款方法
                } catch (OverdraftException e) {// 取款不成功   捕获异常1.取款过大,不能透支 2.不想透支

                    System.out.println("1.重新取款 2.返回主页面 ");
                    int position = scan.nextInt();
                    while (position != 1 && position != 2) {
                        System.out.println("您输入的按钮有误! 请重新输入");
                        System.out.println("1.重新取款 2.返回主页面 ");
                        position = scan.nextInt();
                    }
                    if (position == 1) { // 重新取款
                        System.out.println("*****************************");
                        flag = true;// 打开flag开关,能重新进入case 3
                        break;// 回到while循环

                    } else if (position == 2) {
                        System.out.println("*****************************");
                        Bank();
                        return; // 结束递归后,跳出while

                    }

                }
                // 若取款成功,才执行下面的代码
                System.out.println("取出成功");
                if ((getBalance() < 0)) {
                    System.out.println("您已透支"); // 是否透支
                }
                System.out.println("当前金额为" + getBalance());// 返回余额
                returnButton(); //返回主页面的循环判断
                return;
            }

            case 4://直接离开
                return;

            }

        }

    }


    public static void main(String[] args) {
        System.out.println("设置存款:");  //设置存款,余额
        Scanner scan = new Scanner(System.in);
        double init = scan.nextDouble();
        Account user = new Account(init);
        System.out.println("设置透支额:");  //设置透支金额
        double deficit = scan.nextDouble();
        new OverdraftException(deficit);

        System.out.println("Welcome to ShenYuBank!!");
        user.Bank(); // 进入方法
        System.out.println("再见!");
    }
}

class OverdraftException extends Exception {
    /**
     * 无法完成透支取款的异常
     * 1.不进行透支取款2.透支金额不足
     */
    private static final long serialVersionUID = 1L;

    private static double deficit;

    public OverdraftException(double deficit) { // 设置透支金额的构造方法

        OverdraftException.deficit = deficit;

    }

    public double getDeficit() { // 获取透支金额的方法

        return deficit;

    }

    public OverdraftException(String message, double dificit) { // 取款金额过大的异常处理方法

        System.out.println("您当前可透支金额为:" + dificit);
        System.out.println("当前金额已超出您可透支的范围");

    }

    public OverdraftException(String message) {

        System.out.println(message); // 不进行透支的异常处理方法

    }

    public OverdraftException() {

        super();

    }

    public OverdraftException(String message, Throwable cause) {

        super(message, cause);

    }

    public OverdraftException(Throwable cause) {

        super(cause);

    }
}
二、I/O
1、文件对象:文件和文件夹都是用File代表
使用绝对路径或者相对路径创建File对象:
public static void main(String[] args) {
        // 绝对路径
        File f1 = new File("d:/LOLFolder");
        System.out.println("f1的绝对路径:" + f1.getAbsolutePath());
        // 相对路径,相对于工作目录,如果在eclipse中,就是项目目录
        File f2 = new File("LOL.exe");
        System.out.println("f2的绝对路径:" + f2.getAbsolutePath());

        // 把f1作为父目录创建文件对象
        File f3 = new File(f1, "LOL.exe");

        System.out.println("f3的绝对路径:" + f3.getAbsolutePath());
    }
文件常用方法:
public static void main(String[] args) {

        File f = new File("d:/LOLFolder/LOL.exe");
        System.out.println("当前文件是:" +f);
        //文件是否存在
        System.out.println("判断是否存在:"+f.exists());

        //是否是文件夹
        System.out.println("判断是否是文件夹:"+f.isDirectory());

        //是否是文件(非文件夹)
        System.out.println("判断是否是文件:"+f.isFile());

        //文件长度
        System.out.println("获取文件的长度:"+f.length());

        //文件最后修改时间
        long time = f.lastModified();
        Date d = new Date(time);
        System.out.println("获取文件的最后修改时间:"+d);
        //设置文件修改时间为1970.1.1 08:00:00
        f.setLastModified(0);

        //文件重命名
        File f2 =new File("d:/LOLFolder/DOTA.exe");
        f.renameTo(f2);
        System.out.println("把LOL.exe改名成了DOTA.exe");

        System.out.println("注意: 需要在D:\\LOLFolder确实存在一个LOL.exe,\r\n才可以看到对应的文件长度、修改时间等信息");
    }
public static void main(String[] args) throws IOException {
File f = new File("d:/LOLFolder/skin/garen.ski");
// 以字符串数组的形式,返回当前文件夹下的所有文件(不包含子文件及子文件夹)
f.list();
// 以文件数组的形式,返回当前文件夹下的所有文件(不包含子文件及子文件夹)
File[]fs= f.listFiles();
// 以字符串形式返回获取所在文件夹
f.getParent();
// 以文件形式返回获取所在文件夹
f.getParentFile();
// 创建文件夹,如果父文件夹skin不存在,创建就无效
f.mkdir();
// 创建文件夹,如果父文件夹skin不存在,就会创建父文件夹
f.mkdirs();
// 创建一个空文件,如果父文件夹skin不存在,就会抛出异常
f.createNewFile();
// 所以创建一个空文件之前,通常都会创建父目录
f.getParentFile().mkdirs();
// 列出所有的盘符c: d: e: 等等
f.listRoots();
// 刪除文件
f.delete();
// JVM结束的时候,刪除文件,常用于临时文件的删除
f.deleteOnExit();
}2、流(Stream):就是一系列的数据
当不同的介质之间有数据交互的时候,JAVA就使用流来实现。
数据源可以是文件,还可以是数据库,网络甚至是其他的程序
比如读取文件的数据到程序中,站在程序的角度来看,就叫做输入流
输入流: InputStream 把数据从硬盘的文件,读取到JVM(内存)
输出流:OutputStream
try {
            File f = new File("d:/lol.txt");
            // 创建基于文件的输入流
            FileInputStream fis = new FileInputStream(f);
            // 通过这个输入流,就可以把数据从硬盘,读取到Java的虚拟机中来,也就是读取到内存中

        } catch (IOException e) {
            // TODO Auto-generated catch block
            e.printStackTrace();
        }
3、字节流:用于以字节的形式读取和写入数据
InputStream字节输入流 读取
OutputStream字节输出流 写入
美国信息交换标准代码ASSII码:所有的数据存放在计算机中都是以数字的形式存放。 所以字母就需要转换为数字才能够存放。
以字节流的形式读取文件内容:
InputStream是字节输入流,同时也是抽象类,只提供方法声明,不提供方法的具体实现。
FileInputStream 是InputStream子类,以FileInputStream 为例进行文件读取
        try {
            //准备文件lol.txt其中的内容是AB,对应的ASCII分别是65 66
            File f =new File("d:/lol.txt");
            //创建基于文件的输入流
            FileInputStream fis =new FileInputStream(f);
            //创建字节数组,其长度就是文件的长度
            byte[] all =new byte[(int) f.length()];
            //以字节流的形式读取文件所有内容
            fis.read(all);
            for (byte b : all) {
                //打印出来是65 66
                System.out.println(b);
            }

            //每次使用完流,都应该进行关闭
            fis.close();

        } catch (IOException e) {
            // TODO Auto-generated catch block
            e.printStackTrace();
        }

    }
以字节流的形式向文件写入数据:
OutputStream是字节输出流,同时也是抽象类,只提供方法声明,不提供方法的具体实现。
FileOutputStream 是OutputStream子类,以FileOutputStream 为例向文件写出数据
注: 如果文件d:/lol2.txt不存在,写出操作会自动创建该文件。
但是如果是文件 d:/xyz/lol2.txt,而目录xyz又不存在,会抛出异常
        try {
            // 准备文件lol2.txt其中的内容是空的
            File f = new File("d:/lol2.txt");
            // 准备长度是2的字节数组,用88,89初始化,其对应的字符分别是X,Y
            byte data[] = { 88, 89 };

            // 创建基于文件的输出流
            FileOutputStream fos = new FileOutputStream(f);
            // 把数据写入到输出流
            fos.write(data);
            // 关闭输出流
            fos.close();

        } catch (IOException e) {
            // TODO Auto-generated catch block
            e.printStackTrace();
        }
4、关闭流的方式:
所有的流,无论是输入流还是输出流,使用完毕之后,都应该关闭。 如果不关闭,会产生对资源占用的浪费。 当量比较大的时候,会影响到业务的正常开展。
①、在try中关闭:
在try的作用域里关闭文件输入流,在前面的示例中都是使用这种方式,这样做有一个弊端;
如果文件不存在,或者读取的时候出现问题而抛出异常,那么就不会执行这一行关闭流的代码,存在巨大的资源占用隐患。 不推荐使用
②、在finally中关闭:这是标准的关闭流的方式
1. 首先把流的引用声明在try的外面,如果声明在try里面,其作用域无法抵达finally.
2. 在finally关闭之前,要先判断该引用是否为空
3. 关闭的时候,需要再一次进行try catch处理
    public static void main(String[] args) {
        File f = new File("d:/lol.txt");
        FileInputStream fis = null;
        try {
            fis = new FileInputStream(f);
            byte[] all = new byte[(int) f.length()];
            fis.read(all);
            for (byte b : all) {
                System.out.println(b);
            }

        } catch (IOException e) {
            e.printStackTrace();
        } finally {
            // 在finally 里关闭流
            if (null != fis)
                try {

                    fis.close();
                } catch (IOException e) {
                    // TODO Auto-generated catch block
                    e.printStackTrace();
                }
        }

    }
③、使用try()的方式:
把流定义在try()里,try,catch或者finally结束的时候,会自动关闭
这种编写代码的方式叫做 try-with-resources, 这是从JDK7开始支持的技术
所有的流,都实现了一个接口叫做 AutoCloseable,任何类实现了这个接口,都可以在try()中进行实例化。 并且在try, catch, finally结束的时候自动关闭,回收相关资源。
    public static void main(String[] args) {
        File f = new File("d:/lol.txt");

        //把流定义在try()里,try,catch或者finally结束的时候,会自动关闭
        try (FileInputStream fis = new FileInputStream(f)) {
            byte[] all = new byte[(int) f.length()];
            fis.read(all);
            for (byte b : all) {
                System.out.println(b);
            }
        } catch (IOException e) {
            e.printStackTrace();
        }

    }
5、字符流:专门用于字符形式的数据读取和写入。
Reader字符输入流
Writer字符输出流
使用字符流读取文件:FileReader 是Reader子类,以FileReader 为例进行文件读取
    public static void main(String[] args) {
        // 准备文件lol.txt其中的内容是AB
        File f = new File("d:/lol.txt");
        // 创建基于文件的Reader
        try (FileReader fr = new FileReader(f)) {
            // 创建字符数组,其长度就是文件的长度
            char[] all = new char[(int) f.length()];
            // 以字符流的形式读取文件所有内容
            fr.read(all);
            for (char b : all) {
                // 打印出来是A B
                System.out.println(b);
            }
        } catch (IOException e) {
            // TODO Auto-generated catch block
            e.printStackTrace();
        }

    }
使用字符流把字符串写入到文件:FileWriter 是Writer的子类,以FileWriter 为例把字符串写入到文件
    public static void main(String[] args) {
        // 准备文件lol2.txt
        File f = new File("d:/lol2.txt");
        // 创建基于文件的Writer
        try (FileWriter fr = new FileWriter(f)) {
            // 以字符流的形式把数据写入到文件中
            String data="abcdefg1234567890";
            char[] cs = data.toCharArray();
            fr.write(cs);

        } catch (IOException e) {
            // TODO Auto-generated catch block
            e.printStackTrace();
        }

    }
文件加密与文件解密:
6、编码:
经常接触的编码方式有如下几种:
ISO-8859-1 包含 ASCII
GB2312 是简体中文,BIG5是繁体中文,GBK同时包含简体和繁体以及日文。
UNICODE 包括了所有的文字,无论中文,英文,藏文,法文,世界所有的文字都包含其中
UNICODE(会有很大的资源浪费)的各种减肥子编码, 比如UTF-8对数字和字母就使用一个字节,而对汉字就使用3个字节
Java采用的是Unicode
文件的编码方式——记事本: 用记事本打开任意文本文件,并且另存为,就能够在编码这里看到一个下拉。
ANSI 这个不是ASCII的意思,而是采用本地编码的意思。如果你是中文的操作系统,就会使GBK,如果是英文的就会是ISO-8859-1
Unicode UNICODE原生的编码方式
Unicode big endian 另一个 UNICODE编码方式
UTF-8 最常见的UTF-8编码方式,数字和字母用一个字节, 汉字用3个字节。
文件的编码方式——eclipse: eclipse也有类似的编码方式,右键任意文本文件,点击最下面的"property"
就可以看到Text file encoding
也有ISO-8859-1,GBK,UTF-8等等选项。
其他的US-ASCII,UTF-16,UTF-16BE,UTF-16LE不常用。
①、用FileInputStream字节流正确读取中文: 为了能够正确的读取中文内容
1. 必须了解文本是以哪种编码方式保存字符的
2. 使用字节流读取了文本后,再使用对应的编码方式去识别这些数字,得到正确的字符
    public static void main(String[] args) {
        File f = new File("E:\\project\\j2se\\src\\test.txt");
        try (FileInputStream fis = new FileInputStream(f);) {
            byte[] all = new byte[(int) f.length()];
            fis.read(all);

            //文件中读出来的数据是
            System.out.println("文件中读出来的数据是:");
            for (byte b : all)
            {
                int i = b&0x000000ff;  //只取16进制的后两位
                System.out.println(Integer.toHexString(i));
            }
            System.out.println("把这个数字,放在GBK的棋盘上去:");
            String str = new String(all,"GBK");
            System.out.println(str);
        } catch (IOException e) {
            // TODO Auto-generated catch block
            e.printStackTrace();
        }

    }
②、用FileReader字符流正确读取中文: FileReader得到的是字符,所以一定是已经把字节根据某种编码识别成了字符了
而FileReader使用的编码方式是Charset.defaultCharset()的返回值,如果是中文的操作系统,就是GBK
FileReader是不能手动设置编码方式的,为了使用其他的编码方式,只能使用InputStreamReader来代替,像这样:
new InputStreamReader(new FileInputStream(f),Charset.forName("UTF-8"));
为什么中字前面有一个?
如果是使用记事本另存为UTF-8的格式,那么在第一个字节有一个标示符,叫做BOM用来标志这个文件是用UTF-8来编码的。
    public static void main(String[] args) throws UnsupportedEncodingException, FileNotFoundException {
        File f = new File("E:\\project\\j2se\\src\\test.txt");
        System.out.println("默认编码方式:"+Charset.defaultCharset());
        //FileReader得到的是字符,所以一定是已经把字节根据某种编码识别成了字符了
        //而FileReader使用的编码方式是Charset.defaultCharset()的返回值,如果是中文的操作系统,就是GBK
        try (FileReader fr = new FileReader(f)) {
            char[] cs = new char[(int) f.length()];
            fr.read(cs);
            System.out.printf("FileReader会使用默认的编码方式%s,识别出来的字符是:%n",Charset.defaultCharset());
            System.out.println(new String(cs));
        } catch (IOException e) {
            // TODO Auto-generated catch block
            e.printStackTrace();
        }
        //FileReader是不能手动设置编码方式的,为了使用其他的编码方式,只能使用InputStreamReader来代替
        //并且使用new InputStreamReader(new FileInputStream(f),Charset.forName("UTF-8")); 这样的形式
        try (InputStreamReader isr = new InputStreamReader(new FileInputStream(f),Charset.forName("UTF-8"))) {
            char[] cs = new char[(int) f.length()];
            isr.read(cs);
            System.out.printf("InputStreamReader 指定编码方式UTF-8,识别出来的字符是:%n");
            System.out.println(new String(cs));
        } catch (IOException e) {
            // TODO Auto-generated catch block
            e.printStackTrace();
        }

    }
7、缓存流:缓存流在读取的时候,会一次性读较多的数据到缓存中,以后每一次的读取,都是在缓存中访问,直到缓存中的数据读取完毕,再到硬盘中读取。
缓存流在写入数据的时候,会先把数据写入到缓存区,直到缓存区达到一定的量,才把这些数据,一起写入到硬盘中去。按照这种操作模式,就不会像字节流,字符流那样每写一个字节都访问硬盘,从而减少了IO操作
①、使用缓存流读取数据:缓存字符输入流 BufferedReader 可以一次读取一行数据
    public static void main(String[] args) {
        // 准备文件lol.txt其中的内容是
        // garen kill teemo
        // teemo revive after 1 minutes
        // teemo try to garen, but killed again
        File f = new File("d:/lol.txt");
        // 创建文件字符流
        // 缓存流必须建立在一个存在的流的基础上
        try (
                FileReader fr = new FileReader(f);
                BufferedReader br = new BufferedReader(fr);
            )
        {
            while (true) {
                // 一次读一行
                String line = br.readLine();
                if (null == line)
                    break;
                System.out.println(line);
            }
        } catch (IOException e) {
            // TODO Auto-generated catch block
            e.printStackTrace();
        }

    }
②、使用缓存流写出数据:PrintWriter 缓存字符输出流, 可以一次写出一行数据
    public static void main(String[] args) {
        // 向文件lol2.txt中写入三行语句
        File f = new File("d:/lol2.txt");

        try (
                // 创建文件字符流
                FileWriter fw = new FileWriter(f);
                // 缓存流必须建立在一个存在的流的基础上
                PrintWriter pw = new PrintWriter(fw);
        ) {
            pw.println("garen kill teemo");
            pw.println("teemo revive after 1 minutes");
            pw.println("teemo try to garen, but killed again");
        } catch (IOException e) {
            // TODO Auto-generated catch block
            e.printStackTrace();
        }

}③、flush:有的时候,需要立即把数据写入到硬盘,而不是等缓存满了才写出去。 这时候就需要用到flush
    public static void main(String[] args) {
        //向文件lol2.txt中写入三行语句
        File f =new File("d:/lol2.txt");
        //创建文件字符流
        //缓存流必须建立在一个存在的流的基础上
        try(FileWriter fr = new FileWriter(f);PrintWriter pw = new PrintWriter(fr);) {
            pw.println("garen kill teemo");
            //强制把缓存中的数据写入硬盘,无论缓存是否已满
                pw.flush();
            pw.println("teemo revive after 1 minutes");
                pw.flush();
            pw.println("teemo try to garen, but killed again");
                pw.flush();
        } catch (IOException e) {
            // TODO Auto-generated catch block
            e.printStackTrace();
        }
    }
8、数据流:
DataInputStream 数据输入流
DataOutputStream 数据输出流
直接进行字符串的读写:
使用数据流的writeUTF()和readUTF() 可以进行数据的格式化顺序读写
如本例,通过DataOutputStream 向文件顺序写出 布尔值,整数和字符串。 然后再通过DataInputStream 顺序读入这些数据。
注: 要用DataInputStream 读取一个文件,这个文件必须是由DataOutputStream 写出的,否则会出现EOFException,因为DataOutputStream 在写出的时候会做一些特殊标记,只有DataInputStream 才能成功的读取。
    public static void main(String[] args) {
        write();
        read();
    }

    private static void read() {
        File f =new File("d:/lol.txt");
        try (
                FileInputStream fis  = new FileInputStream(f);
                DataInputStream dis =new DataInputStream(fis);
        ){
            boolean b= dis.readBoolean();
            int i = dis.readInt();
            String str = dis.readUTF();

            System.out.println("读取到布尔值:"+b);
            System.out.println("读取到整数:"+i);
            System.out.println("读取到字符串:"+str);

        } catch (IOException e) {
            e.printStackTrace();
        }

    }

    private static void write() {
        File f =new File("d:/lol.txt");
        try (
                FileOutputStream fos  = new FileOutputStream(f);
                DataOutputStream dos =new DataOutputStream(fos);
        ){
            dos.writeBoolean(true);
            dos.writeInt(300);
            dos.writeUTF("123 this is gareen");
        } catch (IOException e) {
            e.printStackTrace();
        }

    }
9、对象流:可以直接把一个对象以流的形式传输给其他的介质,比如硬盘
一个对象以流的形式进行传输,叫做序列化。 该对象所对应的类,必须是实现Serializable接口
序列化一个对象:
    public static void main(String[] args) {
        //创建一个Hero garen
        //要把Hero对象直接保存在文件上,务必让Hero类实现Serializable接口
        Hero h = new Hero();
        h.name = "garen";
        h.hp = 616;

        //准备一个文件用于保存该对象
        File f =new File("d:/garen.lol");

        try(
            //创建对象输出流
            FileOutputStream fos = new FileOutputStream(f);
            ObjectOutputStream oos =new ObjectOutputStream(fos);
            //创建对象输入流
            FileInputStream fis = new FileInputStream(f);
            ObjectInputStream ois =new ObjectInputStream(fis);
        ) {
            oos.writeObject(h);
            Hero h2 = (Hero) ois.readObject();
            System.out.println(h2.name);
            System.out.println(h2.hp);

        } catch (IOException e) {
            // TODO Auto-generated catch block
            e.printStackTrace();
        } catch (ClassNotFoundException e) {
            // TODO Auto-generated catch block
            e.printStackTrace();
        }

    }
import java.io.Serializable;
public class Hero implements Serializable {
//表示这个类当前的版本,如果有了变化,比如新设计了属性,就应该修改这个版本号
private static final long serialVersionUID = 1L;
public String name;
public float hp;
}序列化数组:
package com.how2j.objectstream;

import java.io.Serializable;

public class Hero implements Serializable{
    private static long serialVersionID = 1L;
    public String name;
    public int hp;
    @Override
    public String toString() {
        return name + ":" + hp;
    }

}

package com.how2j.objectstream;

import java.io.EOFException;
import java.io.File;
import java.io.FileInputStream;
import java.io.FileNotFoundException;
import java.io.FileOutputStream;
import java.io.IOException;
import java.io.ObjectInputStream;
import java.io.ObjectOutputStream;

/**
 * 准备一个长度是10,类型是Hero的数组,使用10个Hero对象初始化该数组 然后把该数组序列化到一个文件heros.lol
 * 接着使用ObjectInputStream 读取该文件,并转换为Hero数组,验证该数组中的内容,是否和序列化之前一样
 *
 * @author litte
 *
 */
public class Test01 {
    public static void main(String[] args) throws EOFException {
        Hero[] heros = new Hero[10];
        for (int i = 0; i < heros.length; i++) {
            Hero hero = new Hero();
            hero.name = "hero";
            hero.hp = i;
            heros[i] = hero;
        }
        System.out.println("得到的序列化數組");
        for (Hero h : heros) {
            System.out.println(h);
        }

        File file = new File("E:" + File.separator + "TestFolder" + File.separator + "Hero.lol");
        FileInputStream fis = null;
        FileOutputStream fos = null;
        ObjectInputStream ois = null;
        ObjectOutputStream oos = null;
        try {
            // 将序列化数组写入到文件中
            fos = new FileOutputStream(file);
            oos = new ObjectOutputStream(fos);
            for (Hero h : heros) {
                oos.writeObject(h);
            }
            fis = new FileInputStream(file);
            ois = new ObjectInputStream(fis);
            Hero hero;
            System.out.println("查看文件中反序列化出来的数组中的每一个元素:");
            while ((hero = (Hero) ois.readObject()) != null) {
                if (hero != null) {
                    System.out.println(hero);
                }
            }
        } catch (FileNotFoundException e) {
            e.printStackTrace();
        } catch (IOException e) {
            e.printStackTrace();
        } catch (ClassNotFoundException e) {
            e.printStackTrace();
        } finally {
            if (fis != null || fos != null || ois != null || oos != null) {
                try {
                    ois.close();
                    fis.close();
                    oos.close();
                    fos.close();
                } catch (IOException e) {
                    e.printStackTrace();

                }
            }
        }
    }
}
10、System.out 是常用的在控制台输出数据的
System.in 可以从控制台输入数据
    public static void main(String[] args) {
        // 控制台输入
        try (InputStream is = System.in;) {
            while (true) {
                // 敲入a,然后敲回车可以看到
                // 97 13 10
                // 97是a的ASCII码
                // 13 10分别对应回车换行
                int i = is.read();
                System.out.println(i);
            }
        } catch (IOException e) {
            e.printStackTrace();
        }
    }
Scanner读取字符串: 使用System.in.read虽然可以读取数据,但是很不方便
使用Scanner就可以逐行读取了
            Scanner s = new Scanner(System.in);

            while(true){
                String line = s.nextLine();
                System.out.println(line);
            }
Scanner从控制台读取整数:
        Scanner s = new Scanner(System.in);
        int a = s.nextInt();
        System.out.println("第一个整数:"+a);
        int b = s.nextInt();
        System.out.println("第二个整数:"+b);
自动创建有一个属性的类文件。
通过控制台,获取类名,属性名称,属性类型,根据一个模板文件,自动创建这个类文件,并且为属性提供setter和getter