什么是appache:
apache就是一个网络服务器,这个服务器侦听一个TCP端口,一般是80,对端口收到的命令进行解释,然后提交一些结果。 apache是专门用来提供HTTP服务的,以及相关配置的(例如虚拟主机等)。
apache的基本配置
1:安装apache:
yum install httpd -y //安装
systemctl start httpd //开启http服务
firewalld-cmd --permanent --add-server=http(添加httpd服务<前提是防火墙是处于开启状态的>,这样就不用关闭防火墙,确保了主机的安全性,但是关闭防火墙也是可以的)
firewalld-cmd --reload (刷新防火墙,成功添加httpd服务)

netstat -antlupe | grep httpd //查看httpd的端口(默认端口为80)

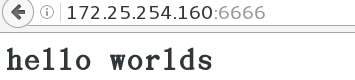
vim /var/www/html/index.html //默认发布文件编辑(hello,worlds),其中,/var/www/html为apache的默认发布目录,index.html为默认发布文件,编辑是<h1>的作用是改变字体大小的
![]()
![]()
浏览器测试(输入apache主机的ip172.25.254.160):看到的内容就是/var/www/html/index.html的内容

修改默认端口后的查询方式
1:系统默认httpd服务可以使用的端口:
vim /etc/httpd/conf/httpd.conf //编辑配置文件 ,每次修改完配置文件后都要都要重起服务
![]() 将端口值修改为8080
将端口值修改为8080
listen 8080; //将原来的80改为现在的8080;
systemctl restart httpd //重启服务
netstat -antlupe | grep httpd //查看此时的端口是否是修改后的8080

firewalld-cmd --permanent --add-port=8080/tcp //执行防火墙添加端口命令(但是之前不是给防火墙添加httpd服务,而是关闭了防火墙,则不需要这一步)
firewalld-cmd --reload //刷新

semange port -l | grep http //查看http服务的端口(8080端口为系统带的)

浏览器查询(这里的端口已经不是默认的了,需要指定端口):
172.25.254.160:8080
2:系统不默认给httpd服务使用的端口 例如:6666(semange -port -l | grep http可以查看http可以使用的端口)
vim /etc/httpd/conf/httpd.conf //编辑配置文件 将端口值换成6666
![]()
firewalld-cmd --permanent --add-port=6666/tcp //执行防火墙添加端口命令
firewalld-cmd --reload //刷新
firewalld-cmd --list-all(查看httpd服务可以使用的端口)

netstat -antlupe | grep httpd //查看此时的端口

浏览器查询:
做完实验之后将端口恢复至80,不要影响后面的实验;
重新指定默认发布目录
[root@server ~]# mkdir /westos/web/html -p //建立新的目录
[root@server ~]# cd /westos/web/html/
[root@server html]# pwd //查询当前目录
/westos/web/html
[root@server html]# vim yyzz.html //编辑文件内容(内容为yyzz)
[root@server html]# vim /etc/httpd/conf/httpd.conf //编辑配置文件 还要讲默认发布文件改为yyzz.html,该默认发布文件谁在前默 认发布谁


修改默认发布目录需要修改安全上下文
![]()
刷新
![]()
[root@server html]# systemctl restart httpd //重启服务
浏览器检测:默认发布目录就发生了改变

重新指定默认发布文件(谁在前就默认发布谁,此处的westos.html index.html 都是/var/www/html目录下的,之前做的修改默 认发布目录的操作注释掉)系统默认的apache发布文件为/var/www/html目录下的index.html文件
之前index.html中的内容为hello,worlds
[root@server html]# vim /etc/httpd/conf/httpd.conf //编辑配置文件

浏览器检测:

注意:要想直接输入apache主机的ip而查看文件的内容,修改默认发布目录和修改默认发布文件要对应,一定要是默认发布目录下的默认发布文件,默认发布目录和默认发布文件都要修改都要修改
虚拟主机(用一个ip发布多个节点的测试页)
1、首先完成本地解析(真机上进行):
vim /etc/hosts //本地解析文件
172.25.254.160 www.westos.com music.westos.com news.westos.com
![]()
2、在虚拟机server完成以下操作(完成apache配置的主机)一定要将目录建立在/var/www下,apache的默认发布目录
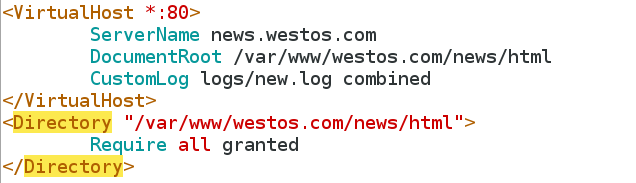
[root@server ~]# mkdir /var/www/westos.com/news/html -p //建立发布目录
[root@server ~]# mkdir /var/www/westos.com/music/html -p
[root@server ~]# vim /var/www/westos.com/news/html/index.html //编辑news.westos.com发布内容
![]()
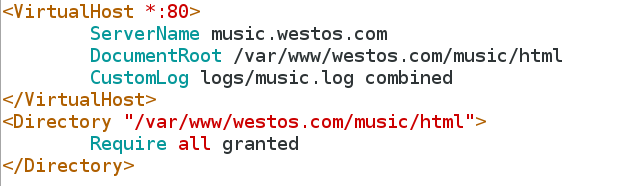
[root@server ~]# vim /var/www/westos.com/music/html/index.html //编辑music.westos.com发布内容
![]()
[root@server ~]# vim /var/www/html/index.html //编辑www.westos.com发布内容
![]()
 修改相关的配置文件:
[root@server ~]# cd /etc/httpd/conf.d/ //cd到httpd服务的配置文件所在的目录下
[root@server conf.d]# vim a_default.conf //编辑默认网页发布的文件 (www.westos.com)

[root@server conf.d]# cp a_default.conf news.conf //前面的有些内容
[root@server conf.d]# vim news.conf //编辑news.westos.com发布内容
[root@server conf.d]# cp news.conf music.conf //复制一份
[root@server conf.d]# vim music.conf //更改所有的news为music :%s/news/music/
[root@server conf.d]# systemctl restart httpd //重启服务

浏览器(配置本地解析的那台主机的浏览器)测试:


访问控制:白名单和黑名单
[root@server ~]# vim a_default.conf 编辑文件(系统默认的发布目录):对某些ip进行访问控制;
[root@server ~]# systemctl restart httpd //重启服务

Order Allow,Deny //先读取白名单的内容,后读取黑名单的内容
Allow from All //白名单:允许所有ip进行访问
Deny from 172.25.254.60 //黑名单,禁止ip为172.25.254.60进行访问;
浏览器检测:
1:ip=172.25.254.60的主机:

2:其他主机进行测试:

注意:此处的Allow和Deny的顺序不是随意的,谁在前先执行谁,后面的会覆盖前面的
例如:Allow在前,Deny在后,意思就是所有的都能访问,处理ip=172.25.254.60的这台主机
如果Deny在前,Allow在后,意思就是ip=172.25.254.60的这台主机不能访问,但是后面执执
行的Allow命令会把前面的Deny命令的内容给覆盖掉,就变成了,所有的主机就都能进行访问了
基于用户的访问控制(网站访问加密)
指定单个用户进行访问
准备实验环境:注释刚刚ip的设定
[root@server conf.d]# htpasswd -cm apacheuser yz1 //修改tom的密码
[root@server conf.d]# htpasswd -m apacheuser yz2 //加上-c会覆盖之前的内容(如果想要创建多个用户时就不能加-c)
(例如加-c创建用户yz1之后,之前的yz用户就被覆盖了)
[root@server conf.d]# cat apacheuser //查看用户及密码信息

[root@server ~]# vim a_default.conf 编辑文件(系统默认的发布目录),也可以对别的目录进行操作,对哪个目录进行操作就修改 哪个的配置文件,默认发布目录只是进行操作比较方便

配置文件中:Require user yz1 (只允许yz1用户,输入用户名和密码进行访问,其他的用户即使拥有密码也不能访问,例如yz2)
但是在配置文件中写的是:这说明只要拥有用户名和密码就能进行访问
![]()
[root@server ~]# systemctl restart httpd //重启服务
浏览器进行检测:输入用户名和密码才能进行访问

php语言支持
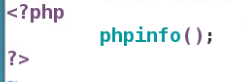
[root@server html]# yum install php -y //安装软件
[root@server html]# vim index.php //编辑php类型文本
[root@server html]# systemctl restart httpd //重启服务
浏览器检测:

cgi
[root@server conf.d]# cd /var/www
[root@server www]# cd cgi-bin
[root@server cgi-bin]# vim index.cgi //编辑cgi脚本
#!/usr/bin/perl
print "Content-type: text/html\n\n";
print `date`; //显示日期

[root@server cgi-bin]# chmod +x index.cgi //赋予可执行权限
[root@server cgi-bin]# ./cgi/index.cgi //执行脚本

浏览器中查看脚本执行的结果:

如果在浏览器输入的内容是:172.25.254.160/cgi/index.cgi时,看到的只是脚本的内容而不是脚本执行的内容

此时修改默认发布目录的配置文件:(一定要将之前做的内容给注释掉,否则会对后年的实验造成影响实验)
[root@server ~]# vim a_default.conf 编辑文件(系统默认的发布目录)

还要对安全上下文进行修改:之前浏览器能够执行172.25.254.160/cgi-bin/index.cgi可以看到脚本执行的结果,因为/car/www/cgi-bin的安全上下文是httpd_sys_script_exec_t格式的
修改目录/var/www/html/cgi的安全上下文:、

[root@server html]# systemctl restart httpd //重启服务
浏览器进行检测:

自定义自签名证书
[root@server ~]# yum install mod_ssl -y
![]()
[root@server ~]# yum install crypto-utils.x86_64 -y
![]()
[root@server ~]# genkey www.westos.com //执行此命令后进入自定义设置界面


上述操作结束后可以就看到生成了两个文件,一个是证书,一个是秘钥

[root@server ~]# vim /etc/httpd/conf.d/ssl.conf //安装证书及其私钥
SSLCertificateFile /etc/pki/tls/certs/www.westos.com.crt
SSLCertificateKeyFile /etc/pki/tls/private/www.westos.com.key
[root@server ~]# systemctl restart httpd //重启服务

打开浏览器,必须是本机的浏览器(我就是在server浏览器中)
输入 https://www.westos.com(点击锁的样式,看证书是否是自定义的;)


可以查看到证书是自己定义的

网页重写
在真机的地址解析添加:在172.25.254.160后面添加login.westos.com
![]()
在虚拟机完成以下操作:
[root@server westos.com]# mkdir login/html
[root@server westos.com]# vim login/html/index.html
[root@server conf.d]# cp new.conf login.conf
[root@desktop conf.d]# vim login.conf

[root@server conf.d]# systemctl restart httpd //重启服务
此时浏览器检测:

但是我想让它自动转换为https:
vim /etcs/httpd/conf.d/login.conf //修改配置文件

[root@server conf.d]# systemctl restart httpd //重启服务
浏览器进行检测(需要证书进行认证,注意缓存的清除):


可知自动转换到https
Python语言的支持
[root@server Desktop]# cd /var/www/
[root@server www]# cd cgi-bin
[root@server conf.d]# vim webapp.conf //编辑配置文件

[root@server cgi-bin]# vim webapp.wsgi //写入支持Python的脚本

[root@server cgi-bin]# python webapp.wsgi
[root@server cgi-bin]#chmod +x webapp.wsgi //给予执行的权限
[root@server cgi-bin]# yum install mod_wsgi.x86_64 -y //安装相关的插件
![]()
真机进行解析 vim /hosts
![]()
浏览器进行检测:可以看到脚本执行的结果,说明http支持Python语言

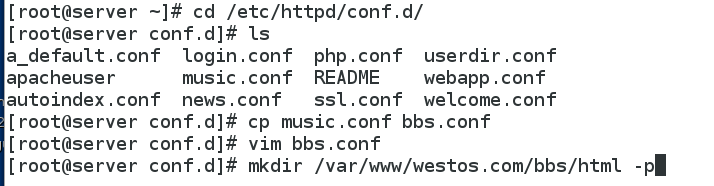
bbs论坛的安装方法
在/etc/httpd/conf.d/目录中建立bbs的配置文件目录
[root@server conf.d]# vim bbs.conf
[root@server conf.d]# mkdir /var/www/westos.com/bbs/html -p //建立bbs发布目录
获取相关的文件压缩包:把文件直接拷贝到/var/www/westos.com/html目录下

[root@server html]# unzip Discuz_x3.2_SC_UTF8.zip //对文件进行解压,解压后,删除原来的压缩包,节省空间
[root@server html]# cd upload //在此目录下,给相关目录权限目录权限,否则无法安装bbs论坛,会有许多叉号
[root@server upload]# chmod -R 777 config
[root@server upload]# chmod -R 777 data
[root@server upload]# chmod -R 777 uc_client uc_server
[root@server upload]# setenforce 0 /修改内核级防火墙的状态
[root@server upload]#getsebool -a | grep httpd //查看所需要打开的服务

[root@server upload]# setbool -P httpd_anon_write on //打开相关的服务
![]()
![]()

![]()
给过相关的文件权限后,发现需要数据库的支持


[root@server upload]# vim /etc/my.cnf //隐藏数据库的端口

![]()
[root@server upload]# mysql_secure_installation #安全初始化脚本
[root@server upload]# yum install php-mysql.x86_64 -y //安装所需的插件,使得数据库支持相关的服务
![]()
[root@server upload]# systemctl restart httpd //重启服务
浏览器检测:就可以正常安装了(bbs.westos.com/upload/install)


翻墙(不能上网的主机,通过能上网的主机上网)
squid正向代理
1:打开真机防火墙,当成路由器,真机也要能上网 ping www.bsidu.com 要能ping通
2:给防火墙添加masquerade服务

3:打开一台主机,必须是没有安装过apache的,修改其配置文件,让它能上网(我用的是Desktop虚拟机)


4:systemctl restart network 重启网络服务
5: route -n 查看网关是否存在
6:ping www.baidu.com 发现可以ping通百度,能上网
保有有一台主机(desktop主机可以上网)可以上网,另一台主机(server主机)想要上网必须通过有网的主机缓存
yum install squid -y //安装squid代理所需的插件
vim /etc/squid/squid.conf
56 http_access allow all
62 cache_dir ufs /var/spool/squid 100 16 256 //取消这行的注释
![]()
![]()
systemctl start squid
输入百度的网址,测试可以看到网页,但是真实访问的不是真实的网页,而是172.25.254.180这台主机的缓存
在不能上网的主机浏览器中(server主机)


此时浏览器中: www.baidu.com 就可以了

squid反向代理
实现了两次加速;
实验需要2个主机:
主机作为服务端,相当于深圳;server作为中介,相当于西安;
主机(服务端):设置好httpd服务
server:
yum install squid -y //安装squid;
systemctl stop firewalld //关闭火墙
vim /etc/squid/suqid.conf
56 http_access allow all
59 http_port 80 vhost vport //虚拟主机和虚拟端口
![]()
60 cache_peer 172.25.254.160 parent 80 0 proxy-only //通过80端口缓存自己没有的东西
systemctl start squid
打开浏览器,关闭网络代理:preferences–>Advanced–>Network–>Settings–>No Proxy
在server(客户端)浏览器中查询ip:172.25.254.160可以看到apache的发布内容;
对www.westos.com的轮询
需要有两台主机的域名都是www.westos.com 然后在浏览器中,相互轮询查看www.westos.com的内容
修改配置文件:
vim /etc/squid/suqid.conf

浏览器检测:

刷新一次后,就轮到172.25.254.130这台主机了

修改轮询的次数:172.25.254.100执行两次才轮到172.25.254.130执行一次
