前景回顾:
【手把手TensorFlow】一、从开始使用TensorFlow到弄清楚“搭建神经网络套路”
【手把手TensorFlow】二、神经网络优化
【手把手TensorFlow】三、神经网络搭建完整框架+MNIST数据集实践
一、实现模型识别手动输入的图片
根据我们前面提到的搭建神经网络框架,我们先搭建神经网络框架并训练。
1.前向传播mnist_forward.py
import tensorflow as tf

INPUT_NODE = 784
OUTPUT_NODE = 10
LAYER1_NODE = 500

def get_weight(shape, regularizer):
    w = tf.Variable(tf.truncated_normal(shape,stddev=0.1))
    if regularizer != None: tf.add_to_collection('losses', tf.contrib.layers.l2_regularizer(regularizer)(w))
    return w


def get_bias(shape):
    b = tf.Variable(tf.zeros(shape))
    return b

def forward(x, regularizer):
    w1 = get_weight([INPUT_NODE, LAYER1_NODE], regularizer)
    b1 = get_bias([LAYER1_NODE])
    y1 = tf.nn.relu(tf.matmul(x, w1) + b1)

    w2 = get_weight([LAYER1_NODE, OUTPUT_NODE], regularizer)
    b2 = get_bias([OUTPUT_NODE])
    y = tf.matmul(y1, w2) + b2
    return y
2.反向传播mnist_backward.py
import tensorflow as tf
from tensorflow.examples.tutorials.mnist import input_data
import mnist_forward
import os

BATCH_SIZE = 200
LEARNING_RATE_BASE = 0.1
LEARNING_RATE_DECAY = 0.99
REGULARIZER = 0.0001
STEPS = 50000
MOVING_AVERAGE_DECAY = 0.99
MODEL_SAVE_PATH="./model/"
MODEL_NAME="mnist_model"


def backward(mnist):

    x = tf.placeholder(tf.float32, [None, mnist_forward.INPUT_NODE])
    y_ = tf.placeholder(tf.float32, [None, mnist_forward.OUTPUT_NODE])
    y = mnist_forward.forward(x, REGULARIZER)
    global_step = tf.Variable(0, trainable=False)

    ce = tf.nn.sparse_softmax_cross_entropy_with_logits(logits=y, labels=tf.argmax(y_, 1))
    cem = tf.reduce_mean(ce)
    loss = cem + tf.add_n(tf.get_collection('losses'))

    learning_rate = tf.train.exponential_decay(
        LEARNING_RATE_BASE,
        global_step,
        mnist.train.num_examples / BATCH_SIZE,
        LEARNING_RATE_DECAY,
        staircase=True)

    train_step = tf.train.GradientDescentOptimizer(learning_rate).minimize(loss, global_step=global_step)

    ema = tf.train.ExponentialMovingAverage(MOVING_AVERAGE_DECAY, global_step)
    ema_op = ema.apply(tf.trainable_variables())
    with tf.control_dependencies([train_step, ema_op]):
        train_op = tf.no_op(name='train')

    saver = tf.train.Saver()

    with tf.Session() as sess:
        init_op = tf.global_variables_initializer()
        sess.run(init_op)

        ckpt = tf.train.get_checkpoint_state(MODEL_SAVE_PATH)
        if ckpt and ckpt.model_checkpoint_path:
            saver.restore(sess, ckpt.model_checkpoint_path)

        for i in range(STEPS):
            xs, ys = mnist.train.next_batch(BATCH_SIZE)
            _, loss_value, step = sess.run([train_op, loss, global_step], feed_dict={x: xs, y_: ys})
            if i % 1000 == 0:
                print("After %d training step(s), loss on training batch is %g." % (step, loss_value))
                saver.save(sess, os.path.join(MODEL_SAVE_PATH, MODEL_NAME), global_step=global_step)


def main():
    mnist = input_data.read_data_sets("./data/", one_hot=True)
    backward(mnist)

if __name__ == '__main__':
    main()
3.测试程序mnist_test.py
#coding:utf-8
import time
import tensorflow as tf
from tensorflow.examples.tutorials.mnist import input_data
import mnist_forward
import mnist_backward
TEST_INTERVAL_SECS = 5

def test(mnist):
    with tf.Graph().as_default() as g:
        x = tf.placeholder(tf.float32, [None, mnist_forward.INPUT_NODE])
        y_ = tf.placeholder(tf.float32, [None, mnist_forward.OUTPUT_NODE])
        y = mnist_forward.forward(x, None)

        ema = tf.train.ExponentialMovingAverage(mnist_backward.MOVING_AVERAGE_DECAY)
        ema_restore = ema.variables_to_restore()
        saver = tf.train.Saver(ema_restore)

        correct_prediction = tf.equal(tf.argmax(y, 1), tf.argmax(y_, 1))
        accuracy = tf.reduce_mean(tf.cast(correct_prediction, tf.float32))

        while True:
            with tf.Session() as sess:
                ckpt = tf.train.get_checkpoint_state(mnist_backward.MODEL_SAVE_PATH)
                if ckpt and ckpt.model_checkpoint_path:
                    saver.restore(sess, ckpt.model_checkpoint_path)
                    global_step = ckpt.model_checkpoint_path.split('/')[-1].split('-')[-1]
                    accuracy_score = sess.run(accuracy, feed_dict={x: mnist.test.images, y_: mnist.test.labels})
                    print("After %s training step(s), test accuracy = %g" % (global_step, accuracy_score))
                else:
                    print('No checkpoint file found')
                    return
            time.sleep(TEST_INTERVAL_SECS)

def main():
    mnist = input_data.read_data_sets("./data/", one_hot=True)
    test(mnist)

if __name__ == '__main__':
    main()
经过上述3步我们就建立了一个完整的训练框架,但要是我们现在手里有10个图片,如下图,我们应该怎么应用训练好的模型判断呢?

所以我们引入应用程序代码:
4.应用程序mnist_app.py
#coding:utf-8
import tensorflow as tf
import numpy as np
from PIL import Image
import mnist_backward
import mnist_forward
def restore_model(testPicArr):
with tf.Graph().as_default() as tg:
x = tf.placeholder(tf.float32, [None, mnist_forward.INPUT_NODE])
y = mnist_forward.forward(x, None)
preValue = tf.argmax(y, 1)
variable_averages = tf.train.ExponentialMovingAverage(mnist_backward.MOVING_AVERAGE_DECAY)
variables_to_restore = variable_averages.variables_to_restore()
saver = tf.train.Saver(variables_to_restore)
with tf.Session() as sess:
ckpt = tf.train.get_checkpoint_state(mnist_backward.MODEL_SAVE_PATH)
if ckpt and ckpt.model_checkpoint_path:
saver.restore(sess, ckpt.model_checkpoint_path)
preValue = sess.run(preValue, feed_dict={x:testPicArr})
return preValue
else:
print("No checkpoint file found")
return -1
def pre_pic(picName):
img = Image.open(picName)
reIm = img.resize((28,28), Image.ANTIALIAS)
im_arr = np.array(reIm.convert('L'))
threshold = 50
for i in range(28):
for j in range(28):
im_arr[i][j] = 255 - im_arr[i][j]
if (im_arr[i][j] < threshold):
im_arr[i][j] = 0
else: im_arr[i][j] = 255
nm_arr = im_arr.reshape([1, 784])
nm_arr = nm_arr.astype(np.float32)
img_ready = np.multiply(nm_arr, 1.0/255.0)
return img_ready
def application():
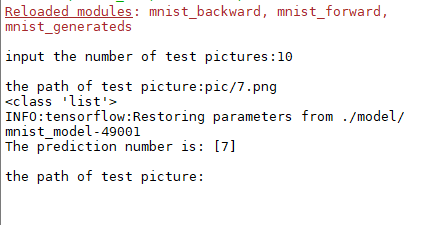
testNum = input("input the number of test pictures:")
for i in range(int(testNum)):
testPic = input("the path of test picture:")
testPicArr = pre_pic(testPic)
print(type(list(testPicArr)))
preValue = restore_model(list(testPicArr))
print("The prediction number is:", preValue)
def main():
application()
if __name__ == '__main__':
main()
任务分成两个函数完成:
1)testPicArr = pre_pic(testPic)对手写数字图片做预处理
2)preValue = restore_model(testPicArr) 将符合神经网络输入要求的图片喂给复现的神经网络模型,输出预测值
处理具体过程:
- 模型要求为黑底白字,所以需要将输入像素点改为255减去原值得到互补的反色。
- 进行二值化处理
- 将形状拉为1行784列,并把值变为浮点型
- 让现有RGB图从0-25的变为0-1之间的浮点数
- 计算输出的y,y的最大值所对应的索引为预测结果
运行结果:
二、自己生成数据集进行训练
1.生成数据集mnist_generateds.py
#coding:utf-8
import tensorflow as tf
import numpy as np
from PIL import Image
import os

image_train_path='./mnist_data_jpg/mnist_train_jpg_60000/'
label_train_path='./mnist_data_jpg/mnist_train_jpg_60000.txt'
tfRecord_train='./data/mnist_train.tfrecords'
image_test_path='./mnist_data_jpg/mnist_test_jpg_10000/'
label_test_path='./mnist_data_jpg/mnist_test_jpg_10000.txt'
tfRecord_test='./data/mnist_test.tfrecords'
data_path='./data'
resize_height = 28
resize_width = 28
# =============================================================================
# 生成tfrecords文件
# =============================================================================
def write_tfRecord(tfRecordName, image_path, label_path):
    #新建一个writer
    writer = tf.python_io.TFRecordWriter(tfRecordName)
    num_pic = 0
    f = open(label_path, 'r')
    contents = f.readlines()
    f.close()
    for content in contents:
        value = content.split()
        img_path = image_path + value[0]
        img = Image.open(img_path)
        img_raw = img.tobytes()
        labels = [0] * 10
        labels[int(value[1])] = 1
        #以键值对的方式存储训练数据  ,封装到example中。
        example = tf.train.Example(features=tf.train.Features(feature={
                'img_raw': tf.train.Feature(bytes_list=tf.train.BytesList(value=[img_raw])),
                'label': tf.train.Feature(int64_list=tf.train.Int64List(value=labels))
                }))
        #将example进行序列化
        writer.write(example.SerializeToString())
        num_pic += 1
        print ("the number of picture:", num_pic)
    writer.close()
    print("write tfrecord successful")

def generate_tfRecord():
    isExists = os.path.exists(data_path)
    if not isExists:
        os.makedirs(data_path)
        print('The directory was created successfully')
    else:
        print ('directory already exists' )
    write_tfRecord(tfRecord_train, image_train_path, label_train_path)
    write_tfRecord(tfRecord_test, image_test_path, label_test_path)

# =============================================================================
# 解析tfrecords文件
# =============================================================================
def read_tfRecord(tfRecord_path):
    #生成先入先出序列,文件阅读器会使用它来读数据
    filename_queue = tf.train.string_input_producer([tfRecord_path], shuffle=True)
    reader = tf.TFRecordReader()
    _, serialized_example = reader.read(filename_queue)
    features = tf.parse_single_example(serialized_example,
                                       features={
                                        'label': tf.FixedLenFeature([10], tf.int64),
                                        'img_raw': tf.FixedLenFeature([], tf.string)
                                        })
    img = tf.decode_raw(features['img_raw'], tf.uint8)
    img.set_shape([784])
    img = tf.cast(img, tf.float32) * (1. / 255)
    label = tf.cast(features['label'], tf.float32)
    return img, label

def get_tfrecord(num, isTrain=True):
    if isTrain:
        tfRecord_path = tfRecord_train
    else:
        tfRecord_path = tfRecord_test
    img, label = read_tfRecord(tfRecord_path)
    img_batch, label_batch = tf.train.shuffle_batch([img, label],
                                                    batch_size = num,
                                                    num_threads = 2,
                                                    capacity = 1000,
                                                    min_after_dequeue = 700)
    return img_batch, label_batch

def main():
    generate_tfRecord()

if __name__ == '__main__':
    main()
tfrecords 文件
1)tfrecords:是一种二进制文件,可先将图片和标签制作成该格式的文件。使用 tfrecords 进行数据读取,会提高内存利用率。
2)tf.train.Example: 用来存储训练数据。训练数据的特征用键值对的形式表示。
3)SerializeToString( ):把数据序列化成字符串存储。
filename_queue = tf.train.string_input_producer([tfRecord_path]) 该函数会生成一个先入先出的队列,文件阅读器会使用它来读取数据。
除此之外,反向传播文件修改图片标签获取的接口(mnist_backward.py),并且利用多线程提高图片和标签的批获取效率 。
2.mnist_backward.py
import tensorflow as tf
from tensorflow.examples.tutorials.mnist import input_data
import mnist_forward
import os
import mnist_generateds#1

BATCH_SIZE = 200
LEARNING_RATE_BASE = 0.1
LEARNING_RATE_DECAY = 0.99
REGULARIZER = 0.0001
STEPS = 50000
MOVING_AVERAGE_DECAY = 0.99
MODEL_SAVE_PATH="./model/"
MODEL_NAME="mnist_model"
train_num_examples = 60000#2

def backward():

    x = tf.placeholder(tf.float32, [None, mnist_forward.INPUT_NODE])
    y_ = tf.placeholder(tf.float32, [None, mnist_forward.OUTPUT_NODE])
    y = mnist_forward.forward(x, REGULARIZER)
    global_step = tf.Variable(0, trainable=False)

    ce = tf.nn.sparse_softmax_cross_entropy_with_logits(logits=y, labels=tf.argmax(y_, 1))
    cem = tf.reduce_mean(ce)
    loss = cem + tf.add_n(tf.get_collection('losses'))

    learning_rate = tf.train.exponential_decay(
        LEARNING_RATE_BASE,
        global_step,
        train_num_examples / BATCH_SIZE,
        LEARNING_RATE_DECAY,
        staircase=True)

    train_step = tf.train.GradientDescentOptimizer(learning_rate).minimize(loss, global_step=global_step)

    ema = tf.train.ExponentialMovingAverage(MOVING_AVERAGE_DECAY, global_step)
    ema_op = ema.apply(tf.trainable_variables())
    with tf.control_dependencies([train_step, ema_op]):
        train_op = tf.no_op(name='train')

    saver = tf.train.Saver()
    img_batch, label_batch = mnist_generateds.get_tfrecord(BATCH_SIZE, isTrain=True)#3

    with tf.Session() as sess:
        init_op = tf.global_variables_initializer()
        sess.run(init_op)

        ckpt = tf.train.get_checkpoint_state(MODEL_SAVE_PATH)
        if ckpt and ckpt.model_checkpoint_path:
            saver.restore(sess, ckpt.model_checkpoint_path)
        #开启线程协调器
        coord = tf.train.Coordinator()#4
        threads = tf.train.start_queue_runners(sess=sess, coord=coord)#5

        for i in range(STEPS):
            xs, ys = sess.run([img_batch, label_batch])#6
            _, loss_value, step = sess.run([train_op, loss, global_step], feed_dict={x: xs, y_: ys})
            if i % 1000 == 0:
                print("After %d training step(s), loss on training batch is %g." % (step, loss_value))
                saver.save(sess, os.path.join(MODEL_SAVE_PATH, MODEL_NAME), global_step=global_step)
        #关闭线程协调器
        coord.request_stop()#7
        coord.join(threads)#8


def main():
    backward()#9

if __name__ == '__main__':
    main()
其中mnist_test.py和mnist_app.py对获取数据都需要一点改动。最终便有了生成数据集并应用的案例。
参考中国MOOC《TensorFlow笔记》——北京大学 曹健老师