异常处理
之前学JAVA-WEB的时候一直有这么一个概念,数据库查,查不到信息,null 然后主动抛出一个异常,然后捕获住,获取一个writer 返回给前端,对不起我没有找到。我去,太经典了 有没有。就像下面一样。
@WebServlet(name = "TestServlet", urlPatterns = "/testServlet")
public class TestServlet extends HttpServlet {
    protected void doPost(HttpServletRequest request, HttpServletResponse response) throws ServletException, IOException {

    }

    protected void doGet(HttpServletRequest request, HttpServletResponse response) throws ServletException, IOException {

        if (request.getParameter("test") == null) {
            try {
                throw new MyNullException("参数未找到");
            } catch (MyNullException e) {
                response.getWriter().write("Not Found");
            }
        }

    }
}
这种是属于继承自Exception的受查型异常。受查型和非受查型异常,可有参考下面的文章:https://blog.csdn.net/u013142781/article/details/50609488
捕获之后输出即可。但是这样会在原来的代码里面充斥着大量的捕获代码。也比较乱,后来入手了SpringMVC,发现了新大陆。主要有三种方法。
SimpleMappingExceptionResolver
简介:
一种简单的异常处理,和它的名字一样,简单的映射异常处理。简单概括来说,就是你的某一个异常对应着一个页面进行显示。
配置:
<bean class="org.springframework.web.servlet.handler.SimpleMappingExceptionResolver">
        <!--默认的全局异常处理页面-->
        <property name="defaultErrorView" value="error.jsp"/>
        <property name="exceptionMappings">
            <props>
                <prop key="exception.UserException">error</prop>
            </props>
        </property>
    </bean>
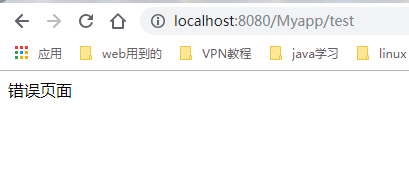
效果:
2018-12-11 14:58:24 DEBUG SimpleMappingExceptionResolver:259 - Resolving to view 'error' based on mapping [exception.UserException]
2018-12-11 14:58:24 WARN  SimpleMappingExceptionResolver:140 - Resolved [exception.UserException: 没有这样的用户] to ModelAndView [view="error"; model={exception=exception.UserException: 没有这样的用户}]
2018-12-11 14:58:24 DEBUG DispatcherServlet:1319 - Using resolved error view: ModelAndView [view="error"; model={exception=exception.UserException: 没有这样的用户}]
2018-12-11 14:58:24 DEBUG JstlView:309 - View name 'error', model {exception=exception.UserException: 没有这样的用户}
2018-12-11 14:58:24 DEBUG JstlView:168 - Forwarding to [/WEB-INF/jsp/error.jsp]
2018-12-11 14:58:25 DEBUG DispatcherServlet:1123 - Completed 200 OK
优缺点
- 优点:简单易用。一个异常直接跳转到另一个页面。
- 缺点:现在前后端分离,如果你想回复给前端json数据,这个就不能满足需求了。
接口HandlerExceptionResolver
介绍
接口方法。
public ModelAndView resolveException(
            HttpServletRequest request, HttpServletResponse response,
            Object o, Exception e)
这个接口是异常处理的关键接口。瞅这个request和response就知道应该属于较底层的了。
思路
通常都有一个exception package包来存放自定义的异常。之前我的做法是,定义很多的异常类,一个UserException分成几个,在网上找了一下发现了一个好方法。一个总的异常类,我们可以使用枚举来定义具体的异常。最后通过一个类来封装相应的信息,作为传递给前端json数据的承载bean。之后只需要通过jackson来返回相应的json数据。
枚举类
枚举类,你想定义什么异常,异常有哪些属性你可以在里面写,这样的好处是什么?比如UserException你不用再定义多个继承RuntimeException的类。你相加直接在枚举类里面多一条数据。至于类需要什么属性,你可以直接进行调整。当我看到这个方法的时候,我很兴奋。一下子省略了很多的Exception类= =。
public enum UserExceptionEnum {
    NO_SUCH_USER(1, "没有这样的用户");

    private Integer code;
    private String message;

    UserExceptionEnum(Integer code, String message) {
        this.code = code;
        this.message = message;
    }

    public Integer getCode() {
        return code;
    }

    public void setCode(Integer code) {
        this.code = code;
    }

    public String getMessage() {
        return message;
    }

    public void setMessage(String message) {
        this.message = message;
    }
}
自定义异常类
通过传入一个枚举类。完成异常的定义。
public class UserException extends RuntimeException {
    private Integer code;
    private String message;

    public UserException() {
    }

    public UserException(UserExceptionEnum userExceptionEnum) {
        this.code = userExceptionEnum.getCode();
        this.message = userExceptionEnum.getMessage();
    }

    public Integer getCode() {
        return code;
    }

    public void setCode(Integer code) {
        this.code = code;
    }

    @Override
    public String getMessage() {
        return message;
    }

    public void setMessage(String message) {
        this.message = message;
    }
}
信息封装类
作为传输数据的对象
public class ExceptionInfo {
    private Integer code;
    private String message;

    public ExceptionInfo(Integer code, String message) {
        this.code = code;
        this.message = message;
    }

    public Integer getCode() {
        return code;
    }

    public void setCode(Integer code) {
        this.code = code;
    }

    public String getMessage() {
        return message;
    }

    public void setMessage(String message) {
        this.message = message;
    }
}
实现异常处理的类。
public class UserExceptionResolver implements HandlerExceptionResolver {
    private static final Logger LOGGER = LogManager.getLogger(UserExceptionResolver.class);

    @Override
    public ModelAndView resolveException(
            HttpServletRequest request, HttpServletResponse response,
            Object o, Exception e) {

//        response.setStatus(HttpStatus.OK.value()); //设置状态码
        response.setContentType(MediaType.APPLICATION_JSON_VALUE); //设置ContentType
        response.setCharacterEncoding("UTF-8"); //避免乱码
        response.setHeader("Cache-Control", "no-cache, must-revalidate");

        ObjectMapper objectMapper = new ObjectMapper();
        // 判断是否是目标异常
        if (e instanceof UserException) {
            UserException exception = (UserException) e;
            Integer code = exception.getCode();
            String message = exception.getMessage();
            ExceptionInfo exceptionInfo = new ExceptionInfo(code, message);
            try {
                String json = objectMapper.writeValueAsString(exceptionInfo);
                LOGGER.info("UserExceptionResolver执行,输出的json数据是:" + json);
                response.getWriter().println(json);
            } catch (JsonProcessingException e1) {
                throw new RuntimeException(e);
            } catch (IOException e1) {
                throw new RuntimeException(e1);
            }
        }
        // 这个要加不然返回的状态码是500
        return new ModelAndView();
    }
}
配置相应的bean。
<bean class="handler.UserExceptionResolver"/>
测试controller。
@Controller
public class UserController {

    @RequestMapping("/test")
    public String test() {
        throw new UserException(UserExceptionEnum.NO_SUCH_USER);
//        return "test";
    }
}
效果:
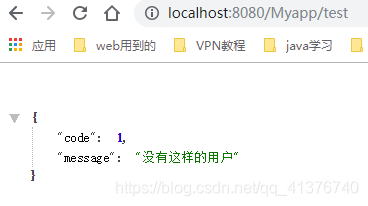
优缺点
- 优点:相对于前面的基于页面的处理,我们这里可以返回json给前端了。在前后端分离上做出了好的表现。
- 缺点:我们需要通过response来处理输出。下面我们可以通过注解的方法来完成。
@ControllerAdvice @ExceptionHandler
@ControllerAdvice
public class GlobalExceptionHandler {

    @ExceptionHandler(UserException.class)
    @ResponseBody
    public ExceptionInfo userExceptionHandler(UserException e) {

        // 对Exception进行封装
        return new ExceptionInfo(e.getCode(), e.getMessage());
    }
}
效果和上面的一样,但是代码量减少了相当多。记得ControllerAdvice也是使用了@Component这个注解的,所以要在spring-mvc.xml里面添加上注解扫描。
小结
异常处理的三种方法,就是这样了。但是也只是知道了如何使用,等会用了之后还需要去了解一下SpringMVC里面的异常处理机制是怎么样的。先会用吧,之后再看原理。对了,其它博客说基于注解的全局异常处理,处理不了拦截器的异常,我这里是可以的。