版权声明:转载请申明出处,谢谢 https://blog.csdn.net/qq_35495763/article/details/86499573
update time:20191-17 type:复习笔记 author:要你命三千又三千
文章目录
1.LinearLayout的使用
注意点:
- orientation的值为horizontal 内部控件不可将宽度指定为match_parent
因为这样的控件会将整个水平方向沾满(水平的方向是同理) - layout_gravity用于指定控件在布局中的对齐方式
- android:gravity:用于指定内部内容位置。
- 当LinearLayout的排列方向是vertical时,只有水平方向上的对齐方式才会生效(同理)
- layout_weight:允许我们使用比例的方式来指定控件的
<LinearLayout xmlns:android="http://schemas.android.com/apk/res/android"
android:layout_width="match_parent"
android:layout_height="match_parent"
android:orientation="horizontal" >
<EditText
android:id="@+id/input_message"
android:layout_width="0dp"
android:layout_height="wrap_content"
android:layout_weight="1"
android:hint="Type something"
/>
<Button
android:id="@+id/send"
android:layout_width="0dp"
android:layout_height="wrap_content"
android:layout_weight="1"
android:text="Send"
/>
</LinearLayout>
注解:将layoutWidth宽度指定为0,是规范写法,控件的宽度由layout——weight的比例来定。
2.RelativeLayout
通过相对定位的方式让控件出现在布局的任何位置
使用方法:

3.FrameLayout的使用(应用场景较少)
将所有控件都摆在左上角
4.TableLayout
使用表格的方式来排列控件
注意点:在TableTow中我们无法指定控件的宽度
<?xml version="1.0" encoding="utf-8"?>
    <TableLayout
        xmlns:android="http://schemas.android.com/apk/res/android"
        xmlns:app="http://schemas.android.com/apk/res-auto"
        xmlns:tools="http://schemas.android.com/tools"
        android:layout_height="wrap_content"
        android:layout_width="wrap_content"
        >
   <TableRow>
       <TextView
            android:layout_height="wrap_content"
           android:layout_width="wrap_content"
           android:text="Accout;"
           />
       <EditText
            android:layout_height="wrap_content"
           android:layout_width="wrap_content"
           android:hint="your accout"
           />
   </TableRow>
        <TableRow>
            <TextView android:layout_height="wrap_content"
                android:text="Password:"/>
            <EditText android:layout_height="wrap_content"
                android:inputType="textPassword"/>

        </TableRow>
        <TableRow>
            <Button
                android:layout_width="wrap_content"
                android:text="button"
                android:layout_span="2"
                android:layout_height="wrap_content"/>
<!--使用layout_sapn 来合并列,TableRow无法指定行宽度-->
        </TableRow>
    </TableLayout>
结果: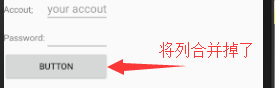
4.1问题:如何解决TableRow 中无法指定行宽度的问题?
使用stretchColumns属性,将TableLayout中某一列进行拉伸,到达自动适应屏幕的宽度的作用。
列号从0开始,1指定为第二列进行拉伸(当一行没有填充满的时候,指定拉伸的列号)
<TableLayout
        xmlns:android="http://schemas.android.com/apk/res/android"
        xmlns:app="http://schemas.android.com/apk/res-auto"
        xmlns:tools="http://schemas.android.com/tools"
        android:layout_height="wrap_content"
        android:layout_width="wrap_content"
        android:stretchColumns="1"
        >
      <TableRow>
       <TextView
            android:layout_height="wrap_content"
           android:layout_width="wrap_content"
           android:text="Accout;"
           />
       <EditText
            android:layout_height="wrap_content"
           android:layout_width="wrap_content"
           android:hint="your accout"
           />
   </TableRow>
        <TableRow>
            <TextView android:layout_height="wrap_content"
                android:text="Password:"/>
            <EditText android:layout_height="wrap_content"
                android:inputType="textPassword"/>

        </TableRow>
        <TableRow>
            <Button
                android:layout_width="wrap_content"
                android:text="button"
                android:layout_span="2"
                android:layout_height="wrap_content"/>
<!--使用layout_sapn 来合并列,TableRow无法指定行宽度-->
        </TableRow>
    </TableLayout>
5.问题:如何引入一个自定义通用布局的使用
使用方发实例:
title.xml
<?xml version="1.0" encoding="utf-8"?>
<LinearLayout
    xmlns:android="http://schemas.android.com/apk/res/android"
    android:layout_width="match_parent"
    android:layout_height="wrap_content"
    android:orientation="horizontal"
   >
   <!--这里的默认orientation的值的为horizontal可以省略,水平的布局,则对齐方式只在垂直方向有效。-->
    <Button

        android:layout_width="wrap_content"
        android:layout_height="wrap_content"
        android:layout_gravity="center"
        android:layout_margin="5dip"

        android:text="Back"
        />
    <TextView
        android:layout_width="0dp"
        android:layout_height="wrap_content"
        android:layout_gravity="center"
        android:layout_margin="5dip"
          android:layout_weight="1"
        android:text="TITLE"/>
        <!--layout-width指定为空,是规范写法,在指定layout_gravity=1,由于其他两个没有指定,所有占据所有剩下的布局1/1,-->
    <Button
        android:layout_width="wrap_content"
        android:layout_height="wrap_content"
        android:layout_gravity="center"
        android:layout_margin="5dip"
        android:text="next"
        />
        <!--由于指定了 android:layout_height="wrap_content",所以高度方layout_gravity,先包含内容的高,再次垂直居中-->
</LinearLayout>
将title.xml 包含在布局中(引入布局)
<LinearLayout xmlns:android="http://schemas.android.com/apk/res/android"
    xmlns:app="http://schemas.android.com/apk/res-auto"
    xmlns:tools="http://schemas.android.com/tools"
    android:layout_width="match_parent"
    android:layout_height="match_parent"
    android:orientation="vertical"
    tools:context=".MainActivity">
    <include layout="@layout/title"/>
    <!--引入布局-->
   </LinearLayout>
步骤三:在代码中取消掉标题栏
省略
结果是:
6.问题:如何创建自定义控件的使用
第一步:写一个xml 布局
<?xml version="1.0" encoding="utf-8"?>
<LinearLayout
    xmlns:android="http://schemas.android.com/apk/res/android"
    android:layout_width="match_parent"
    android:layout_height="wrap_content"
    android:orientation="horizontal"
   >
    <Button
        android:id="@+id/back"
        android:layout_width="wrap_content"
        android:layout_height="wrap_content"
        android:layout_gravity="center"
        android:layout_margin="5dip"

        android:text="Back"
        />
    <TextView
        android:layout_width="0dp"
        android:layout_height="wrap_content"
        android:layout_gravity="center"
        android:layout_margin="5dip"
          android:layout_weight="1"
        android:text="TITLE"/>
    <Button
        android:layout_width="wrap_content"
        android:layout_height="wrap_content"
        android:layout_gravity="center"
        android:layout_margin="5dip"
        android:text="next"
        />
</LinearLayout>
第二步:重写java 代码加载xml 文件
package com.example.neon.a201914project;

import android.app.Activity;
import android.content.Context;
import android.util.AttributeSet;
import android.view.LayoutInflater;
import android.view.View;
import android.widget.Button;
import android.widget.LinearLayout;

import java.util.jar.Attributes;

public class TitleLayout extends LinearLayout {
    public TitleLayout(Context context, AttributeSet attributes){
        super(context,attributes);
        LayoutInflater.from(context).inflate(R.layout.title,this);
        Button titleBack=findViewById(R.id.back);
        titleBack.setOnClickListener(new OnClickListener() {
            @Override
            public void onClick(View v) {
                ((Activity)getContext()).finish();
            }
        });
    }  //重写构造函数,加载布局文件。inflate()
       //参数分别是:TItleLayout 布局文件,第二个是直接传父布局this,指定为
       //TitleLayout
}
第三步:使用自定义控件
<com.example.neon.a201914project.TitleLayout
        android:layout_width="match_parent"
        android:layout_height="wrap_content">
    </com.example.neon.a201914project.TitleLayout>