版权声明:https://blog.csdn.net/weixin_42499593 https://blog.csdn.net/weixin_42499593/article/details/86570670
一、搭建dhcp服务器
yum install dhcp -y ##安装dhcp软件

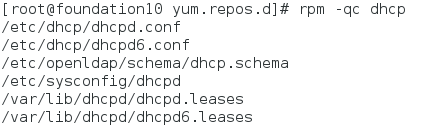
rpm -qc dhcp				##查看dhcp安装路径
cp  /usr/share/doc/dhcp*/dhcpd.conf.example /etc/dhcp/dhcpd.conf	##复制模版到dhcpd.conf

vim /etc/dhcp/dhcpd.conf ##更改其中部分配置,以下文为准,有注释的行可自行更改
  1 # dhcpd.conf
  2 #
  3 # Sample configuration file for ISC dhcpd
  4 #
  5
  6 # option definitions common to all supported networks...
  7 option domain-name "dhcpserver.com";		##设置域名
  8 option domain-name-servers 114.114.114.114;	##dns解析地址
  9
 10 default-lease-time 600;
 11 max-lease-time 7200;
 12
 13 # Use this to enble / disable dynamic dns updates globally.
 14 #ddns-update-style none;
 15
 16 # If this DHCP server is the official DHCP server for the local
 17 # network, the authoritative directive should be uncommented.
 18 #authoritative;
 19
 20 # Use this to send dhcp log messages to a different log file (you also
 21 # have to hack syslog.conf to complete the redirection).
 22 log-facility local7;
 23
 24 # No service will be given on this subnet, but declaring it helps the
 25 # DHCP server to understand the network topology.
 26
 27
 28 # This is a very basic subnet declaration.
 29
 30 subnet 172.25.254.0 netmask 255.255.255.0 {
 31   range 172.25.254.60 172.25.254.99;	##分配的ip段
 32   option routers 172.25.254.10;			##分配的网关
 33 }

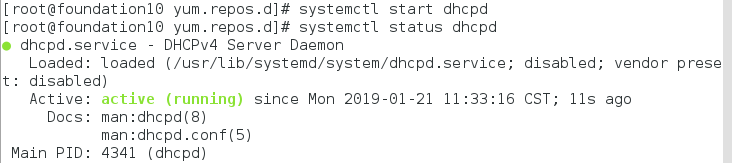
systemctl start dhcpd ##打开dhcpd服务
二、自动安装虚拟机
1.建立自动安装系统脚本
注:该脚本可在虚拟机上建立也可在真机上建立,以下是在虚拟机中建立过程。
yum install system-config-kickstart -y ##安装生成自动安装系统脚本的软件

system-config-kickstart ##打开该软件的图形界面,开始设置


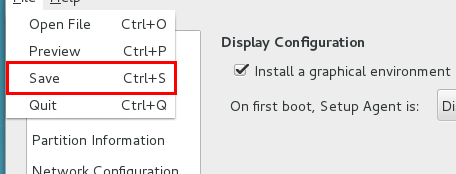
完成以上步骤后会生成ks.cfg文件,打开该文件,在文章的最后添加以下内容
%packages
@base
lftp
%end

ksvalidator ks.cfg ##检验ks.cfg是否有语法错误

yum install httpd -y		##安装httpd
systemctl stop firewalld	##关闭防火墙
systemctl disable firewalld	##设置开机自动关闭防火墙
systemctl start httpd		##开启httpd
systemctl enable httpd		##设置开机自动开启httpd
cp ks.cfg /var/www/html/	##发布ks.cfg到网络上


- 以下步骤必须在真机中操作
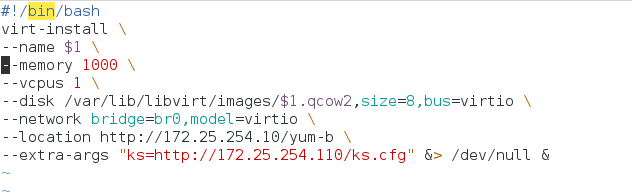
vim vm_install ##创建安装虚拟机脚本
#!/bin/bash
virt-install \			##新建虚拟机命令
--name $1 \				##设置名字,并在调用时命名
--memory 1000 \			##设置内存
--vcpus 1 \				##设置cpu内核数
--disk /var/lib/libvirt/images/$1.qcow2,size=8,bus=virtio \	##设置硬盘
--network bridge=br0,model=virtio \			##设置网卡
--location http://172.25.254.10/yum-b \		##选择镜像路径
--extra-args "ks=http://172.25.254.110/ks.cfg" &> /dev/null &	##选择自动安装系统脚本
扫描二维码关注公众号,回复:
5130283 查看本文章

sh vm_install lan ##调用自动安装虚拟机脚本

到此界面后说明安装没有错误,只需等待完成即可。