温馨提示:本教程的 GitHub 地址为「intellij-idea-tutorial」,欢迎感兴趣的童鞋
Star、Fork,纠错。
在「详述 IntelliJ IDEA 创建 Maven 项目及设置 java 源目录的方法」一文中,我们已经将 IntelliJ IDEA 中的 Maven 项目的框架搭建完成。接着上文,在本文中,我们更近一步,利用 Tomcat 运行我们的 Web 项目。
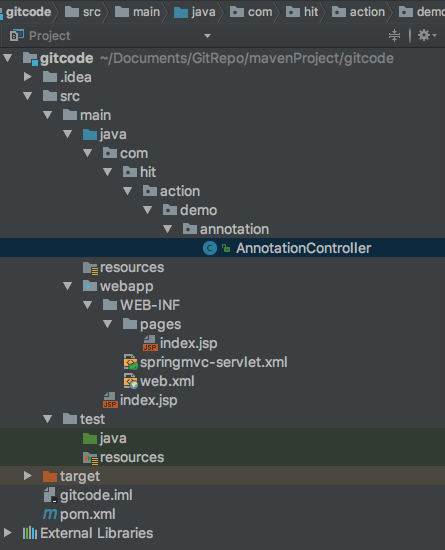
如上图所示,我们进一步扩展了项目的结构,在java目录下新建了一系列的目录层级,并在annotation目录下建立一个名为AnnotationController的 Java 类,用于测试 Spring MVC 框架;在WEB-INF目录下,新建了一个pages目录,用于存放jsp页面,并新建了一个名为springmvc-servlet.xml的文件,用于书写 Spring MVC 框架的配置项。接下来,我们依次看看这些文件的内容:
- 控制类:
AnnotationController
package com.hit.action.demo.annotation;

import org.springframework.stereotype.Controller;
import org.springframework.web.bind.annotation.RequestMapping;
import org.springframework.web.bind.annotation.ResponseBody;
import org.springframework.web.servlet.ModelAndView;

import javax.servlet.http.HttpServletRequest;

/**
 * author:Charies Gavin
 * https:github.com/guobinhit
 */
@Controller
public class AnnotationController {

    // 请求映射地址 http://localhost:8080/gitcode/test,其中 8080 为默认端口
    @RequestMapping(value = "/test")
    public String goTest(HttpServletRequest request) {
        // 输出请求 URL 路径
        System.out.println(request.getRequestURL());
        // 返回逻辑名
        return "index";
    }
}- Spring MVC 配置文件:
springmvc-servlet.xml
<?xml version="1.0" encoding="UTF-8"?>
<beans xmlns="http://www.springframework.org/schema/beans"
       xmlns:xsi="http://www.w3.org/2001/XMLSchema-instance"
       xmlns:mvc="http://www.springframework.org/schema/mvc"
       xmlns:context="http://www.springframework.org/schema/context"
       xsi:schemaLocation="http://www.springframework.org/schema/beans
                        http://www.springframework.org/schema/beans/spring-beans-3.2.xsd
                        http://www.springframework.org/schema/mvc
                        http://www.springframework.org/schema/mvc/spring-mvc-3.2.xsd
                        http://www.springframework.org/schema/context
                        http://www.springframework.org/schema/context/spring-context-3.2.xsd ">

    <!-- 声明注解开发方式 -->
    <mvc:annotation-driven/>

    <!-- 包自动扫描 -->
    <context:component-scan base-package="com.hit.action"/>

    <!-- 内部资源视图解析器,前缀 + 逻辑名 + 后缀 -->
    <bean class="org.springframework.web.servlet.view.InternalResourceViewResolver">
        <property name="prefix" value="/WEB-INF/pages/"/>
        <property name="suffix" value=".jsp"/>
    </bean>
</beans>- 全局配置文件:
web.xml
<!DOCTYPE web-app PUBLIC
 "-//Sun Microsystems, Inc.//DTD Web Application 2.3//EN"
 "http://java.sun.com/dtd/web-app_2_3.dtd" >

<web-app version="2.5" xmlns="http://java.sun.com/xml/ns/javaee"
         xmlns:xsi="http://www.w3.org/2001/XMLSchema-instance"
         xsi:schemaLocation="http://java.sun.com/xml/ns/javaee
         http://java.sun.com/xml/ns/javaee/web-app_2_5.xsd">

    <!-- 如果修改 Spring 配置文件的位置和名称,则通过以下方式进行声明全局配置文件 -->
    <context-param>
        <param-name>contextConfigLocation</param-name>
        <param-value>/WEB-INF/springmvc-servlet.xml</param-value>
    </context-param>

    <!-- 配置 Spring 监听器 -->
    <listener>
        <listener-class>org.springframework.web.context.ContextLoaderListener</listener-class>
    </listener>

    <!-- 配置 DispatcherServlet 对 url 进行过滤 -->
    <servlet>
        <servlet-name>springmvc</servlet-name>
        <servlet-class>org.springframework.web.servlet.DispatcherServlet</servlet-class>

        <!-- 显示配置用于解析 DispatcherServlet 的配置文件 -->
        <!-- 如果不显示指定,则 Spring MVC 会自动扫描 WEB-INF 下以 servlet-name 标签声明的名称开头以 servlet 结尾的配置文件 -->
        <init-param>
            <param-name>contextConfigLocation</param-name>
            <param-value>/WEB-INF/springmvc-servlet.xml</param-value>
        </init-param>
        <!-- 显示指定加载顺序-->
        <load-on-startup>1</load-on-startup>
    </servlet>
    <servlet-mapping>
        <servlet-name>springmvc</servlet-name>
        <!-- 如果声明 /* 则会拦截所有请求,包括 action 返回的 .jsp 页面 -->
        <url-pattern>/</url-pattern>
    </servlet-mapping>

    <!-- 配置欢迎页 -->
    <welcome-file-list>
        <welcome-file>index.jsp</welcome-file>
    </welcome-file-list>
</web-app>
如上图所示,我们
———— ☆☆☆ —— 返回 -> 史上最简单的 IntelliJ IDEA 教程 <- 目录 —— ☆☆☆ ————