LVS模式一:DR(Direct Routing)直接路由模式
client -> vs -> Rs ->client
- DR模式下调度器和服务器组都必须在物理上有一个网卡通过不分段的局域网相连,即通过交换机或者高速的HUB相连,中间没有隔有路由器。
- VIP地址为调度器和服务器组共享,调度器配置的VIP地址是对外可见的,用于接收虚拟服务的请求报文
- 所有的服务器把VIP地址配置在各自的Non-ARP网络设备上,它对外面是不可见的,只是用于处理目标地址为VIP的网络求。
server2
1.安装apache
[root@server2 ~]# yum install httpd -y2.编写前端文件
[root@server2 ~]# cd /var/www/html
[root@server2 html]# vim index.html
<h1>www.westos.org - server2</h1>- server3:同上
[root@server3 ~]# cd /var/www/html
[root@server3 html]# vim index.html
<h1>www.westos.org - server3</h1>
一、配置 ipvsadm
- 在虚拟服务器上配置更高级yum源
![]()


2.在server1(虚拟服务器)上安装ipvsadm(调度器)
[root@server1 yum.repos.d]# yum install ipvsadm -y
3.添加策略
(1)添加一台虚拟设备
-A 增加一台虚拟设备
-a 添加真实服务器的操作
-t tcp服务地址
-s 调度算法(10中调度算法rr|wrr|lc|wlc|lblc|lblcr|dh|sh|sed|nq)
-r 对应的真实ip
-g rh(路由)
rr 调度算法:轮询
(2)添加后端实际服务器
(3)保存策略

4.显示调度次数ipvsadm -L (-n不解析)

5.添加VIP
给所有的服务器把 VIP 地址配置在各自的 NonARP 网络设备上
[root@server1 ~]# ip addr add 172.25.254.100/24 dev eth0
[root@server2 html]# ip addr add 172.25.254.100/32 dev eth0
[root@server3 html]# ip addr add 172.25.254.100/32 dev eth0
- 将server2,和server3的httpd服务都打开
[root@server2 html]# /etc/init.d/httpd start
[root@server3 html]# /etc/init.d/httpd  start
测试:
- 以上情况,server1,2,3都有可能被访问到
- 如果绑定的MAC地址是server1,则在server2,3轮询
- 如果绑定的MAC地址是sever2或sever3的,那么我们会发现,在测试端根本不会形成轮询,而是直接去了MAC绑定的后端服务器 (显然这样在企业中是不允许的)
如何避免这种情况实现?
- 要避免这种情况,要求只能绑定server1(调度器)的MAC地址,所以我们要配置server2和server3的arp路由策略
- 在server2和server3中下载yum install -y arptables_jf
- 为arptables网络的用户控制过滤的守护进程
- 防止在物理机中测试时直接访问server2和server3
root@server2 html]# yum install arptables_jf -y
##server3和server2一样
[root@server3 html]# yum install arptables_jf -y
- 再次测试:
- 先删除现有绑定MAC地址
arp -d 172.25.254.100 - 测试端测试curl 172.25.64.100(出现轮询,且数据经过调度器)


为什么需要健康检查?
- 如果后端真实服务器出现问题,那么在测试端测试的时候,会返回给我们一个错误的页面,那么我们需要对后端服务器做健康检查,保证只返回正确的页面提供给用户。
实现健康检查的配置步骤:
安装之前先配置yum源

- 安装软件ldirectord-3.9.5-3.1.x86_64.rpm用来对后端服务器做健康检查
root@server1 ~]# yum install -y ldirectord-3.9.5-3.1.x86_64.rpm查看配置文件

2.配置文件的母板拷到/etc/ha.d/
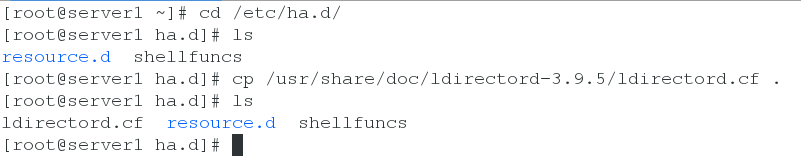
3.编辑 ldirectord的配置文件
[root@server1 ha.d]# vim ldirectord.cf
# Global Directives                 #“ 全局 ” 设置
checktimeout=3                      #指定定real server出错的时间间隔
checkinterval=1                     #指定ldirectord在两次检查之间的时间间隔
autoreload=yes                      #自动重载配置文件,选yes时,当配置文件发生变化,自动载入配置信息
quiescent=no
#当一个节点在 checktimeout 设置的时间周期内没有响应是它是 “ 静止的 ” (它的权重为0),当你设置了这个选项后,ldirectord 将 会从 IPVS 表中移除真实服务器而不是 “ 停止 ” 它,从 IPVS 表移除节点将中断现有的客户端连接,并使 LVS 丢掉所有的连接跟踪记录和持续连接模板,如果 你不将这个选项设置为 no,当某个节点崩溃时,对某些客户端计算机而言可能会显示为集群关闭了,因为在这个节点崩溃前这些客户端计算机被分配给它了,而连接跟踪记录和程序连接模板仍然保留在Director上。
logfile="/var/log/ldirectord.log"   #设定ldirectord日志输出文件路径
# Sample for an http virtual service
virtual=172.25.254.100:80              #VIP 地址和端口号
        real=172.25.254.2:80 gate      #指定RealServer地址和端口,同时设定LVS工作模式,gate表示DR模式,ipip表示TUNL模式,masq表示NAT模式。
        real=172.25.254.3:80 gate      #当所有的real server节点不能工作时,web服务重定向的地址
        fallback=127.0.0.1:80 gate     #当所有的real server节点不能工作时,web服务重定向的地址
        service=http            #指定服务类型,对http服务做负载均衡
        scheduler=rr           #指定调度算法,这里是rr(轮叫)算法
        #persistent=600
        #netmask=255.255.255.255
        protocol=tcp                       #指出该服务使用的协议:tcp、udp 或 fwm
        checktype=negotiate                 #指定Ldirectord的检测类型,默认为negotiate
        checkport=80                       #健康检查使用的端口是 80
        request="index.html"
        #receive="Test Page"              #指定请求和应答字串
        #virtualhost=www.x.y.z            #虚拟服务器的名称

##开启服务
[root@server1 ha.d]# /etc/init.d/ldirectord start
Starting ldirectord... success
4.物理机 测试:
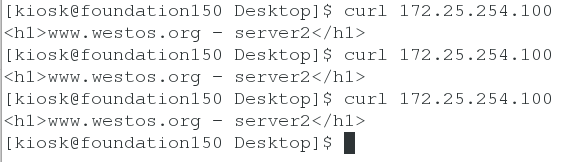
- 后端真实服务器都正常时(RealServer 无宕机 ):实行轮询

将server3关掉(RealServer 有一台宕机)
[root@server3 html]# /etc/init.d/httpd stop
则显示只调度server2服务器
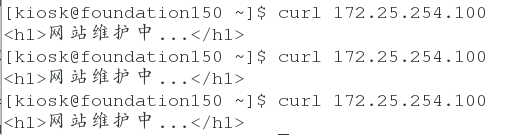
- RealServer 全部宕机
- 将server2,和server3的httpd服务都关掉
[root@server2 html]# /etc/init.d/httpd stop
[root@server3 html]# /etc/init.d/httpd stop
- 在调度器server1上编写前端文件
[root@server1 html]# cd /var/www/html
[root@server1 html]# vim index.html
<h1>网站维护中..</h1>
- server1的httpd服务端口改成80
[root@server1 html]# vim /etc/httpd/conf/httpd.conf
Listen 80
[root@server1 html]# /etc/init.d/httpd restart
重启ldirectord 服务
[root@server1 ha.d]# /etc/init.d/ldirectord restart
Restarting ldirectord... success- 物理机测试