文章目录
概述
随着前后端分离这种开发模式的普及,前台和后台分开部署,可能部署在一台主机上不同的端口下,也有可能部署在多个主机上,前后台通过ajax或者axios等方式调用restful接口进行交互。由于浏览器的“同源策略”,协议、域名、端口号但凡有一个不同,势必会产生跨域问题。
如果发生跨域的话,浏览器中每次请求的session都是一个新的,即sessionId肯定不相同。
我们知道 ,服务器可以为每个用户浏览器创建一个session对象。默认情况下一个浏览器中独占一个session.
http请求是无状态的,那服务器是如何知道多次浏览器的请求是同一个会话呢?
事实上服务器创建session出来后,会将session的id,以cookie的形式回写给客户机,这样,只要浏览器不关,再去访问服务器时,都会带着session的id号去,服务器发现客户端浏览器携带session id过来了,就会使用内存中与之对应的session为之服务。 下文配合代码和浏览器一起来看下。
浏览器同源策略
参考阮一峰老师的文章:浏览器同源政策及其规避方法
后台搭建
为了简单,我们使用Spring Boot 快速搭建个后台服务,提供restful接口。 我这里加上了interceptor,其实验证这个问题,没必要加。 加上一方面是熟悉下拦截器的使用,二来也可以看下request中请求的URI

pom.xml
<?xml version="1.0" encoding="UTF-8"?>
<project xmlns="http://maven.apache.org/POM/4.0.0"
	xmlns:xsi="http://www.w3.org/2001/XMLSchema-instance"
	xsi:schemaLocation="http://maven.apache.org/POM/4.0.0 http://maven.apache.org/xsd/maven-4.0.0.xsd">
	<modelVersion>4.0.0</modelVersion>
	<parent>
		<groupId>org.springframework.boot</groupId>
		<artifactId>spring-boot-starter-parent</artifactId>
		<version>2.1.3.RELEASE</version>
		<relativePath /> <!-- lookup parent from repository -->
	</parent>
	<groupId>com.artisan</groupId>
	<artifactId>CrossDomain</artifactId>
	<version>0.0.1-SNAPSHOT</version>
	<name>CrossDomainByNginxBackground</name>
	<description>Artisan </description>

	<properties>
		<java.version>1.8</java.version>
	</properties>

	<dependencies>
		<dependency>
			<groupId>org.springframework.boot</groupId>
			<artifactId>spring-boot-starter-web</artifactId>
		</dependency>


		<dependency>
			<groupId>org.projectlombok</groupId>
			<artifactId>lombok</artifactId>
		</dependency>

		<dependency>
			<groupId>org.springframework.boot</groupId>
			<artifactId>spring-boot-devtools</artifactId>
			<optional>true</optional>
			<scope>true</scope>
		</dependency>

		<dependency>
			<groupId>org.springframework.boot</groupId>
			<artifactId>spring-boot-starter-test</artifactId>
			<scope>test</scope>
		</dependency>
	</dependencies>

	<build>
		<plugins>
			<plugin>
				<groupId>org.springframework.boot</groupId>
				<artifactId>spring-boot-maven-plugin</artifactId>
			</plugin>
		</plugins>
	</build>

</project>
interceptor 配置
不多说了,MyInterceptor.java 参考 Spring Boot2.x-12 Spring Boot2.1.2中Filter和Interceptor 的使用
按照工程中restful的设计,注意下 WebConfig中的拦截路径即可。

Controller
package com.artisan.controller;

import javax.servlet.http.HttpServletRequest;

import org.springframework.web.bind.annotation.GetMapping;
import org.springframework.web.bind.annotation.RequestMapping;
import org.springframework.web.bind.annotation.RestController;

@RestController
@RequestMapping("/artisan")
public class ArtisanController {


	@GetMapping("/getValueFromSession")
	public String getSession(HttpServletRequest request) {
		// 获取当前request的session,将属性设置到session里
		request.getSession().setAttribute("artisan", "artisanTest");
		return "sessionId:" + request.getSession().getId() + ", artisans的属性值:" + request.getSession().getAttribute("artisan");
	}

	@GetMapping("/checkCrossDomain")
	public String checkCrossDomain(HttpServletRequest request) {
		return  "sessionId:" + request.getSession().getId() + ", artisans的属性值:" + request.getSession().getAttribute("artisan");
	}

}
启动测试
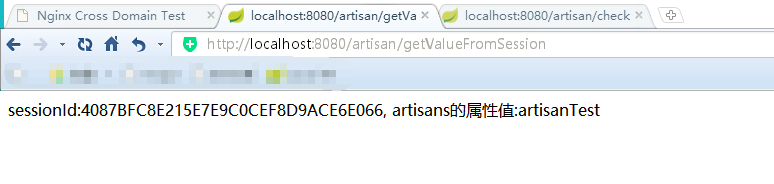
没在application.yml中指定server.port ,使用了默认的8080端口,启动项目,确保可以访问
http://localhost:8080/artisan/getValueFromSession
不要关闭浏览器,继续访问
http://localhost:8080/artisan/checkCrossDomain

注意下这两个sessionId是一样的,说明是同一个session
浏览器和session
刚才概述中

再细化点
-
用户向服务器发送请求,比如登录操作发送用户名和密码
-
服务器验证通过后,通过HttpServletRequest#getSession()#setAttribute等方法保存相关数据
-
服务器向用户返回一个 session_id,浏览器set-cookie Cookie 即Cookie = session_id
-
用户随后的每一次请求,都会通过 Cookie,将 session_id 传回服务器。
-
服务器收到 session_id,找到前期保存的数据,由此得知用户的身份。
当然了单节点的情况下还好,如果是集群环境,或者是跨域的服务请求,那么久需要实现session 数据共享,使集群中的每台服务器都能够读取 session。
总的来说【集群环境下】我目前所了解的有三种思路
-
session复制,比如Tomcat支持的Session复制. 优点:tomcat内置支持 缺点:如果集群过大,session 复制为all to all占用带宽,效率不高
-
session 数据持久化,写入redis或者数据库等。优点架构清晰,缺点是工程量大。而且也需要考虑session数据的持久层的高可用,否则单点登录就会失败。
-
服务端不保存 session ,所有数据都保存在客户端,比如 JWT (JSON WEB TOKEN)
我们清空浏览器的缓存(包括cookie)

结合上面建好的工程来演示下上面的描述。
重新访问 http://localhost:8080/artisan/getValueFromSession

上面的截图就是: 服务器创建session出来后,会将session的id,以cookie的形式回写给客户机
不要关闭浏览器,新开个窗口访问
http://localhost:8080/artisan/checkCrossDomain

上面的截图就是: 只要浏览器不关,再去访问服务器时,都会带着session的id号去,服务器发现客户端浏览器携带session id过来了,就会使用内存中与之对应的session为之服务
后端工程发布到服务器上

把刚才的spring boot 服务端,达成了可执行的jar 【sts 工程右键-- Run As --Maven build , 输入clean package (清除、打包)】 ,放到192.168.31.34服务器上 , 为了创造一个不同的ip地址。 顺便我把端口号也通过启动脚本设置成了9000
启动脚本如下:
#!/bin/bash
nohup java -jar CrossDomain-0.0.1-SNAPSHOT.jar  --server.port=9000 > log.txt & tail -f log.txt
问题复现
为了模拟【协议、域名、端口号但凡有一个不同,势必会产生跨域问题 】,那就让ip地址+端口号不同吧。
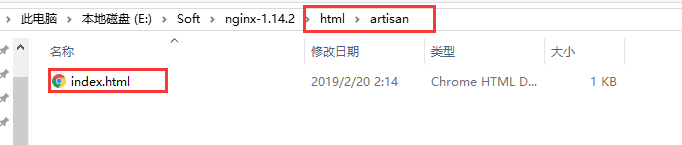
正好前几天折腾axis , 搭建axis环境的时候,正好需要用tomcat去验证下是否搭建成功(把axis拷贝到tomcat的webapps下),那顺便借用下这里的index.html ,修改后的index.html如下
<!DOCTYPE html>
<html lang="en">
<head>
    <meta charset="UTF-8"/>
    <title>Cross Domain Test</title>
</head>
<body>
<h2>Artisan</h2>
<button type="submit" id="btn">跨域请求</button>
<p id="crossDomainRequest1"></p>
<p id="crossDomainRequest2"></p>
</body>

<script src="https://code.jquery.com/jquery-3.2.1.min.js"></script>
<script>
	$("#btn").click(function(event){
		$.ajax({
			 url: 'http://192.168.31.34:9000/artisan/getValueFromSession',
		type: "GET",
		success: function (data) {
			$("#crossDomainRequest1").html("跨域访问成功->getValueFromSession方法返回:" + data);
			$.ajax({
				url: 'http://192.168.31.34:9000/artisan/checkCrossDomain',
				type: "GET",
				success: function (data) {
					$("#crossDomainRequest2").html("跨域访问成功->checkCrossDomain方法返回:" + data);
				}
			});
		},
		error: function (data) {
			$("#crossDomainRequest1").html("发生跨域错误!!");
		}

		});
	});
</script>

</html>
启动tomcat ,访问 http://localhost:8080/axis/index.html ,点击按钮,观察开发者工具中的Network和Console

点击 getValueFromSession 查看,

服务端其实是返回了,也从侧面说明了跨域问题是浏览器的“同源策略”导致,和服务端不相干。
再继续看下报错

Access to XMLHttpRequest at ‘http://192.168.31.34:9000/artisan/getValueFromSession’ from origin ‘http://localhost:8080’ has been blocked by CORS policy: No ‘Access-Control-Allow-Origin’ header is present on the requested resource.
如上 发生了跨域问题。
通过Nginx反向代理解决跨域问题
原理: Nginx的反向代理“欺诈”浏览器,使得浏览器和服务器是同源访问。
安装Nginx
因为要测试跨域 ,为了方便,服务端放到了服务器上,使用Nginx部署的前台我们就放到本地吧,所以使用了windows版本的Nginx 。
Nginx 下载地址: http://nginx.org/en/download.html

修改配置文件
worker_processes 1;
events {
worker_connections 1024;
}
http {
include mime.types;
default_type application/octet-stream;
sendfile on;
keepalive_timeout 65;
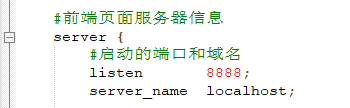
#前端页面服务器信息
server {
#启动的端口和域名
listen 8888;
server_name localhost;
#添加头部信息,proxy_set_header用来重定义发往后端服务器的请求头。
#语法 proxy_set_header Field Value
proxy_set_header Cookie $http_cookie;
proxy_set_header X-Forwarded-Host $host;
proxy_set_header X-Forwarded-Server $host;
proxy_set_header X-Forwarded-For $proxy_add_x_forwarded_for;
#代理地址 及映射的服务端的地址
# 最重要的配置
location /frontend/ {
proxy_pass http://192.168.31.34:9000/; #使用代理地址时末尾加上斜杠"/"
# 如下 proxy_set_header 和 add_header 不加经过验证也是OK的。
# 使用add_header指令来设置response header
if ($request_method = 'OPTIONS') {
add_header 'Access-Control-Allow-Origin' '*';
add_header 'Access-Control-Allow-Methods' 'GET, POST, OPTIONS';
add_header 'Access-Control-Allow-Headers' 'DNT,X-CustomHeader,Keep-Alive,User-Agent,X-Requested-With,If-Modified-Since,Cache-Control,Content-Type,Content-Range,Range,Token';
add_header 'Access-Control-Max-Age' 1728000;
add_header 'Content-Type' 'text/plain; charset=utf-8';
add_header 'Content-Length' 0;
return 204;
}
if ($request_method = 'POST') {
add_header 'Access-Control-Allow-Origin' '*';
add_header 'Access-Control-Allow-Methods' 'GET, POST, OPTIONS';
add_header 'Access-Control-Allow-Headers' 'DNT,X-CustomHeader,Keep-Alive,User-Agent,X-Requested-With,If-Modified-Since,Cache-Control,Content-Type,Content-Range,Range,Token';
add_header 'Access-Control-Expose-Headers' 'DNT,X-CustomHeader,Keep-Alive,User-Agent,X-Requested-With,If-Modified-Since,Cache-Control,Content-Type,Content-Range,Range,Token';
}
if ($request_method = 'GET') {
add_header 'Access-Control-Allow-Origin' '*';
add_header 'Access-Control-Allow-Methods' 'GET, POST, OPTIONS';
add_header 'Access-Control-Allow-Headers' 'DNT,X-CustomHeader,Keep-Alive,User-Agent,X-Requested-With,If-Modified-Since,Cache-Control,Content-Type,Content-Range,Range,Token';
add_header 'Access-Control-Expose-Headers' 'DNT,X-CustomHeader,Keep-Alive,User-Agent,X-Requested-With,If-Modified-Since,Cache-Control,Content-Type,Content-Range,Range,Token';
}
}
#添加拦截路径和根目录
location / {
root html/artisan; # 根目录
index index.html index.htm; #首页
}
}
}
最重要的是 proxy_pass配置
关于add_header ,比如 GET 增加了 add_header ,在浏览器中GET请求的方法可以在response header查看到相关信息
add_header ‘Access-Control-Expose-Headers’ 必须要加上你请求时所带的header,比如我们经常用的Token
参考: https://enable-cors.org/server_nginx.html

下面的浏览器返回截图,是没有增加add_header的,故特意贴一张截图如上,增加上也是OK的,更细粒度的控制,请知悉。
修改前台页面访问地址
<!DOCTYPE html>
<html lang="en">
<head>
    <meta charset="UTF-8"/>
    <title>Nginx Cross Domain Test</title>
</head>
<body>
<h2>Artisan</h2>

<button type="submit" id="btn">跨域请求</button>

<p id="crossDomainRequest1"></p>
<p id="crossDomainRequest2"></p>
</body>

<script src="https://code.jquery.com/jquery-3.2.1.min.js"></script>
<script>
	$("#btn").click(function(event){
		$.ajax({
			 url: 'http://localhost:8888/frontend/artisan/getValueFromSession',
		type: "GET",
		success: function (data) {
			$("#crossDomainRequest1").html("跨域访问成功->getValueFromSession方法返回:" + data);
			$.ajax({
				url: 'http://localhost:8888/frontend/artisan/checkCrossDomain',
				type: "GET",
				success: function (data) {
					$("#crossDomainRequest2").html("跨域访问成功->checkCrossDomain方法返回:" + data);
				}
			});
		},
		error: function (data) {
			$("#crossDomainRequest1").html("发生跨域错误!!");
		}

		});
	});
</script>

</html>
原因分析
先看index.html的存放位置
与 nginx的配置文件中如下配置保持一致

同时配置的启动端口和域名,对应配置文件中的
所以通过访问 http://localhost:8888/index.html 就找到了 html/artisan目录下的index.html文件
再看下 index.html中修改的请求地址,由原先的直接请求后台,改为请求Nginx,让Nginx去转发请求

localhost:8888上面说了,下面来看下这个frontend是个啥东西呢? 是自定义的,叫啥都行,只要能对应上就行。

意思是让Nginx代理该请求
html中的两个地址经过Nginx后,发生如下变化
请求URL:http://localhost:8888/frontend/artisan/getValueFromSession
代理后的URL:http://192.168.31.34:9000/artisan/getValueFromSession
请求URL:http://localhost:8888/frontend/artisan/checkCrossDomain
代理后的URL:http://192.168.31.34:9000/artisan/checkCrossDomain
代理后的地址也是192.168.31.34:9000端口了,和服务端 192.168.31.34:9000一致,也就不存在跨域问题了。
跨域操作实际上是由Nginx的proxy_pass进行完成.
这个可以从控制台中得到确认

启动Nginx 测试
双击nginx.exe 启动Nginx , 访问 http://localhost:8888/index.html

访问正常,且是通过一个session , 跨域问题使用Nginx得到解决。
小结
-
通过Nginx去解决跨域问题本质上是间接跨域,因为使用反向代理欺骗浏览器,所以浏览器任务客户端和服务端在相同的域名中,可以认为是同源访问,所以session不会丢失。上面的实验结论也证明了这一点
-
如果使用CORS实现了直接跨域,主要是在服务端通过给response设置header属性,帮助服务器资源进行跨域授权。 因为发生跨域访问,服务器会每次都创建新的Session,会导致session丢失,安全性和灵活性更高,但需要开发人员去解决跨域session丢失的问题。