Android及蓝牙开发
使用Android Studio进行基本的app开发
掌握Java/Kotlin基本语法和常用标准库的使用
通过阅读相关博客进行比较式学习:Java与C++;kotlin与Java
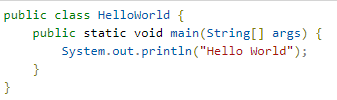
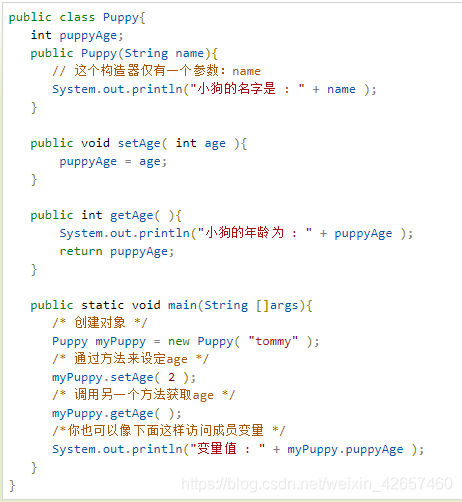
1.Java基本语法:

2.Kotlin基本语法


学习Android开发基本知识
构建第一个app
Android Studio官方指南:
https://developer.android.google.cn/training/basics/firstapp
源代码:
https://github.com/KetoneOlefine/FirstApp
AndroidManifest.xml:
<?xml version="1.0" encoding="utf-8"?>
<manifest xmlns:android="http://schemas.android.com/apk/res/android"
    package="com.example.ketoneolefine.myapplication">

    <application
        android:allowBackup="true"
        android:icon="@mipmap/ic_launcher"
        android:label="@string/app_name"
        android:roundIcon="@mipmap/ic_launcher_round"
        android:supportsRtl="true"
        android:theme="@style/AppTheme">
        <activity android:name=".MainActivity">
            <intent-filter>
                <action android:name="android.intent.action.MAIN" />

                <category android:name="android.intent.category.LAUNCHER" />
            </intent-filter>
        </activity>
        <activity android:name=".DisplayMessageActivity"
            android:parentActivityName=".MainActivity" >
            <!-- The meta-data tag is required if you support API level 15 and lower -->
            <meta-data
                android:name="android.support.PARENT_ACTIVITY"
                android:value=".MainActivity" />
        </activity>
    </application>

</manifest>
MainActivity.java:
package com.example.ketoneolefine.myapplication;

import android.content.Intent;
import android.support.v7.app.AppCompatActivity;
import android.os.Bundle;
import android.view.View;
import android.widget.EditText;

public class MainActivity extends AppCompatActivity {
    public static final String EXTRA_MESSAGE="com.example.myapplication.MESSAGE";

    @Override
    protected void onCreate(Bundle savedInstanceState) {
        super.onCreate(savedInstanceState);
        setContentView(R.layout.activity_main);
    }
    public void sendMessage(View view){
        Intent intent = new Intent(this, DisplayMessageActivity.class);
        EditText editText = (EditText) findViewById(R.id.editText);
        String message = editText.getText().toString();
        intent.putExtra(EXTRA_MESSAGE, message);
        startActivity(intent);
    }
}
DisplayMessageActivity.xml:
package com.example.ketoneolefine.myapplication;

import android.content.Intent;
import android.support.v7.app.AppCompatActivity;
import android.os.Bundle;
import android.widget.TextView;

public class DisplayMessageActivity extends AppCompatActivity {

    @Override
    protected void onCreate(Bundle savedInstanceState) {
        super.onCreate(savedInstanceState);
        setContentView(R.layout.activity_display_message);

        // Get the Intent that started this activity and extract the string
        Intent intent = getIntent();
        String message = intent.getStringExtra(MainActivity.EXTRA_MESSAGE);

        // Capture the layout's TextView and set the string as its text
        TextView textView = findViewById(R.id.textView);
        textView.setText(message);
    }
}
activity_main.xml:
design:
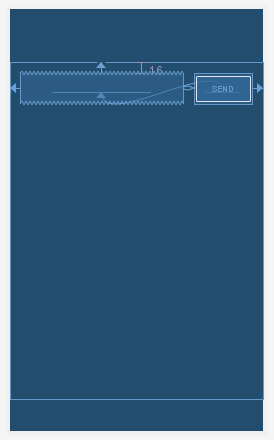
text:
<?xml version="1.0" encoding="utf-8"?>
<android.support.constraint.ConstraintLayout xmlns:android="http://schemas.android.com/apk/res/android"
    xmlns:app="http://schemas.android.com/apk/res-auto"
    xmlns:tools="http://schemas.android.com/tools"
    android:layout_width="match_parent"
    android:layout_height="match_parent"
    tools:context=".MainActivity">

    <EditText
        android:id="@+id/editText"
        android:layout_width="0dp"
        android:layout_height="wrap_content"
        android:layout_marginStart="16dp"
        android:layout_marginLeft="16dp"
        android:layout_marginTop="16dp"
        android:ems="10"
        android:hint="@string/edit_message"
        android:inputType="textPersonName"
        app:layout_constraintEnd_toStartOf="@+id/button"
        app:layout_constraintHorizontal_bias="0.5"
        app:layout_constraintStart_toStartOf="parent"
        app:layout_constraintTop_toTopOf="parent" />

    <Button
        android:id="@+id/button"
        android:layout_width="wrap_content"
        android:layout_height="wrap_content"
        android:layout_marginStart="16dp"
        android:layout_marginLeft="16dp"
        android:layout_marginEnd="16dp"
        android:layout_marginRight="16dp"
        android:onClick="sendMessage"
        android:text="@string/button_send"
        app:layout_constraintBaseline_toBaselineOf="@+id/editText"
        app:layout_constraintEnd_toEndOf="parent"
        app:layout_constraintHorizontal_bias="0.5"
        app:layout_constraintStart_toEndOf="@+id/editText" />
</android.support.constraint.ConstraintLayout>
actvivity_display_message.xml:
design:
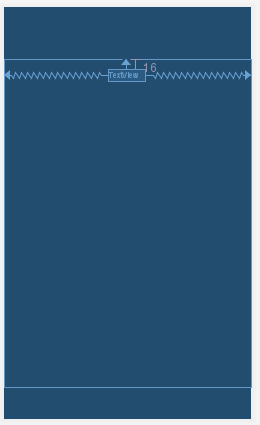
text:
<?xml version="1.0" encoding="utf-8"?>
<android.support.constraint.ConstraintLayout xmlns:android="http://schemas.android.com/apk/res/android"
    xmlns:app="http://schemas.android.com/apk/res-auto"
    xmlns:tools="http://schemas.android.com/tools"
    android:layout_width="match_parent"
    android:layout_height="match_parent"
    tools:context=".DisplayMessageActivity">

    <TextView
        android:id="@+id/textView"
        android:layout_width="wrap_content"
        android:layout_height="wrap_content"
        android:layout_marginTop="16dp"
        android:text="TextView"
        app:layout_constraintEnd_toEndOf="parent"
        app:layout_constraintStart_toStartOf="parent"
        app:layout_constraintTop_toTopOf="parent" />
</android.support.constraint.ConstraintLayout>
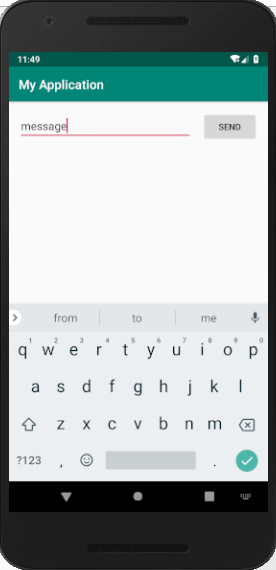
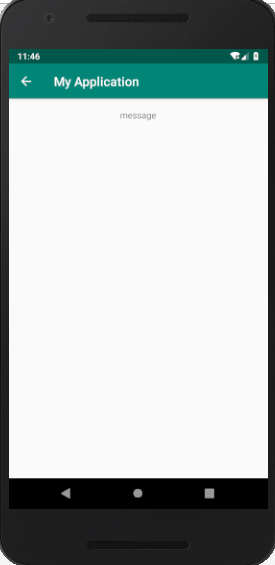
运行效果:
Android Studio基本知识
gradle/maven

maven:http://www.runoob.com/maven/maven-repositories.html
Android Studio目录结构


Android Studio工程目录结构分析
https://blog.csdn.net/xhbxhbsq/article/details/54615663
UI组件的使用
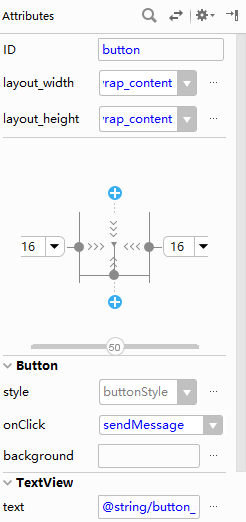
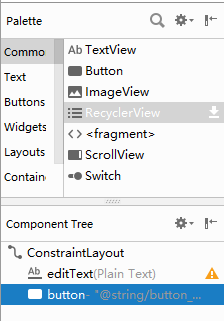
对应button代码:
 <Button
        android:id="@+id/button"
        android:layout_width="wrap_content"
        android:layout_height="wrap_content"
        android:layout_marginStart="16dp"
        android:layout_marginLeft="16dp"
        android:layout_marginEnd="16dp"
        android:layout_marginRight="16dp"
        android:onClick="sendMessage"
        android:text="@string/button_send"
        app:layout_constraintBaseline_toBaselineOf="@+id/editText"
        app:layout_constraintEnd_toEndOf="parent"
        app:layout_constraintHorizontal_bias="0.5"
        app:layout_constraintStart_toEndOf="@+id/editText" />
参考书籍:《第一行代码-Android》
Android蓝牙开发
蓝牙开发基础知识
Android官方指南
https://developer.android.google.cn/guide/topics/connectivity/bluetooth
1.蓝牙权限
<manifest ... >
   <uses-permission android:name="android.permission.BLUETOOTH" />
   <uses-permission android:name="android.permission.BLUETOOTH_ADMIN" />
</manifest>
android 6.0 以上需要添加位置权限:
<uses-permission android:name="android.permission.ACCESS_COARSE_LOCATION" />
2.设置蓝牙
(1)获取mBluetoothAdapter对象,判断设备是否支持蓝牙
BluetoothAdapter mBluetoothAdapter = BluetoothAdapter.getDefaultAdapter();
if (mBluetoothAdapter == null) {
    // Device does not support Bluetooth
}
(2)开启蓝牙
if (!mBluetoothAdapter.isEnabled()) {
    Intent enableBtIntent = new Intent(BluetoothAdapter.ACTION_REQUEST_ENABLE);
    startActivityForResult(enableBtIntent, REQUEST_ENABLE_BT);
}
2.查找设备
(1)查询配对的设备
Set<BluetoothDevice> pairedDevices = mBluetoothAdapter.getBondedDevices();
// If there are paired devices
if (pairedDevices.size() > 0) {
    // Loop through paired devices
    for (BluetoothDevice device : pairedDevices) {
        // Add the name and address to an array adapter to show in a ListView
        mArrayAdapter.add(device.getName() + "\n" + device.getAddress());
    }
}
(2)发现设备
// Create a BroadcastReceiver for ACTION_FOUND
private final BroadcastReceiver mReceiver = new BroadcastReceiver() {
    public void onReceive(Context context, Intent intent) {
        String action = intent.getAction();
        // When discovery finds a device
        if (BluetoothDevice.ACTION_FOUND.equals(action)) {
            // Get the BluetoothDevice object from the Intent
            BluetoothDevice device = intent.getParcelableExtra(BluetoothDevice.EXTRA_DEVICE);
            // Add the name and address to an array adapter to show in a ListView
            mArrayAdapter.add(device.getName() + "\n" + device.getAddress());
        }
    }
};
// Register the BroadcastReceiver
IntentFilter filter = new IntentFilter(BluetoothDevice.ACTION_FOUND);
registerReceiver(mReceiver, filter); // Don't forget to unregister during onDestroy
(3)启用可检测性
Intent discoverableIntent = new
Intent(BluetoothAdapter.ACTION_REQUEST_DISCOVERABLE);
discoverableIntent.putExtra(BluetoothAdapter.EXTRA_DISCOVERABLE_DURATION, 300);
startActivity(discoverableIntent);
3.连接设备
(1)连接为服务器
(2)连接为客户端
4.管理连接
Android蓝牙开发入门
《Android蓝牙开发学习》课程
课程链接:
http://www.maiziedu.com/course/469-6006/
学习笔记及源代码:
https://github.com/KetoneOlefine/bluetooth

蓝牙开发入门实例
AndroidManifest.xml:
<?xml version="1.0" encoding="utf-8"?>
<manifest xmlns:android="http://schemas.android.com/apk/res/android"
    package="ketoneolefine.bluetoothclass2">

    <uses-permission android:name="android.permission.BLUETOOTH"/>
    <uses-permission android:name="android.permission.BLUETOOTH_ADMIN"/>

    <application
        android:allowBackup="true"
        android:icon="@mipmap/ic_launcher"
        android:label="@string/app_name"
        android:roundIcon="@mipmap/ic_launcher_round"
        android:supportsRtl="true"
        android:theme="@style/AppTheme">
        <activity
            android:name=".MainActivity"
            android:label="@string/app_name"
            android:theme="@style/AppTheme.NoActionBar">
            <intent-filter>
                <action android:name="android.intent.action.MAIN" />

                <category android:name="android.intent.category.LAUNCHER" />
            </intent-filter>
        </activity>
    </application>

</manifest>
BlueToothController.java:
package ketoneolefine.bluetoothclass2;

import android.app.Activity;
import android.bluetooth.BluetoothAdapter;
import android.content.Intent;

//蓝牙适配器
public class BlueToothController {

    //成员变量
    private BluetoothAdapter mAdapter;

    //构造函数,为成员变量赋值
    public BlueToothController(){
        //构造实例
        mAdapter=BluetoothAdapter.getDefaultAdapter();
    }


    //是否支持蓝牙
    //@return true 支持,false 不支持
    public boolean isSupportBlueTooth(){
        if(mAdapter!=null) return true;
        else return false;
    }

    //写一个函数判断当前蓝牙状态
    //@return true 打开,false 关闭
    public boolean getBlueToothStatus(){
        assert(mAdapter!=null);
        return mAdapter.isEnabled();
    }

    public void turnOnBlueTooth(Activity activity, int requestCode){
        Intent intent=new Intent(BluetoothAdapter.ACTION_REQUEST_ENABLE);
        activity.startActivityForResult(intent,requestCode);
        //mAdapter.enable()
    }

    //关闭蓝牙
    public void turnOffBlueTooth() {
        mAdapter.disable();
    }
}
MainActivity.java:
package ketoneolefine.bluetoothclass2;

import android.bluetooth.BluetoothAdapter;
import android.content.BroadcastReceiver;
import android.content.Context;
import android.content.Intent;
import android.content.IntentFilter;
import android.os.Bundle;
import android.support.design.widget.FloatingActionButton;
import android.support.design.widget.Snackbar;
import android.support.v7.app.AppCompatActivity;
import android.support.v7.widget.Toolbar;
import android.view.View;
import android.view.Menu;
import android.view.MenuItem;
import android.widget.Toast;

public class MainActivity extends AppCompatActivity {

    private BlueToothController mController = new BlueToothController();
    private Toast mToast;

    private BroadcastReceiver receiver=new BroadcastReceiver() {
        @Override
        public void onReceive(Context context, Intent intent) {
            int state=intent.getIntExtra(BluetoothAdapter.EXTRA_STATE,-1);
            switch (state){
                case BluetoothAdapter.STATE_OFF:
                    showToast("STATE_OFF");
                    break;
                case BluetoothAdapter.STATE_ON:
                    showToast("STATE_ON");
                    break;
                case BluetoothAdapter.STATE_TURNING_ON:
                    showToast("STATE_TURNING_ON");
                    break;
                case BluetoothAdapter.STATE_TURNING_OFF:
                    showToast("STATE_TURNING_OFF");
                    break;
                default:
                    showToast("Unknown STATE");
                    break;
            }
        }
    };

    @Override
    protected void onCreate(Bundle savedInstanceState) {
        super.onCreate(savedInstanceState);
        setContentView(R.layout.activity_main);
        IntentFilter filter=new IntentFilter(BluetoothAdapter.ACTION_LOCAL_NAME_CHANGED);
        registerReceiver(receiver,filter);
    }

    public void isSupportBlueTooth(View view){
        boolean ret=mController.isSupportBlueTooth();
        showToast("support Bluetooth? "+ret);
    }

    public void isBlueToothEnable(View view){
        boolean ret=mController.getBlueToothStatus();
        showToast("Bluetooth enable? "+ret);
    }

    public void requestTurnOnBlueTooth(View view){
        mController.turnOnBlueTooth(this,0);
    }

    public void turnOffBlueTooth(View view){
        mController.turnOffBlueTooth();
    }

    private void showToast(String text){
        if(mToast==null){
            mToast= Toast.makeText(this,text,Toast.LENGTH_SHORT);
        }
        else{
            mToast.setText(text);
        }
        mToast.show();
    }
    @Override
    public boolean onCreateOptionsMenu(Menu menu) {
        // Inflate the menu; this adds items to the action bar if it is present.
        getMenuInflater().inflate(R.menu.menu_main, menu);
        return true;
    }

    @Override
    public boolean onOptionsItemSelected(MenuItem item) {
        // Handle action bar item clicks here. The action bar will
        // automatically handle clicks on the Home/Up button, so long
        // as you specify a parent activity in AndroidManifest.xml.
        int id = item.getItemId();

        //noinspection SimplifiableIfStatement
        if (id == R.id.action_settings) {
            return true;
        }

        return super.onOptionsItemSelected(item);
    }

    @Override
    public void onActivityResult(int requestCode,int resultCode,Intent data){
        super.onActivityResult(requestCode,resultCode,data);
        if(resultCode==RESULT_OK){
            showToast("打开成功");
        }
        else{
            showToast("打开失败");
        }
    }
}
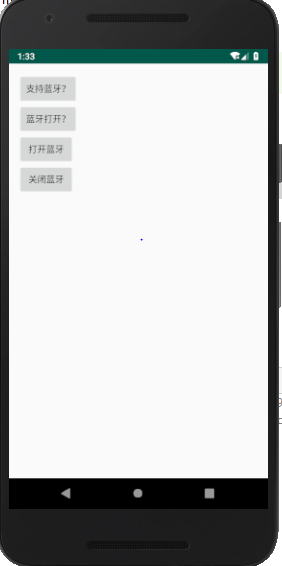
activity_main.xml:
?xml version="1.0" encoding="utf-8"?>
<LinearLayout xmlns:android="http://schemas.android.com/apk/res/android"
    xmlns:app="http://schemas.android.com/apk/res-auto"
    xmlns:tools="http://schemas.android.com/tools"
    android:layout_width="match_parent"
    android:layout_height="match_parent"
    android:orientation="vertical"
    android:paddingLeft="16dp"
    android:paddingRight="16dp"
    android:paddingTop="16dp"
    android:paddingBottom="16dp"
    tools:context="ketoneolefine.bluetoothclass2.MainActivity">

    <Button
        android:id="@+id/is_support_blue_tooth"
        android:layout_width="wrap_content"
        android:layout_height="wrap_content"
        android:onClick="isSupportBlueTooth"
        android:text="@string/support_bluetooth" />

    <Button
        android:id="@+id/is_blue_tooth_enable"
        android:layout_width="wrap_content"
        android:layout_height="wrap_content"
        android:onClick="isBlueToothEnable"
        android:text="@string/is_turn_on" />

    <Button
        android:id="@+id/turn_on_blue_tooth"
        android:layout_width="wrap_content"
        android:layout_height="wrap_content"
        android:onClick="requestTurnOnBlueTooth"
        android:text="@string/turn_on" />

    <Button
        android:id="@+id/turn_off_blue_tooth"
        android:layout_width="wrap_content"
        android:layout_height="wrap_content"
        android:onClick="turnOffBlueTooth"
        android:text="@string/turn_off" />
</LinearLayout>
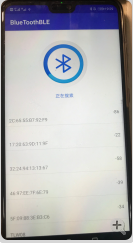
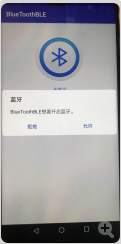
运行效果:
配对实例
Huawei Mate 9 & Huawei P20