版权声明:Firewine 的博客,想要转载请标明出处 https://blog.csdn.net/xyjworkgame/article/details/84920349
ssm简单例子
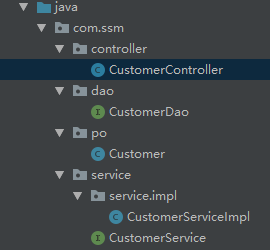
首先就是创建结构
网上的教程是先创建maven工程,然后再补充相应的文件夹。而且我也不是直接创建的springmvc工程,下面只是为了让自己更加的熟悉这种架构。
我是先创建web工程,然后选择框架支持。idea会自动把你的项目变成maven的那种格式。这就是我建立的文件夹格式。

开始添加内容
1.添加依赖pom.xml(图方便没有选择最新的版本,选了个人数用的最多的)
 <dependencies>
        <dependency>
            <groupId>mysql</groupId>
            <artifactId>mysql-connector-java</artifactId>
            <version>5.1.46</version>
        </dependency>
        <dependency>
            <groupId>org.mybatis</groupId>
            <artifactId>mybatis</artifactId>
            <version>3.4.6</version>
        </dependency>

        <dependency>
            <groupId>org.mybatis</groupId>
            <artifactId>mybatis-spring</artifactId>
            <version>1.3.1</version>
        </dependency>

        <!--spring-->
        <dependency>
            <groupId>org.springframework</groupId>
            <artifactId>spring-core</artifactId>
            <version>5.1.1.RELEASE</version>
        </dependency>
        <dependency>
            <groupId>org.springframework</groupId>
            <artifactId>spring-beans</artifactId>
            <version>5.1.1.RELEASE</version>
        </dependency>
        <dependency>
            <groupId>org.springframework</groupId>
            <artifactId>spring-webmvc</artifactId>
            <version>5.1.1.RELEASE</version>
        </dependency>
        <dependency>
            <groupId>org.springframework</groupId>
            <artifactId>spring-aop</artifactId>
            <version>5.1.1.RELEASE</version>
        </dependency>
        <dependency>
            <groupId>org.springframework</groupId>
            <artifactId>spring-context</artifactId>
            <version>5.1.1.RELEASE</version>
        </dependency>
        <dependency>
            <groupId>org.springframework</groupId>
            <artifactId>spring-jdbc</artifactId>
            <version>5.1.1.RELEASE</version>
        </dependency>

        <!--mybatis-->
        <dependency>
            <groupId>org.mybatis</groupId>
            <artifactId>mybatis</artifactId>
            <version>3.4.6</version>
        </dependency>
        <dependency>
            <groupId>org.mybatis</groupId>
            <artifactId>mybatis-spring</artifactId>
            <version>1.3.1</version>
        </dependency>
        <dependency>
            <groupId>log4j</groupId>
            <artifactId>log4j</artifactId>
            <version>1.2.17</version>
        </dependency>
        <dependency>
            <groupId>commons-logging</groupId>
            <artifactId>commons-logging</artifactId>
            <version>1.2</version>
        </dependency>
        <dependency>
            <groupId>com.mchange</groupId>
            <artifactId>c3p0</artifactId>
            <version>0.9.5.2</version>
        </dependency>
        <dependency>
            <groupId>junit</groupId>
            <artifactId>junit</artifactId>
            <version>4.12</version>
            <scope>test</scope>
        </dependency>

    </dependencies>
2. 开始配置spring的配置文件
- spring接手了MyBatis的数据库连接和事务管理,所以下面写到
<!--读取db.properties-->
    <context:property-placeholder location="classpath:db.properties"/>
    <!--配置数据源-->
    <bean id="dataSource"
        class="com.mchange.v2.c3p0.ComboPooledDataSource">
        <property name="driverClass" value="${jdbc.driver}"></property>
        <property name="user" value="${jdbc.username}"></property>
        <property name="password" value="${jdbc.password}"></property>
        <property name="jdbcUrl" value="${jdbc.url}"></property>
    </bean>

    <!--事务管理器,依赖数据源-->
    <bean id="transactionManager"
          class="org.springframework.jdbc.datasource.DataSourceTransactionManager">
        <!--数据源-->
        <property name="dataSource" ref="dataSource"></property>
    </bean>
    <!--开启事务注解 -->
    <tx:annotation-driven transaction-manager="transactionManager"/>

    <!--配置MyBatis工厂-->
    <bean id="sqlSessionFactory" class="org.mybatis.spring.SqlSessionFactoryBean">
        <!--数据源-->
        <property name="dataSource" ref="dataSource"/>

        <!--核心文件-->
        <property name="configLocation"
                  value="classpath:mybatis-config.xml"/>
    </bean>

   <!--配置mappper 扫描器-->
    <bean class="org.mybatis.spring.mapper.MapperScannerConfigurer">
        <property name="basePackage" value="com.ssm.dao"/>
    </bean>

    <mybatis-spring:scan base-package="com.ssm.po"></mybatis-spring:scan>
    <!--扫描Service-->
    <context:component-scan base-package="com.ssm.service"/>
- 其实有些东西都是死的,都是可以在spring的手册可以看到例子,然后做些相应的改动就可以了。
3. 开始配置springmvc的配置文件
<!--配置包扫描器,扫描@Controller 注解的类-->
    <context:component-scan base-package="com.ssm.controller"/>

    <!--加载注解驱动-->
    <mvc:annotation-driven />

    <!--配置视图解析器-->
    <bean class="org.springframework.web.servlet.view.InternalResourceViewResolver">
        <property name="prefix" value="/WEB-INF/jsp/"/>
        <property name="suffix" value=".jsp" />
    </bean>
- spingmvc只是做到了视图解析的作用,至少我的这个简单项目是这样。
3. MyBatis 的配置文件
 <typeAliases>
        <package name="com.ssm.po"/>
    </typeAliases>
    <!--当sql语句的映射文件可能需要指定下,在ssm当中,这个结构更加清晰-->
    <mappers>
        <mapper resource="CustomerDao.xml"/>
    </mappers>
- 在ssm框架里面,不需要再把sql映射文件和接口类放到一起,可以放到resources里面然后归类好文件信息就可以了(我比较懒,所以只是配置扫描的地方就行了)
4. web.xml 配置信息
    <!--配置加载spring文件的监视器-->
    <context-param>
        <param-name>contextConfigLocation</param-name>
        <param-value>classpath:applicationContext.xml</param-value>
    </context-param>
    <listener>
        <listener-class>org.springframework.web.context.ContextLoaderListener</listener-class>
    </listener>

    <!--编码过滤器-->
    <filter>
        <filter-name>encoding</filter-name>
        <filter-class>org.springframework.web.filter.CharacterEncodingFilter</filter-class>
        <init-param>
            <param-name>encoding</param-name>
            <param-value>UTF-8</param-value>
        </init-param>
    </filter>

    <filter-mapping>
        <filter-name>encoding</filter-name>
        <url-pattern>*.action</url-pattern>
    </filter-mapping>

    <!--配置SpringMVC前端核心控制器-->
    <servlet>
        <servlet-name>crm</servlet-name>
        <servlet-class>
            org.springframework.web.servlet.DispatcherServlet
        </servlet-class>
        <init-param>
            <param-name>contextConfigLocation</param-name>
            <param-value>classpath:springmvc-config.xml</param-value>
        </init-param>
        <!--配置服务器启动后立即加载springmvc配置文件-->
        <load-on-startup>1</load-on-startup>
    </servlet>
    <servlet-mapping>
        <servlet-name>crm</servlet-name>
        <!--拦截所有的请求,除了jsp-->
        <url-pattern>/</url-pattern>
    </servlet-mapping>
现在都是用注解来写filter和servlet ,我这里图简单,直接在xml文件里配置了,
5. 编写jsp
- 这是index
 <form action="/findCustomerById">
        <table>
            <tr><td>id值</td>
                <td><input type="text" name="id"></td>
            </tr>
        <tr>
            <td><input type="submit" value="提交"></td>
        </tr>
        </table>
    </form>
- 输出的页面
 <table border="1">
        <tr>
            <td>编号</td>
            <td>名称</td>
            <td>职业</td>
            <td>电话</td>
        </tr>
        <tr>
            <td>${customer.id}</td>
            <td>${customer.username}</td>
            <td>${customer.jobs}</td>
            <td>${customer.phone}</td>

        </tr>
    </table>
6. 下面就是编写业务代码了
-
这是实现的类
-
我这里没有用MyBatis的反向生成类,但是当你自己写的时候,也是尽量命名的时候写与sql语句一样的,这么会减少很多未知的错误。
package com.ssm.po;

/**
 * Created by IntelliJ IDEA.
 *
 * @version : 1.0
 * @auther : Firewine
 * @mail : [email protected]
 * @Program Name: <br>
 * @Create : 2018-12-07-19:15
 * @Description :  <br/>
 */
public class Customer {
    private Integer id;
    private String username;
    private String jobs;
    private String phone;

    public Integer getId() {
        return id;
    }

    public void setId(Integer id) {
        this.id = id;
    }

    public String getUsername() {
        return username;
    }

    public void setUsername(String username) {
        this.username = username;
    }

    public String getJobs() {
        return jobs;
    }

    public void setJobs(String jobs) {
        this.jobs = jobs;
    }

    public String getPhone() {
        return phone;
    }

    public void setPhone(String phone) {
        this.phone = phone;
    }

    public Customer(Integer id, String username, String jobs, String phone) {
        this.id = id;
        this.username = username;
        this.jobs = jobs;
        this.phone = phone;
    }

    public Customer() {
    }

    @Override
    public String toString() {
        return "Customer{" +
                "id=" + id +
                ", username='" + username + '\'' +
                ", jobs='" + jobs + '\'' +
                ", phone='" + phone + '\'' +
                '}';
    }
}
- 编写的sql映射文件的接口类
package com.ssm.dao;

import com.ssm.po.Customer;

/**
 * Created by IntelliJ IDEA.
 *
 * @version : 1.0
 * @auther : Firewine
 * @mail : [email protected]
 * @Program Name: <br>
 * @Create : 2018-12-07-20:14
 * @Description :  <br/>
 */
public interface CustomerDao {

    /**
     *  根据id查询客户信息
     * @param id
     * @return
     */
    public Customer findCustomerById(Integer id);
}
- 这是相对应的sql映射文件
<?xml version="1.0" encoding="UTF-8" ?>
<!DOCTYPE mapper
        PUBLIC "-//mybatis.org//DTD Mapper 3.0//EN"
        "http://mybatis.org/dtd/mybatis-3-mapper.dtd">
<mapper namespace="com.ssm.dao.CustomerDao">

    <!-- public Customer findCustomerById(Integer id);-->
    <select id="findCustomerById" resultType="Customer" parameterType="Integer" >
        select * from customer where  id = #{id};
    </select>
</mapper>
好的习惯是养成的,把要写的方法写在sql文件的上面,会导致你很轻松的就能看明白写的是什么
- 对于底层的写法,就是用jdbc的那一套,我就不细说了, 直接贴代码
记得还有一种方法就是不用实现接口的写法,那个有兴趣的可以试试
package com.ssm.service;

import com.ssm.po.Customer;

/**
 * Created by IntelliJ IDEA.
 *
 * @version : 1.0
 * @auther : Firewine
 * @mail : [email protected]
 * @Program Name: <br>
 * @Create : 2018-12-07-20:28
 * @Description :  <br/>
 */
public interface CustomerService {
    public Customer findCustomerById(Integer id);
}
package com.ssm.service.service.impl;

import com.ssm.dao.CustomerDao;
import com.ssm.po.Customer;
import com.ssm.service.CustomerService;
import org.springframework.beans.factory.annotation.Autowired;
import org.springframework.stereotype.Service;
import org.springframework.transaction.annotation.Transactional;

/**
 * Created by IntelliJ IDEA.
 *
 * @version : 1.0
 * @auther : Firewine
 * @mail : [email protected]
 * @Program Name: <br>
 * @Create : 2018-12-07-20:30
 * @Description :  <br/>
 */

@Service
@Transactional //针对数据的增加,修改,删除进行事务管理,
public class CustomerServiceImpl implements CustomerService {
    //注解注入CustomerDao
    @Autowired
    private CustomerDao customerDao;
    //查询客户
    @Override
    public Customer findCustomerById(Integer id) {
        return this.customerDao.findCustomerById(id);
    }
}
- 在我看来,最后一个类就是一个servlet,但是现在改名为controller,
package com.ssm.controller;

import com.ssm.po.Customer;
import com.ssm.service.CustomerService;
import org.springframework.beans.factory.annotation.Autowired;
import org.springframework.stereotype.Controller;
import org.springframework.ui.Model;
import org.springframework.web.bind.annotation.RequestMapping;

/**
 * Created by IntelliJ IDEA.
 *
 * @version : 1.0
 * @auther : Firewine
 * @mail : [email protected]
 * @Program Name: <br>
 * @Create : 2018-12-07-20:35
 * @Description :  <br/>
 */
@Controller
public class CustomerController {

    @Autowired
    private CustomerService customerService;
    @RequestMapping("/findCustomerById")
    public String  findCustomerById(Integer id, Model model){
        Customer customer = customerService.findCustomerById(id);

        model.addAttribute("customer",customer);
        return "customer";
    }
}